Add a Payment Method
Add a payment method to POS through the Resolut Online Portal.
Create a Payment Method
First, login to the Resolut Online back office portal.
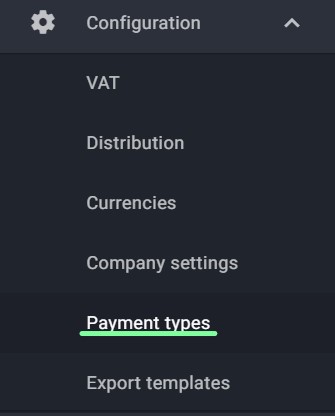
Select Configuration, then Payment Types.
In the right-hand corner, use the + icon to open the ‘Pay’ dialog box.
Select a Category and Eft Provider Type, if applicable. The Menu Order and Number are automatically generated.

At this stage, you can also uncheck the Active box if you wish to not use this payment method for the time being.
Use the Can Refund and Can Reverse checkboxes to set whether the payment type will be refundable or reversable. If refundable, set the Refund Mode using the drop-down menu.
Combining of a payment types can be enabled by checking the Can combine checkbox. The Burn points checkbox is used to enable a payment with loyalty points. Check the Open drawer box to open the cashdrawer after payment and Open drawer refund box to open a cashdrawer after a refund payment.

Select a Customer Mode, Ask Remark mode, and Options mode from the drop-down menus.
If using the ‘Ask Remark’ mode, add a remark in the Ask Remark Comment field.
You can also choose to add any additional information you wish by creating a ‘Free text’ field.

Once you have finished, click Save to add the payment method.
Add the Payment Method to a Role
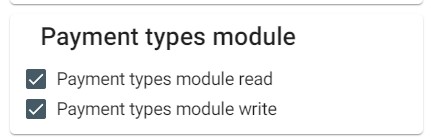
All payment types must be enabled by Role in Infrastructure > Roles.
Select a role to open the “Role detail” window and scroll down to “Payment Types”. Check both checkboxes.
 Next, find the required Payment Types on the right-hand side of the permissions section and check those to be activated for this role.

Click Save. The payment type is now ready to use.