Subsections of Resolut Help Center

Subsections of Resolut

POS4 Installation Guide

1. Introduction

This guide provides instructions on how to install and configure the ResolutPOS4 setup. This document also contains information about the required prerequisites and troubleshooting steps.

ResolutPOS4_dev.exe - Developers setup

Internal setup, created automatically by CI/CD pipelines from DEV branch.

Nightly (or daily) builds can be used to pick up ‘the latest version’. https://downloads.bovertis.nl/pos4installer/Dev/ResolutPOS4_dev.html

The production version can be found here: https://downloads.bovertis.nl/pos4installer/master/resolutpos4.html

2. Prerequisites

The ResolutPOS4.exe setup launcher checks and installs the ResolutPOS application and all required prerequisites together.

The following prerequisites are required for ResolutPOS4.exe setup:

.Net Framework 4.7.2

Required for every ResolutPOS4.exe setup

The Microsoft .NET Framework 4 redistributable package installs the .NET Framework runtime and associated files that are required to run and develop applications to target the .NET Framework 4

URL:

https://dotnet.microsoft.com/download/dotnet-framework/net472

Microsoft Point of Service for .NET v1.14.1 (POS for .NET)

Required for every ResolutPOS4.exe setup

Microsoft Point of Service for .NET (POS for .NET v1.14.1708.8001) is a class library that enables POS developers to apply Microsoft .NET technologies in their products.

URL:

https://www.microsoft.com/en-us/download/details.aspx?id=55758

MSSQL Server 2019 Express

Optional, can be skipped, if any of MSSQL Server 2019 database is already installed on system

SQL Server is a database server by Microsoft. The Microsoft relational database management system is a software product which primarily stores and retrieves data requested by other applications.

URL:

https://go.microsoft.com/fwlink/?linkid=866658

3. Installation Wizard

ResolutPOS4.exe is available to install for all users on the client machine. This means that the setup needs to be installed on a client computer with a user who has elevated privileges (such as local administrators).

ResolutPOS4.exe installer is designed for single, per-machine installations. Setup automatically manages the following processes:

  • Detects and installs all required prerequisites for the ResolutPOS application.
  • Installs ResolutPOS application under C://POS
  • Detects all SQL server instances on local computer
  • Tests the SQL connection for selected database
  • Switches the authentication mode for selected SQL instance to “Mixed mode”
  • Creates a database if none exists (default database name is Resolut)
  • Creates a database user and login if none exists and sets it as the owner for selected database (default user is PosNet)
  • Initializes the database – creates tables, inserts default data
  • Executes SQL queries to initialize the database
  • Creates shortcuts for ResolutPOS4 in the following locations: Desktop, StartMenu Programs folder, Startup folder, Quick Launch toolbar
  • Customizes ResolutPOS application based on environment: Dev, Test, Prod
  • Creates a posconfig.xml with default settings
  • Launches ResolutPOS application at the end of installation

Installation prerequisites

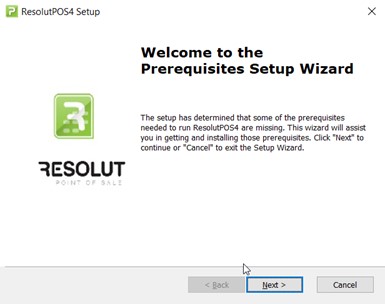
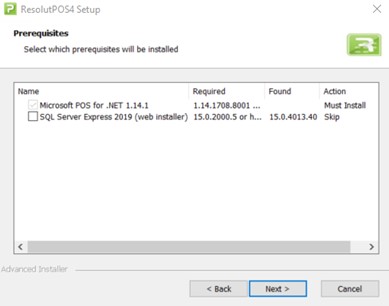
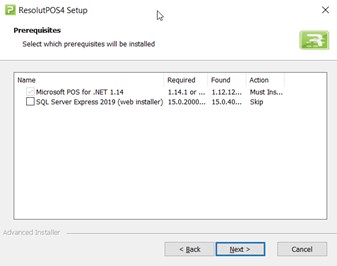
The Prerequisite dialog is the first dialog which will appear at the beginning of installation. The prerequisite dialog will not be shown if all the requirements are met and if every required prerequisite is already installed. These are:

  • .Net Framework 4.7.2,

  • Microsoft Point of Service for .NET v1.14.1 (POS for .NET 1.14.1708.8001),

  • SQL Express 2019.

    The prerequisites dialog is also displayed, if one of the required prerequisites does not have the newest version required for installation already installed.

    4A1 fig1

    4A1 fig2

    The prerequisites dialog displays the missing prerequisites, the required and the found versions of prerequisites and the action state.

    Action states:

  1. Must install – The prerequisite is required to run ResolutPOS and cannot be deselected.

    The following prerequisites are required for installation:

    Dot Net Framework 4.7.2 and Microsoft Point of Service for .NET v1.14.1 (POS for .NET)

  2. Skip – The user may continue with the main installation, even if the prerequisite is not installed.

  3. Install – The prerequisite will be installed as a pre-install step.

    Note: The main installation process is frozen until the pre-installation step is finished

Installation folder

Select the root installation directory for the application, where all binaries, posconfig.xml, media contents and plugins will be installed.

Note: This directory will be also the working directory for Resolut.exe, all log and data files will be also stored here when run.

4A1 fig3

Warning: It is strongly recommended to use a C:\Pos\ as default.

Important: The setup will automatically create a copy of original configuration file (posconfig.xml), if the file already exist under folder C:\POS\ and will overwrite the original posconfig.xml by initial settings!

4A1 fig4

SQL database

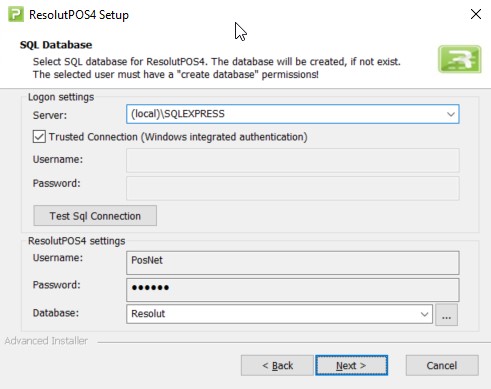
This dialog is a base dialog of the POS4 installer. Based on these settings the setup will create a database, create a user, set rights and overrides posconfig.xml SQL connection elements.

4A1 fig5

  • Logon settings

    The logon settings are used to connect to the selected SQL instance and test the SQL connection.

    Server: Search for all installed SQL server instances in local computer

    4A1 fig6

    Login: The selected SQL login user must have administrator rights, must be able to create databases and tables, execute SQL queries, create users and set logon rights. The Windows integrated authentication and the SQL user authentication are both supported for login.

    Test SQL Connection: This button is used to verify the above selected login settings.

    4A1 fig7

  • ResolutPOS4 settings

    This part of the SQL settings dialog is used to select the database and the database user used by ResolutPOS4

    Username and Password: The database owner for the ResolutPOS4 database

    Database: The setup allows you to select an already existing database or create a new database.

    Click on the three dots icon and select an existing database from the list, if you want to use an already existing database.

    4A1 fig8

    Warning: It is strongly recommended to use a new database instead of an existing one to avoid installation errors!

    Note: The default database name is Resolut and the default username is PosNet.

    The setup automatically creates a database and the user, if they don’t already exist.

Configure shortcuts

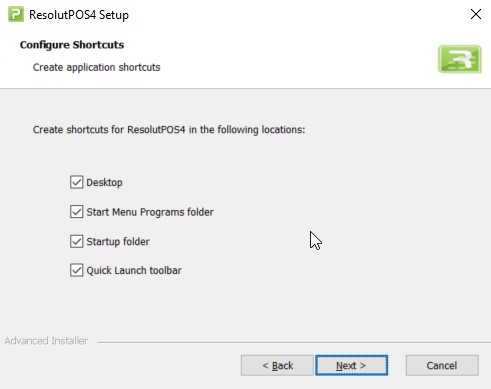
Here we can choose to create a shortcut for the application on the following locations: Desktop, Start Menu Programs folder, Startup folder and under the Quick Launch toolbar.

4A1 fig9

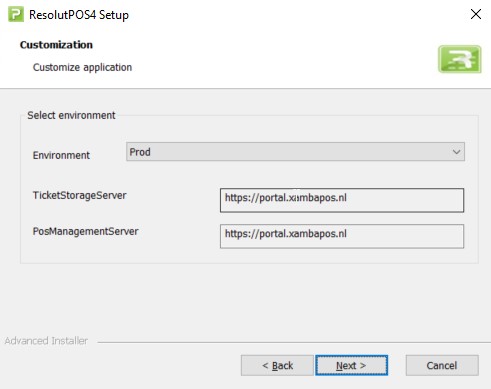
Customization

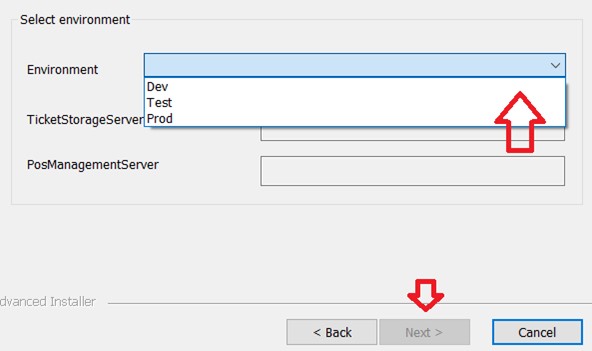
Resolut POS4 will be initialized based on these customization settings. Select the environment which the application should connect to.

4A1 fig10

Note: The wizard cannot continue until you select an environment!

4A1 fig11

4. Uninstall

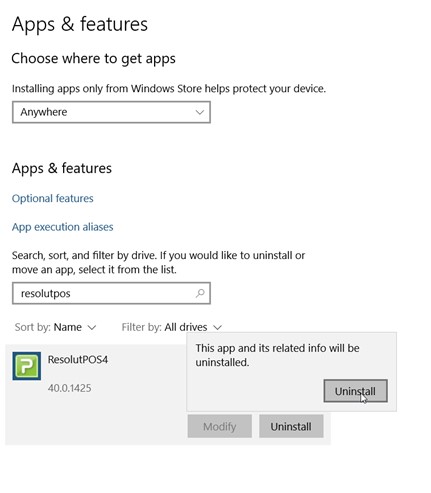
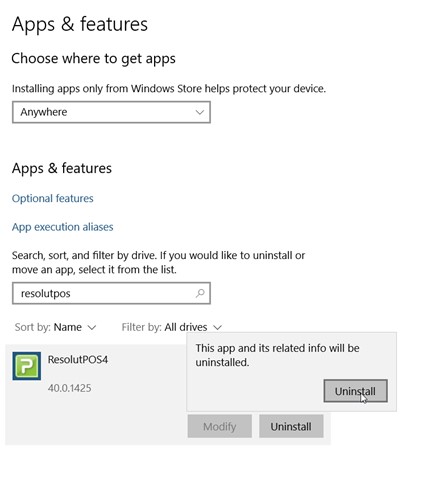
The setup ResolutPOS4.exe can only be uninstalled from the system settings programs list.

4A1 fig12

Important: Log files, data files and configuration files (such as posconfig.xml) are not removed during uninstall. Every uninstall also creates a backup file “posconfig.back” from “posconfig.xml”.

4A1 fig13

Subsections of POS4 Installation Guide

Status Icons

POS4 displays several status icons in the application header. Clicking on the icon expands a dialog balloon giving further details.

4A15 fig1

The various status icons are as follows:

Icon Description
4A15 fig2 Printer is working properly.
4A15 fig3 Printer has low level of paper.
4A15 fig4 There are 3 possibilities: “Printer is offline”, “Printer is out of paper” or “Error, printer is not working”.
4A15 fig5 Credit card is inserted.
4A15 fig6 Sale was successful, please remove the card.
4A15 fig7 Shift is opened but Eft device is signed off or not connected/in error state.
4A15 fig8 4A15 fig9 Low paper level.
4A15 fig10 4A15 fig11 Assistance needed on self checkout.
4A15 fig12 New web-connector orders are available.
4A15 fig13 Lottery system is connected.
4A15 fig14 Lottery system is disconnected.

Installation Troubleshooting

ResolutPOS4 Installer logs - Enable windows installer logging

Used to monitor or catch errors during the installation process written by setup launcher.

To directly catch errors from windows installer, use the following command:

ResolutPOS.exe /l*v log.txt

For more help:

https://support.microsoft.com/en-us/kb/223300

https://technet.microsoft.com/en-us/library/cc775423(v=ws.10).aspx

http://www.thewindowsclub.com/enable-verbose-status-message-windows

How to catch Resolut.exe application logs?

Used to monitor log events or catch errors from application Resolut.exe

The application Resolut.exe logs into C:\Pos\Resolut.log file.

Edit configuration settings for application Resolut.exe manually

Default configuration file posconfig.xml is created and edited by ResolutPOS4.exe installer itself under C:\POS\posconfig.xml.

In some cases, you have to modify the posconfig.xml configuration file and edit or add some configuration elements. Do the following:

  • Stop the application Resolut.exe
    • Open the C:\POS\posconfig.xml by any xml (or text) editor (e.g. notepad++)
    • Insert your changes and save the file
    • Start the application Resolut.exe

How to restore previous configuration state from backup?

The setup will automatically create a copy of original configuration file (posconfig.xml) at uninstall and at install.

To restore the previous configuration state:

  • Stop the application Resolut.exe
    • Rename posconfig.xml
    • Select the posconfig.back file
    • Rename to posconfig.xml
    • Start the application Resolut.exe

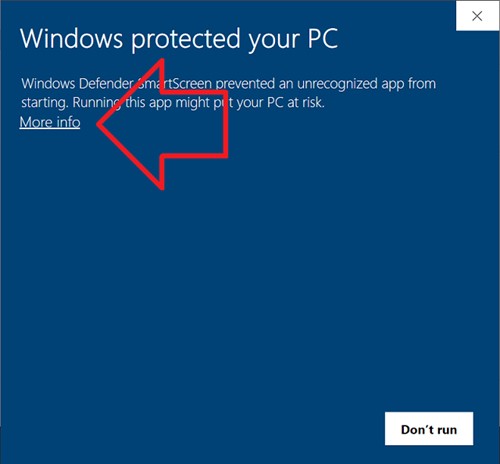
How to run ResolutPOS4.exe when blocked by Windows SmartScreen?

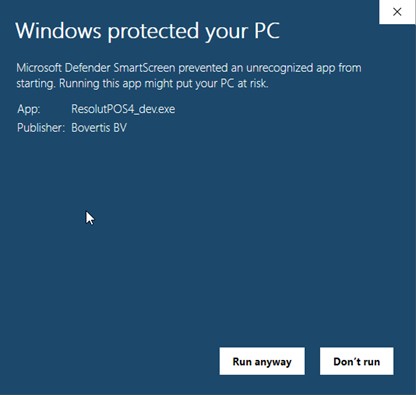
This is normal behaviour of the Windows Smartscreen feature, since it does not yet recognise your application that has been signed with the new certificate. After a bunch opens on different machines, your application+certificate signature will be added to the Smartscreen database, and the alert should go away.

Click More info

4A2 fig1

Then click Run anyway.

4A2 fig2

How to add plugins manually?

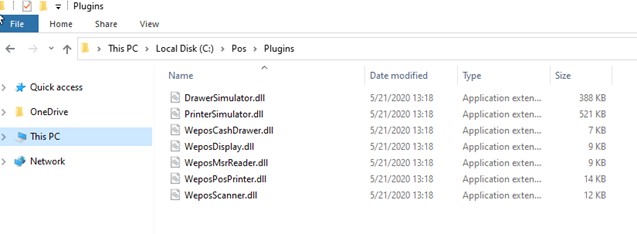
Plugins directory (C:\POS\Plugins) is used to store binaries for specific scanners, printers and simulators. Some of these plugins are automatically installed by the installer, such as:

4A2 fig3

To add a new custom plugin, do the following:

  • Stop the application
    • Copy the new plugin under C:\POS\Plugins
    • Start the application

SQL script warnings at installation!

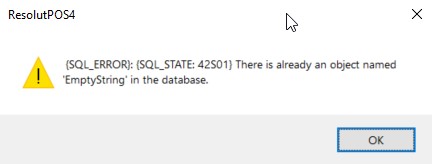
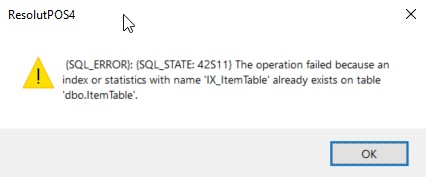
The following warnings may appear, when the installation process tries to create the ResolutPOS4 database and executes SQL scripts for initialization. These warnings come only if you selected an already configured database during the SQL database dialog.

4A2 fig4

4A2 fig5

4A2 fig6

Use a new database for every fresh installation to avoid these warnings!

Another version of this product is already installed on this computer!

This is because maintenance and update mode is not supported. Only the first install can be performed by installer.

4A2 fig7

Uninstall the previous version of the ResolutPOS4 installer first from programs, and launch the executable file again.

4A2 fig8

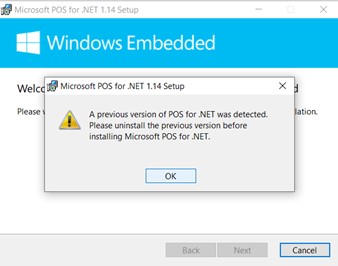
Unable to update Microsoft POS for .NET 1.14 prerequisite!

This is because a direct update from POS for .NET 1.12 to 1.14 is not supported.

4A2 fig9

4A2 fig10

4A2 fig11

Uninstall POS for .Net 1.12 first and launch the ResolutPOS4.exe again.

Cash Drawer Set-up

How to Install and setup a Cash Drawer in Windows

NOTE This setup guide only applies to Poindus devices. For help with setting-up a cash drawer on other devices, please contact our Support Team.

  1. Download OPOS Cash Drawer Demo Tool from: https://www.dropbox.com/sh/4agon96z1td6cj0/AAAPv161l3_R12FYNdq4u8t1a?dl=0
    Click Download

  2. Unzip the “Cash Drawer” file by right-clicking it and choosing Extract All…
    4A7 fig2a

  3. In the folder, navigate to PE22\Tools\Cash_Drawer\ and extract 482H. Open 482H\OPOS\V1.0.15.3 and install “OPOS CCO v1.6 Runtime.exe”
    4A7 fig3a

  4. Install the OPOS Driver (setup.exe)

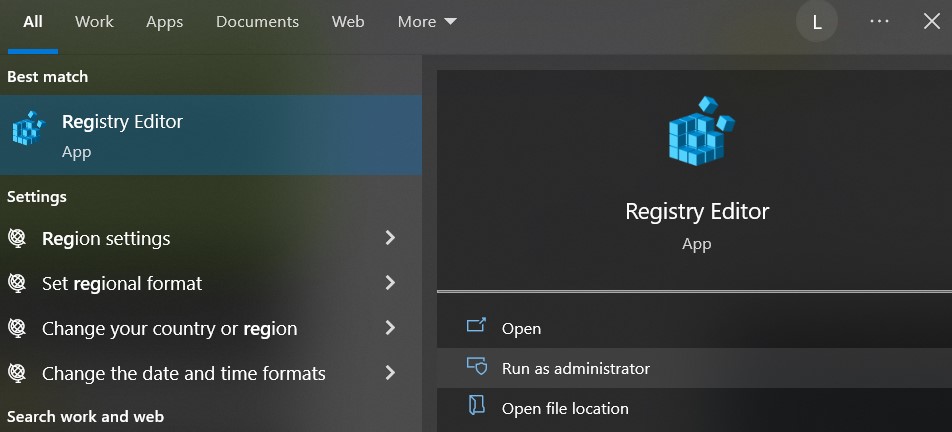
  5. Use Administration to execute “regedit.exe” (type ”regedit” to Search field and click “Run as administrator”)
    4A7 fig4a

  6. Go to
    HKEY_LOCAL_MACHINE\SOFTWARE\Wow6432Node\OLEforRetail\ServiceOPOS\CashDrawer\CD11 in the opened Registry Editor and modify InputAdd and OutputAdd to “0x482”. To do this, right-click and choose Modify… and enter “482” to the “Value Data” field.
    4A7 fig5a

Note: The OPOS driver supports up to two cash drawer connectors, with each cash drawer connector supporting up to two cash drawers. Most POS systems have only one cash drawer connector. The registry keys CD11 and CD21 control the two cash drawers on the first connector. CD12 and CD22 control the two cash drawers on the second connector. If you have only one cash drawer, use CD11

Check cash drawer in OPOS Cash Drawer Demo Tool

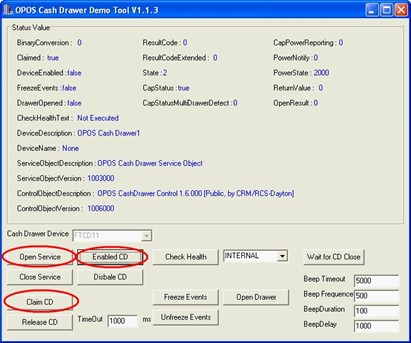
  1. Start the OPOS Cash Drawer Demo Tool. Click Open Service, Claim CD, Enabled CD. You should get the status as shown below:
    4A7 fig6

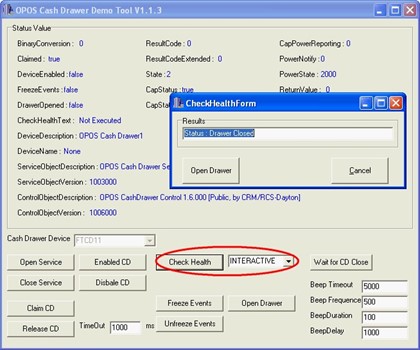
  2. Select “INTERACTIVE” from the drop-down menu, and click Check Health.

    The Check Health status window will open with “Status: Drawer Closed”.
    4A7 fig7

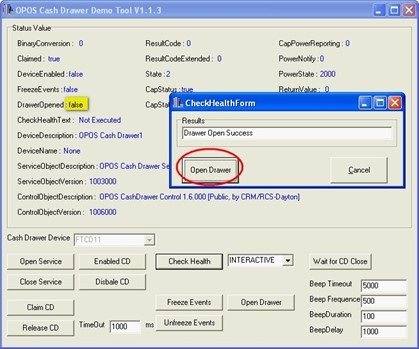
  3. Click Open Drawer. The cash drawer will open, but the status in the main Window is NOT updated as it does not have the focus. If you close the cash drawer now, the status in the Check Health status windows will NOT be updated. Close the status window by clicking on Cancel.
    4A7 fig8

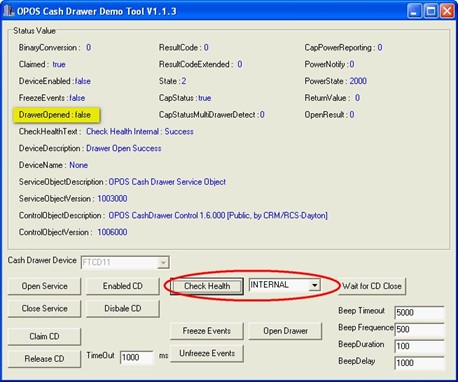
  4. To check whether the cash drawer status is read correctly,

    1. Close the drawer
    2. Select “INTERNAL” (health check) and click Check Health

    The “DrawerOpened” status should change to “false”.
    4A7 fig9

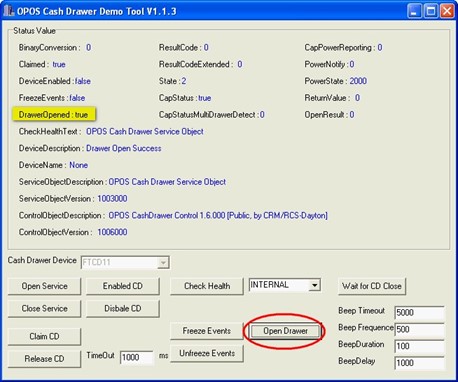
  5. Another way to check that the closing of the drawer is correctly detected is as follows: Click on Open Drawer and verify that the “DrawerOpened” status is “true”.
    4A7 fig10

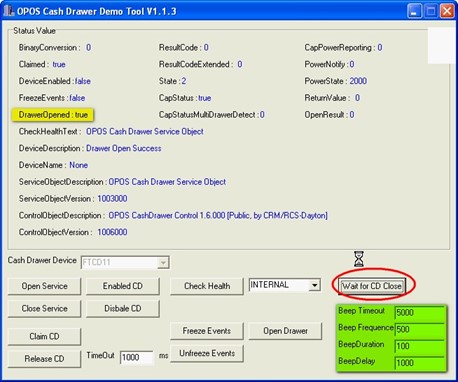
  6. With the drawer open, click on the Wait for CD Close button.

    The “DrawerOpened” status is “true”.

    After 5 seconds, the terminal will start to beep (you can modify the time delay by changing the parameters in the area highlighted in green).
    4A7 fig11

  7. Now close the drawer. The “DrawerOpened” status should change to “false”
    4A7 fig12

Setup of POS4 for cash drawer directly connected to POS terminal

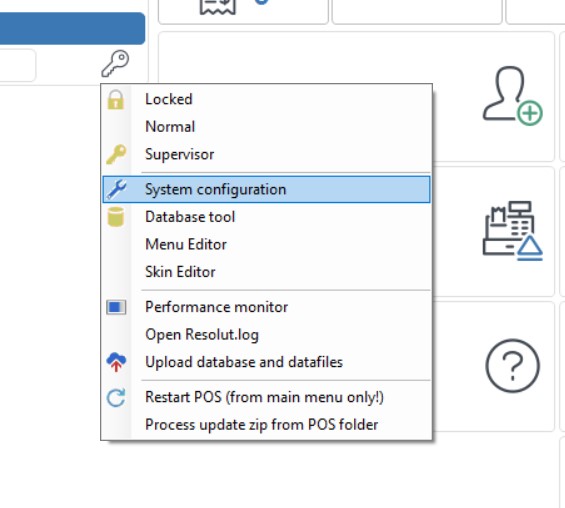
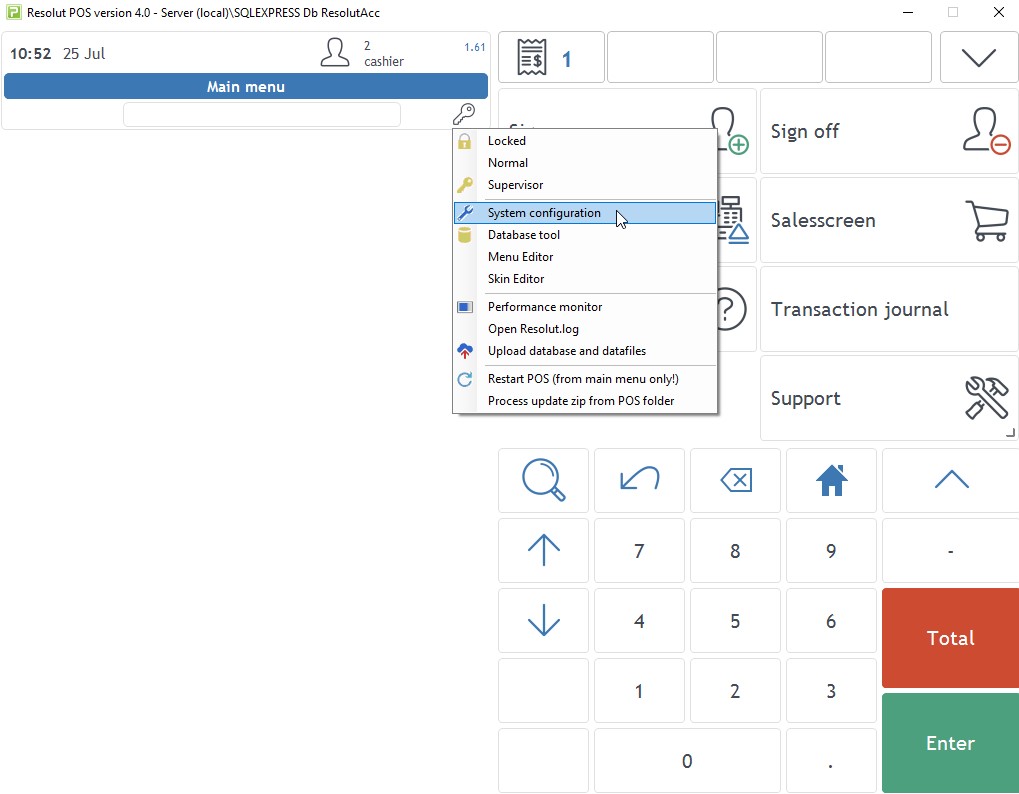
  1. Start POS4. On the home screen, hold the Shift key and right-click on the key icon, then select System configuration.
    4A7 fig13a

  2. Go to Other devices and for “Drawer 1” choose CD11 from the drop-down menu:
    4A7 fig14a

  3. Click Save and Exit application. After restarting POS4 the cash drawer should work.

Add a Voucher Payment button

To add a Voucher payment option to the payment screen in POS4:

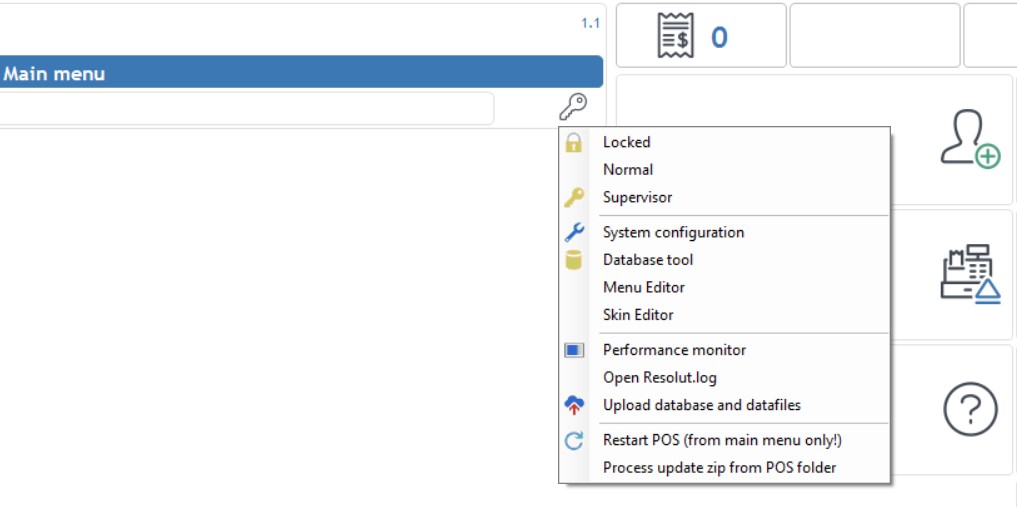
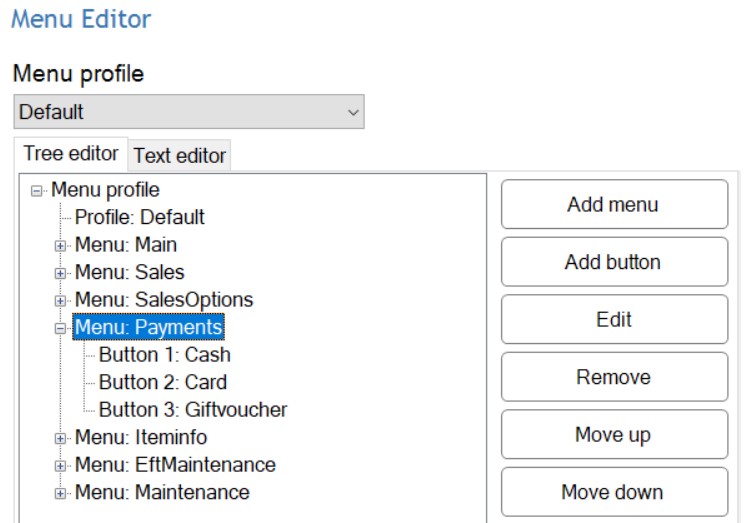
  1. Hold Shift + Right Click on the key button to open the configuration window, and select Menu Editor.
    4A9 fig1a

  2. Click Menu:Payments, then Add button.
    4A9 fig2a

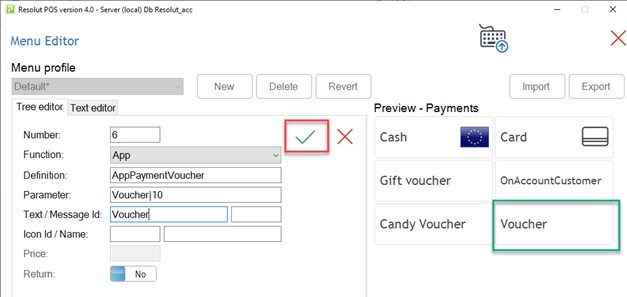
  3. Fill in the required parameters. The Voucher button is shown in “Preview – Payments”, click the green tick to confirm.
    4A9 fig3

  4. The Voucher button is added to the menu. Click the green tick to confirm again.
    4A9 fig4

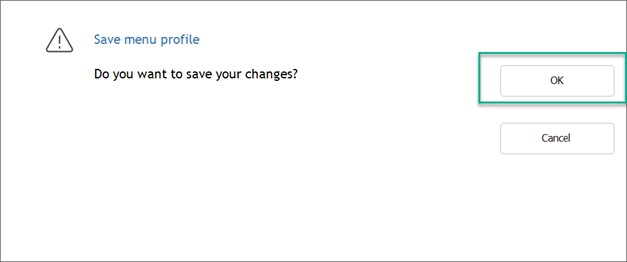
  5. Click OK.
    4A9 fig5

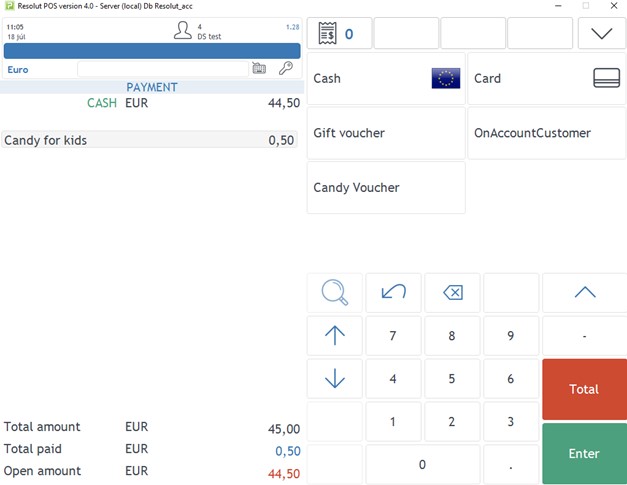
  6. The Voucher button is now visible on the Payment screen.
    4A9 fig6

Add a Voucher Payment button (Database)

  1. Insert the following values to the PaymentTypes table, directly in the POS database:

PaymentTypes values

(20,‘CANDY’,‘EUR’,2,‘Candy for kids’,‘Candy for kids’,0,1,‘0,00’,‘0,5’,‘0,00’,‘0,00’,‘0,00’,0,‘0,00’,1,0)
4A10 fig1

  1. In the POS application, go to the Menu editor and add the Payment voucher button with proper the parameter, for example “CANDY|0.5”

4A10 fig2

Alternatively, you can insert MenuLines directly to the POS database:

MenuLines values

(3,13,0,’-> menuedit Candy voucher’,‘Candy voucher’,0,’’,‘AppPaymentVoucher’,2,‘CANDY|0.50’)
4A10 fig3

  1. Restart the POS. The payment type Candy voucher should be visible in the payment screen, and when clicked, a discount of 0.5 Eur is added to payment
    4A10 fig4

Update POS4

POS4 updates can be triggered remotely from the Resolut Online Portal and Resolut Backoffice Client. The update will start after you restart POS4.

Note: This feature is only compatible with POS4 version 4.0.8629 and above.

Set up

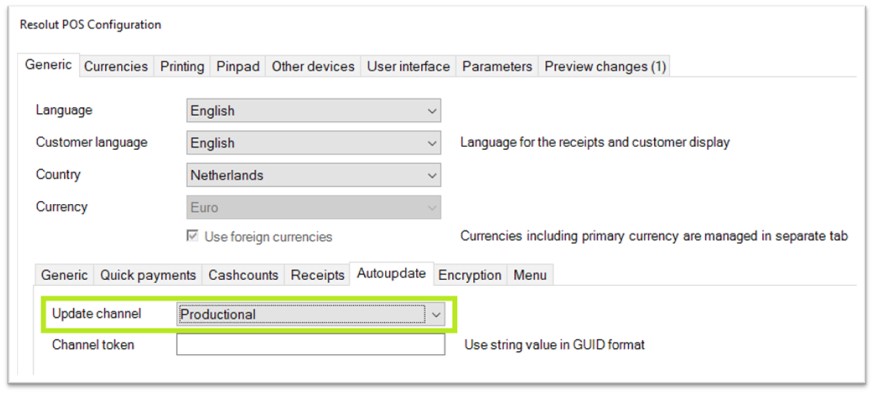
In POS4 go to System Configuration > Generic. Under Autoupdate select Productional from the “Update channel” drop-down menu.
4A14 fig1

Trigger POS4 update from Resolut Online Portal

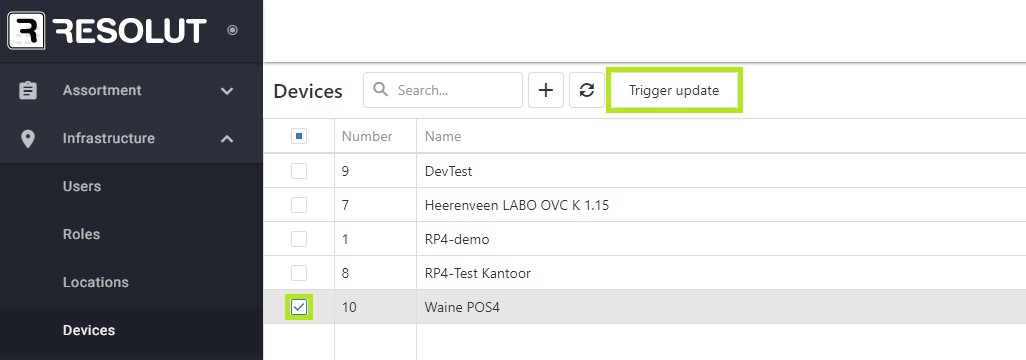
To trigger the POS4 update, go to Infrastructure > Devices. Tick the device you want to update and click Trigger update.
4A14 fig2 The latest available update will be installed the next time you restart the POS.

Trigger POS4 update from RBOS Client

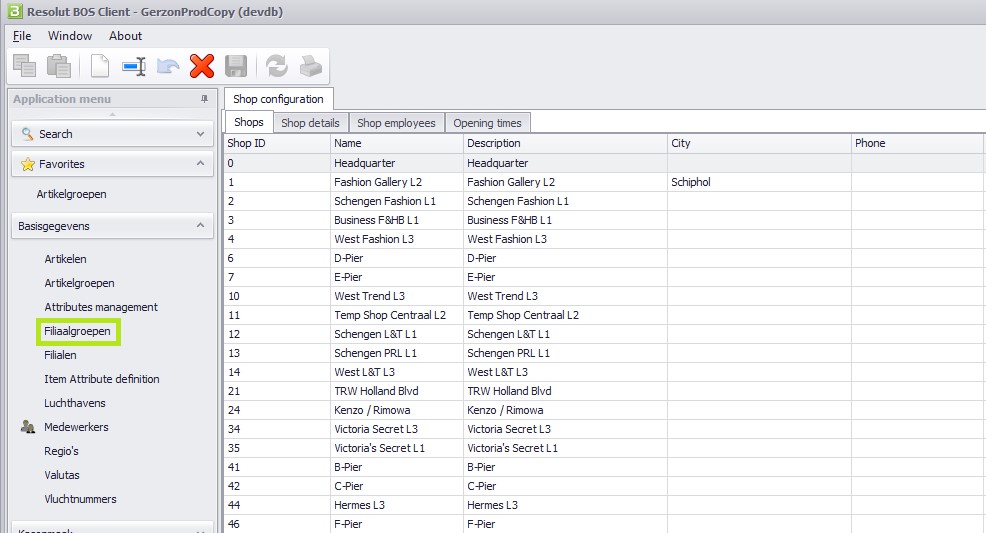
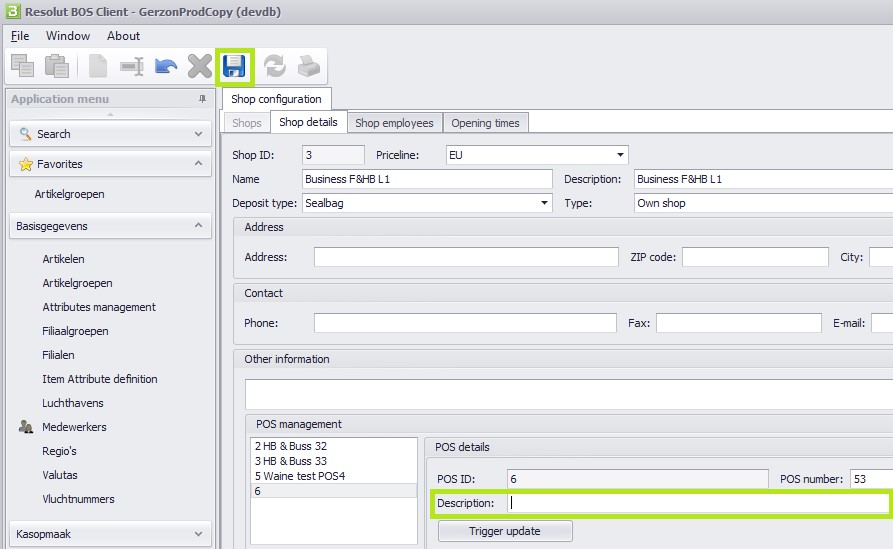
To trigger the POS4 update, go to Basisgegevens > Filialen (Shop configuration).
4A14 fig3

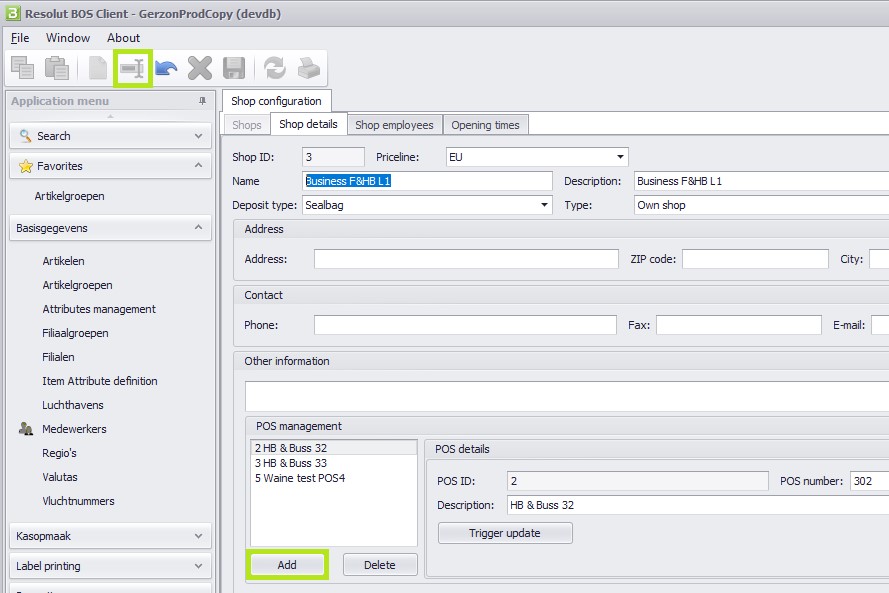
Here select the current Shop for which you want to update POS4 and click on Shop details (or double click on selected Shop). In the bottom part of the screen you will see the “POS management” section.

Find the device in the list on the left, select it and click Trigger update.
4A14 fig4 The latest available update will be installed the next time you restart the POS.

If the current device is not on the list, click the Edit icon, then Add and enter the POS ID for the device.
4A14 fig5 4A14 fig6

Next add a Description for the device and click the Save icon.
4A14 fig7

Selfcheckout Overview

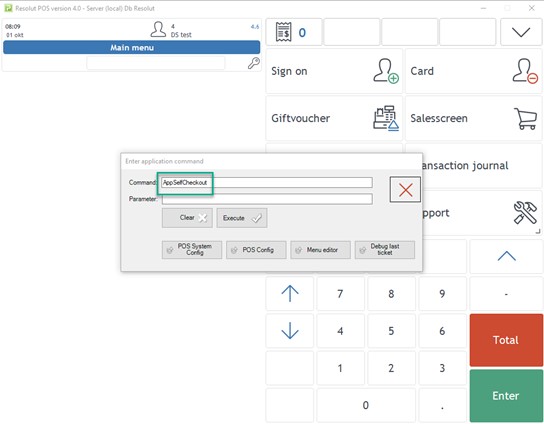
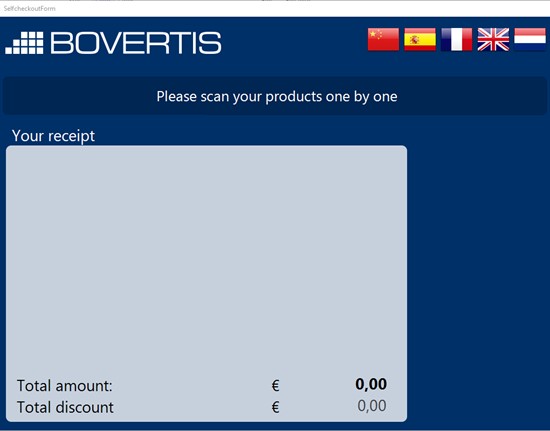
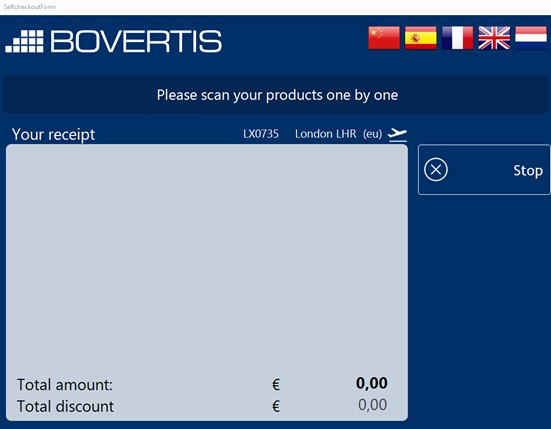
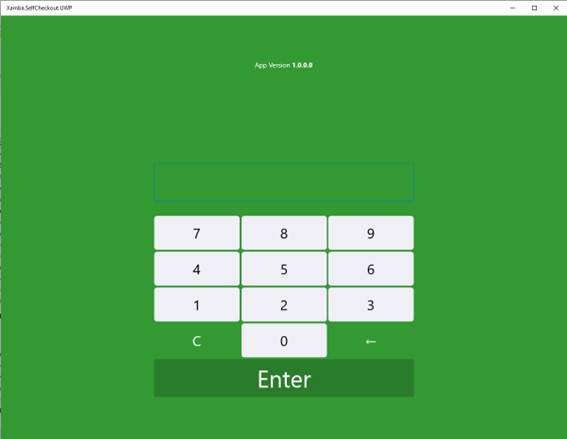
  1. To activate the POS4 Selfcheckout press CTRL+F6, enter the command “AppSelfCheckout“, and then click Execute

    4A3 fig1

    4A3 fig2

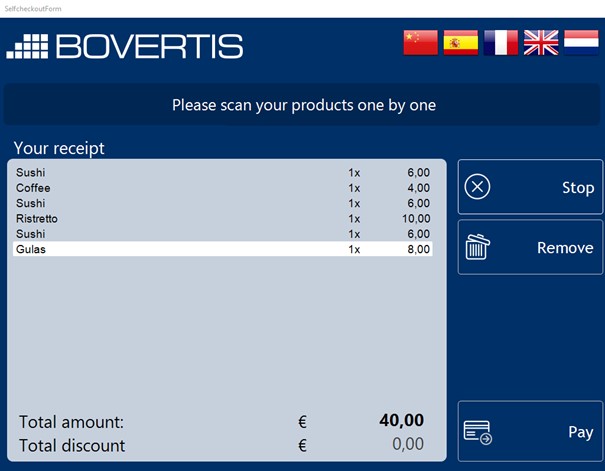
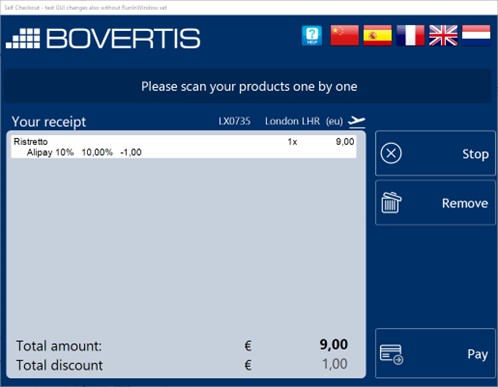
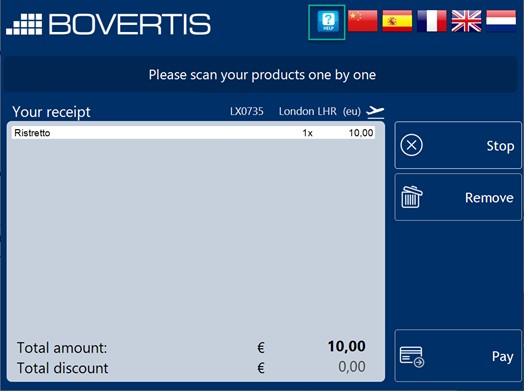
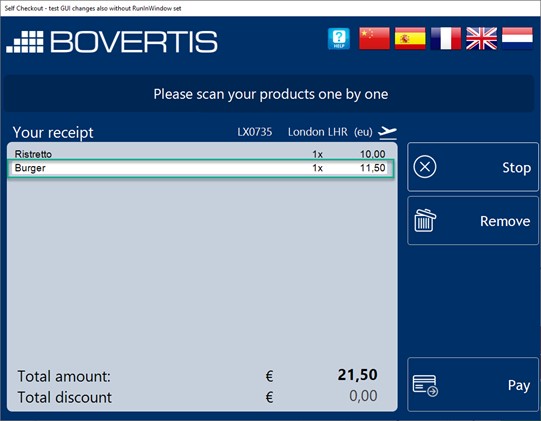
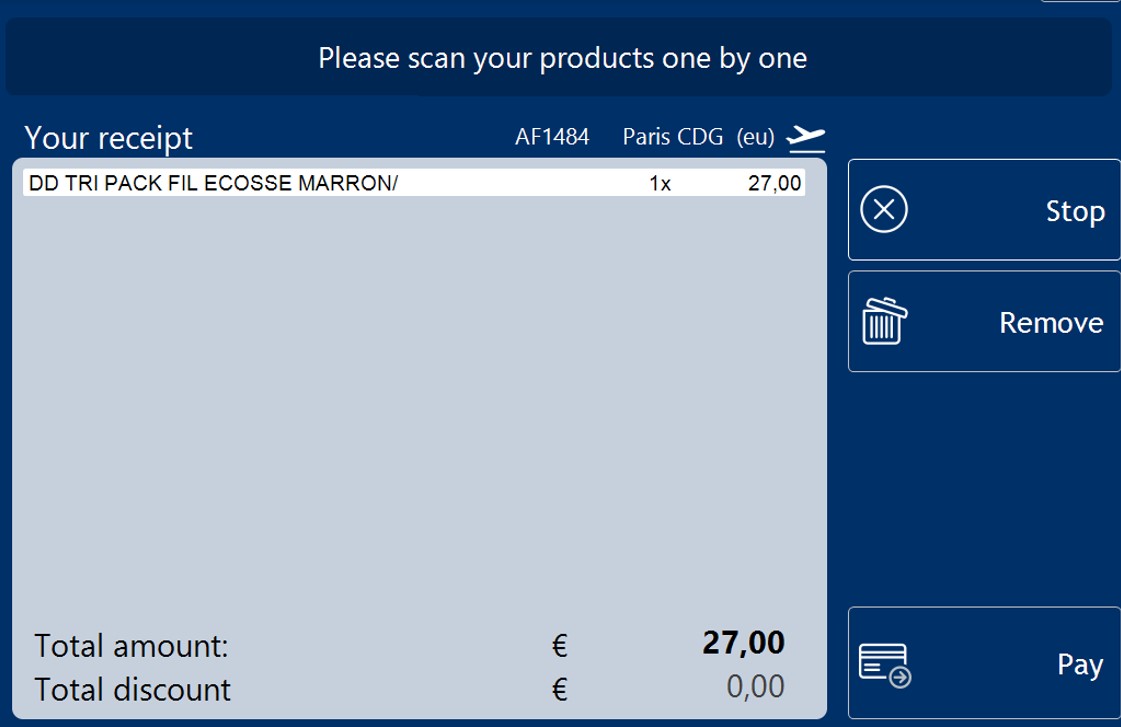
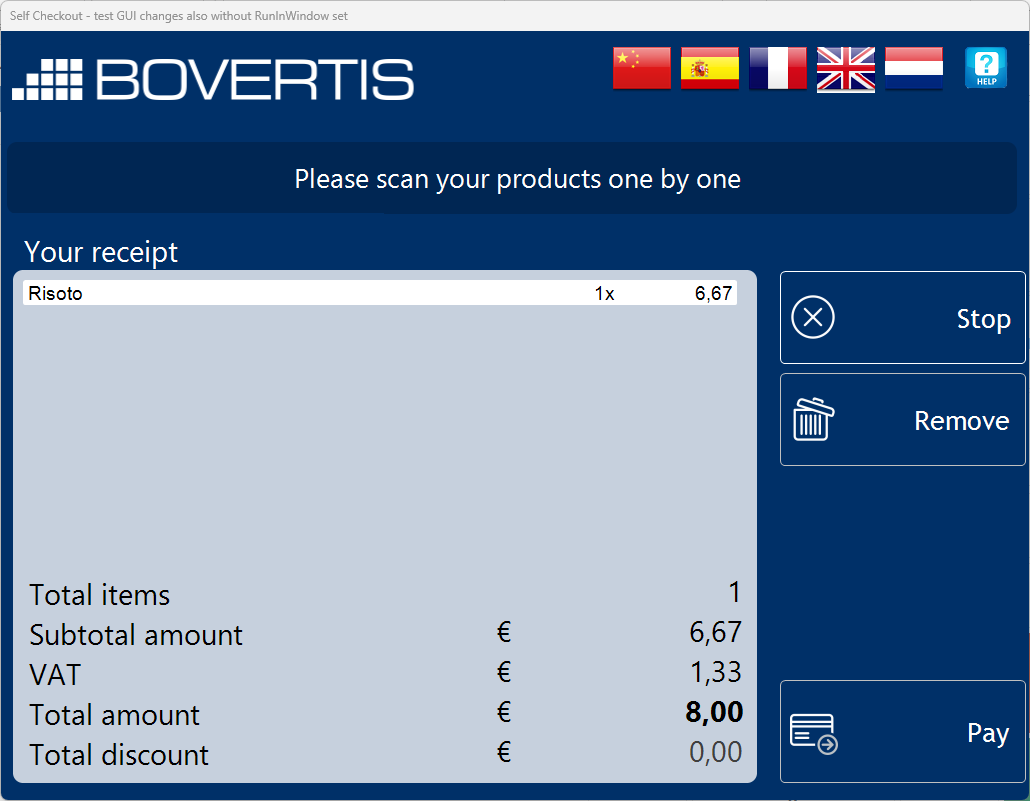
  2. Products are scanned using a barcode scanner and appear on the sale screen.

    4A3 fig3

  3. Products can be removed by selecting them and tapping Remove.

    4A3 fig4

    4A3 fig5

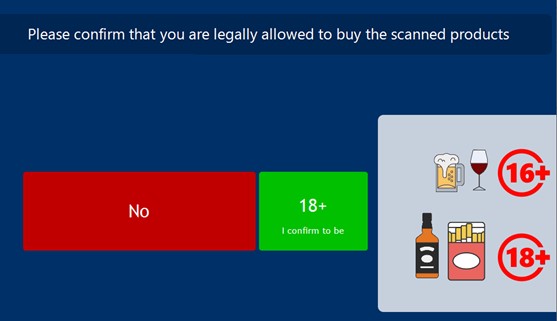
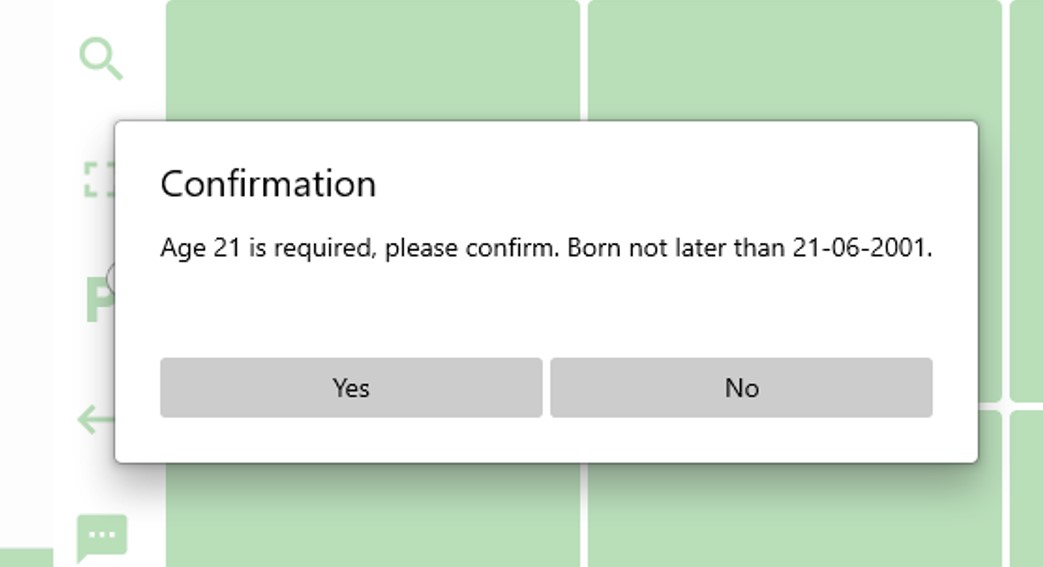
  4. When purchasing a product with an Age check, the user must confirm their age to continue with payment.
    Products can be assigned an Age check of 16+ or 18+. If multiple products with different Age checks are in the cart, the system will display an 18+ age check.

    4A3 fig6

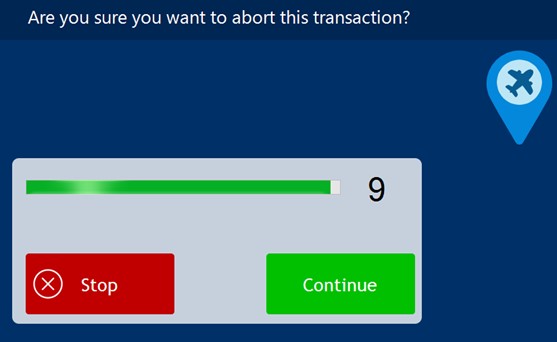
  5. You can stop a transaction from the sale screen if needed, by tapping Stop

    4A3 fig7

    A confirmation window will appear. Tap Stop to stop the transaction, or Continue to return to the Sales screen

    4A3 fig8

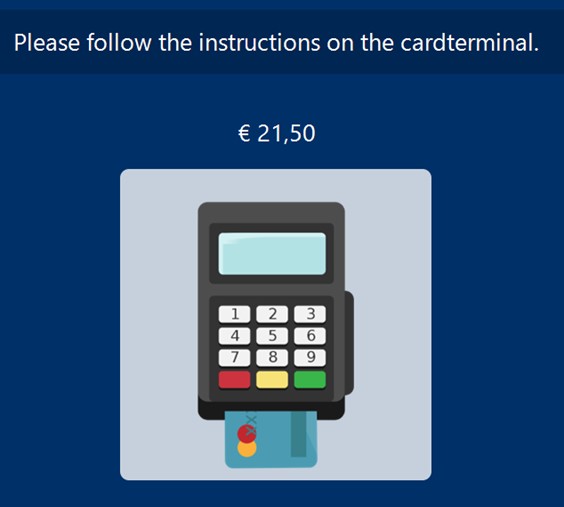
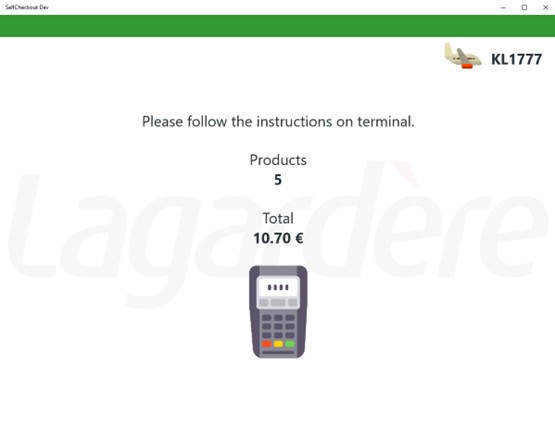
  6. Only card payments are possible when using Selfcheckout

    4A3 fig9

    4A3 fig10

  7. Products can have packaging deposit configured, which is then automatically added to sale with its price, and shown in an extra line.

    4A3 fig11

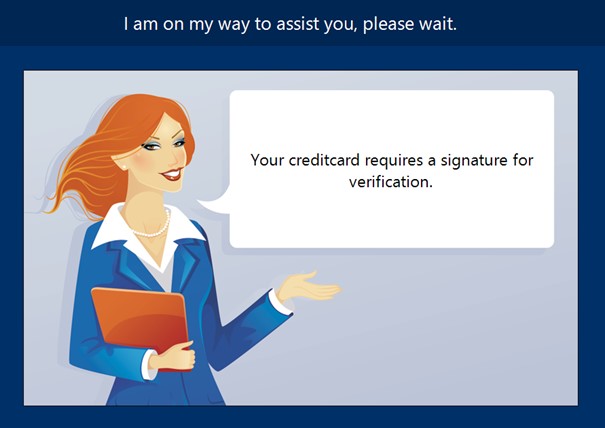
  8. Some credit cards require signature verification, in this case selfcheckout is blocked after a successfull payment and assistance is needed to finish the transaction.

    4A3 fig12

To do this, staff must use the special employee barcode: 26837847

4A3 fig13

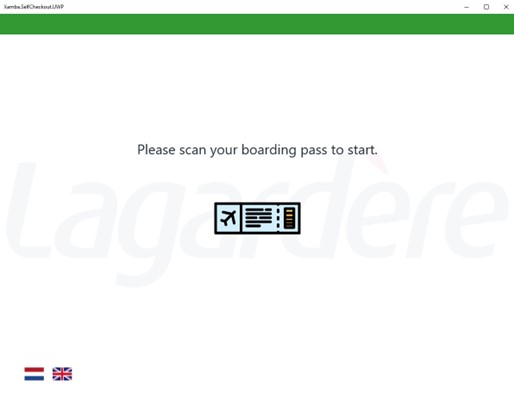
  1. Selfcheckout can be run in “Aiport mode”, requiring users to scan their boarding card first before scanning products

    4A3 fig14

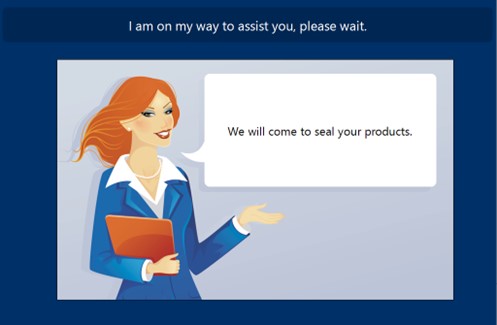
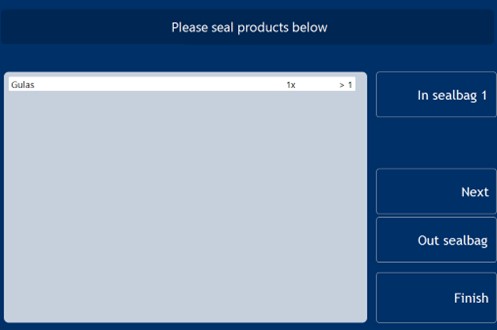
  2. If a product needs to be sealed, staff must assist and put the item in a sealbag. This may be necessary on connecting flights, where the passenger is not travelling directly to their final destination.

    4A3 fig15

    4A3 fig16

    4A3 fig17

  3. If sealbag mode is turned off, products that require sealing must be sold at the cash register.

    4A3 fig18

  4. Discount voucher can be scanned directly in sales screen. It is needed to verify it by employee, enter/scan employee PIN code. Discount will be added to sale. 4A3 fig19 4A3 fig20

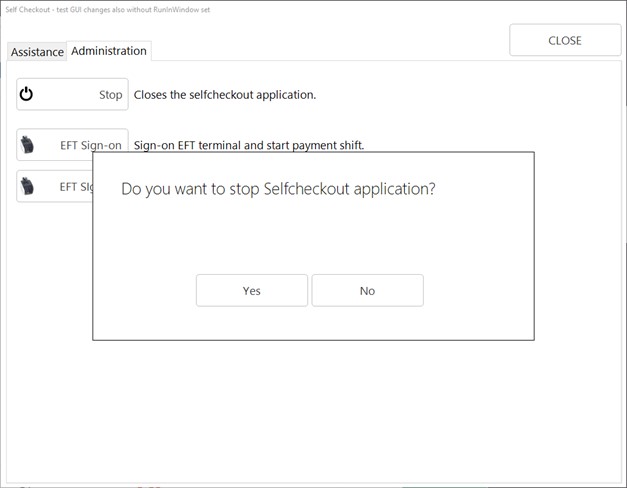
  10. To close the selfcheckout, scan employee barcode 26837847, go to Administration section and click the button Stop. Use EFT Sign-on or EFT Sign-off button if needed. 4A3 fig21 4A3 fig22

Subsections of Selfcheckout Overview

Selfcheckout Assistance Screen

There are several additional options in Selfcheckout mode for cases when the customer has to call for assistance.

The user taps Help in the sales screen and waits for the cashier to come and make manual adjustments to the sale.

4A4 fig1

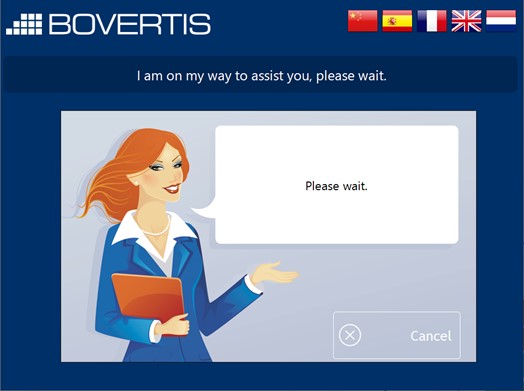
A notification is displayed, indicating that a cashier is on their way to assist.

4A4 fig2

The cashier scans the SCO barcode to open the maintenance screen. Here we can see the five additional options: Search Item, Unknown Item, Change Price, Perc. Discount, and Amount Discount

4A4 fig3

1. Search item

To search for a specific item, enter the Item id, barcode or a description. A list of results will be shown. Select the required item and tap Add item to add it to the cart.

4A4 fig4

4A4 fig5

2. Unknown item

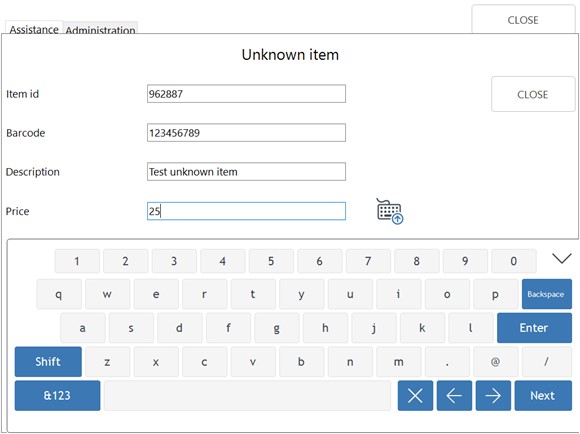
In order to process an unknown item through the sales screen, the SCO.UnknownTemplateItem parameter must be configured in the items table and an “item id” specified in the configuration.

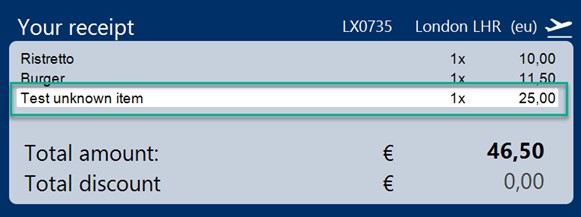
The Item id can then be entered in the Unknown Item screen along with the other fields, and the sale can continue.

4A4 fig7

4A4 fig8

3. Change price

To change the price of an item, the item must first be selected in the sales screen.
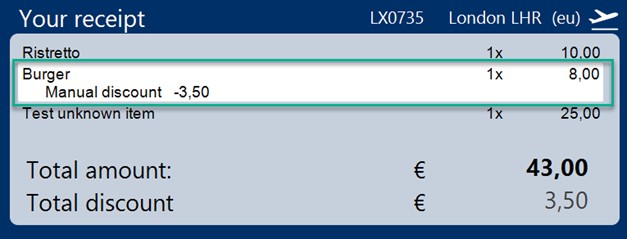
Select Change price, enter a new price, and tap Enter and then Save. The new price is now shown on the sales screen as a manual discount.

4A4 fig9

4A4 fig10

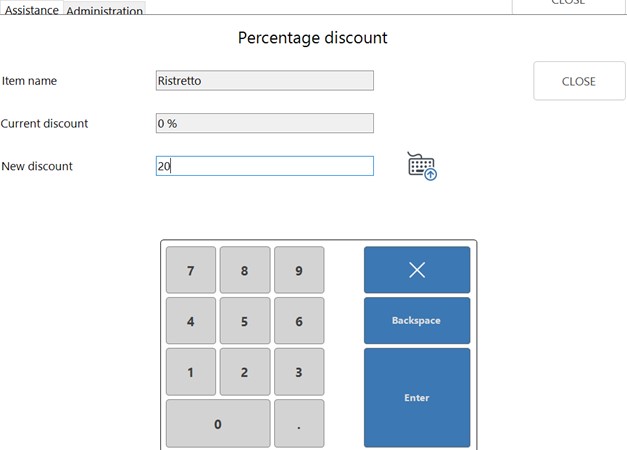
4. Percentage discount

To add a percentage discount to an item, the item must first be selected in the sales screen.
Select Perc.Discount and enter a percentage to be deducted from the price. The new price is shown in the sales screen as a manual discount.

4A4 fig11

4A4 fig12

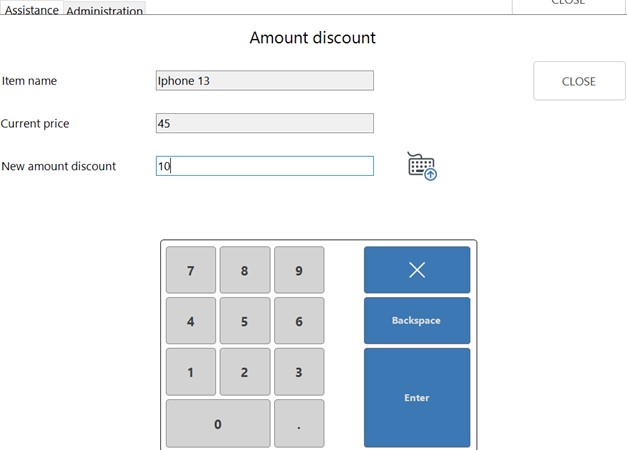
5. Amount discount

To add an amount discount to an item, the item must first be selected in the sales screen.
Select Amount Discount and enter the amount to be deducted from the price. The new price is shown in the sales screen as a manual discount.

4A4 fig13

4A4 fig14

Selfcheckout Parameters

Here is a list of all possible Selfcheckout(SCO) parameters:

Parameter name Default value Description
Basic SCO parameters
SCO.AskForFinalDestination 0 If set and single-leg boarding card is scanned, question whether boarding card destination is the final destination will be presented (only airport mode)
SCO.AssistanceAirportSealbagsMode 0 If set, liquid items can be sold at the SCO (only airport mode)
SCO.AutoStartup 1 If set, SCO-dedicated mode is activated (SCO is automatically opened when POS4 is started)
SCO.BlockConnectedFlights 0 If set, multi-leg flights are not allowed (either by scanning multi-leg boarding card or by indication of the customer after scanning single-leg boarding card; only airport mode)
SCO.BoardingcardAllowArrivals 0 If set, Arrival-flight button is available in scan-boarding-card screen
SCO.DefaultLanguage ENG Default language used in GUI
SCO.DemagnetizeSeconds 0 Number of seconds for which the demagnetizer device is activated after successful payment. Using positive amount activates the demagnetization functionality. Default value is 0.
SCO.DemagnetizeToken Token for connection to demagnetizer device
SCO.DemagnetizeUrl URL for connection to demagnetizer device
SCO.EftBitmapFilename Custom EFT terminal image shown in payment screen located in media folder
SCO.EmployeeId 1 Preferred employee ID the sale transactions are booked to
SCO.MenuProfile SCO Active menu profile (only in buffet mode)
SCO.PrintReceipt 1 If set, receipt is always printed; if not, customer can trigger printing manually
SCO.SalesMenu Sales Sales menu from active profile used in sales screen (only in buffet mode)
SCO.ServiceBarcode 26837847 Barcode for opening maintenance screen
SCO.ScanBoardingcard 0 If set, airport mode is activated (scanning boarding card will be required to start the sale)
SCO.ScanSecondBoardingCard 0 If set, customer is asked to scan the second boarding card in case he indicates that the destination of the first scanned boarding card is not his final destination (airport mode only)
SCO.ScreenHeight 768 Height of SCO window
SCO.ScreenSaverBlockedTime 10-20 Range of hours when screensaver will be disabled (in format Start-End; e.g. value 10-20 represents time between 10:00 and 20:00)
SCO.ScreenWidth 1024 Width of SCO window (value 1920 activates buffet mode)
SCO.ShiftCloseTime 2300 Time of automatic shift closing (only in SCO-dedicated mode)
SCO.SkinFilename SCODefaultSkin.zip Name of a SCO skin file
SCO.UnknownTemplateItem Template item for enabling selling unknown items (in format ItemId or CompanyId|ItemId)
SCO.UpsellingItemIds List of item IDs for upselling
SCO.UsePinpadSignOnOff 1 If set, SCO automatically closes/opens new shift at the end of day, including EFT sign off/on (only in SCO-dedicated mode)
SCO parameters for screen timeouts
SCO.AgeCheckScreenTimeout 20 Timeout of age-check screen
SCO.AskForFinalDestinationTimeout 30 Timeout of ask-for-final-destination screen
SCO.ContinueScreenTimeout 10 Timeout of ask-to-continue screen
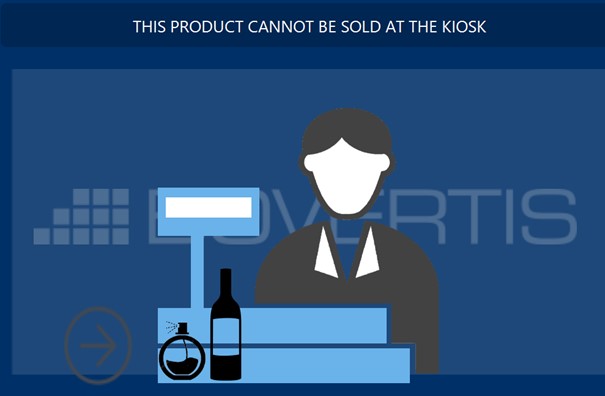
SCO.FinalGoToPosScreenTimeout 5 Timeout of sale-not-possible final screen where customer is directed to visit cashier desk (open when some products cannot be sold at SCO or when multi-leg flights are not allowed; only in airport mode)
SCO.PaymentScreenTimeout 30 Timeout payment screen when payment is not running (after failed or stopped transaction)
SCO.SalesScreenTimeout 30 Timeout of sales screen
SCO.ScanBoardingScreenTimeout 30 Timeout of scan-boarding-card screen
SCO.ScanSecondBoardingScreenTimeout 30 Timeout of scan-second-boarding-card screen
SCO.ScanYourProductTimer 3 Frequency of changing header messages in sale screen (only if old discount vouchers are activated)
SCO.UpsellingScreenTimeout 30 Timeout of upselling-items screen
SCO.WarningTimeout 10 Timeout of warning messages (min 5s)
SCO.YouHavePaidScreenTimeout 5 Timeout of sale-finished screen
Particular POS4 parameters affecting also SCO
CashierInfoOnCreditcardSlip 1 If set, cashier ID and name are printed on merchant receipt
ExportMappedCreditcardCode 0 If set, card names are mapped using EftPinpadMapping table
LoadOldDiscountVouchers 0 If set, old discount vouchers from table DiscountVouchers are included into discount calculation
MaxDiscountAllowed 100 Maximal percentual discount allowed to apply
QMatic.Connected 0 If set, QMatic messages are sent during SCO sale process
RelatedItemIdIsDeposit 0 If set, items specified in RelatedItemId column in ItemTable table are also handled as package deposits
SendBoardingcardInfo 0 If set, PosTicketBoardingCard object with scanned boarding card is added to the ticket (only in airport mode)

Discount Vouchers

To use a discount voucher, start on the Selfcheckout sales screen.

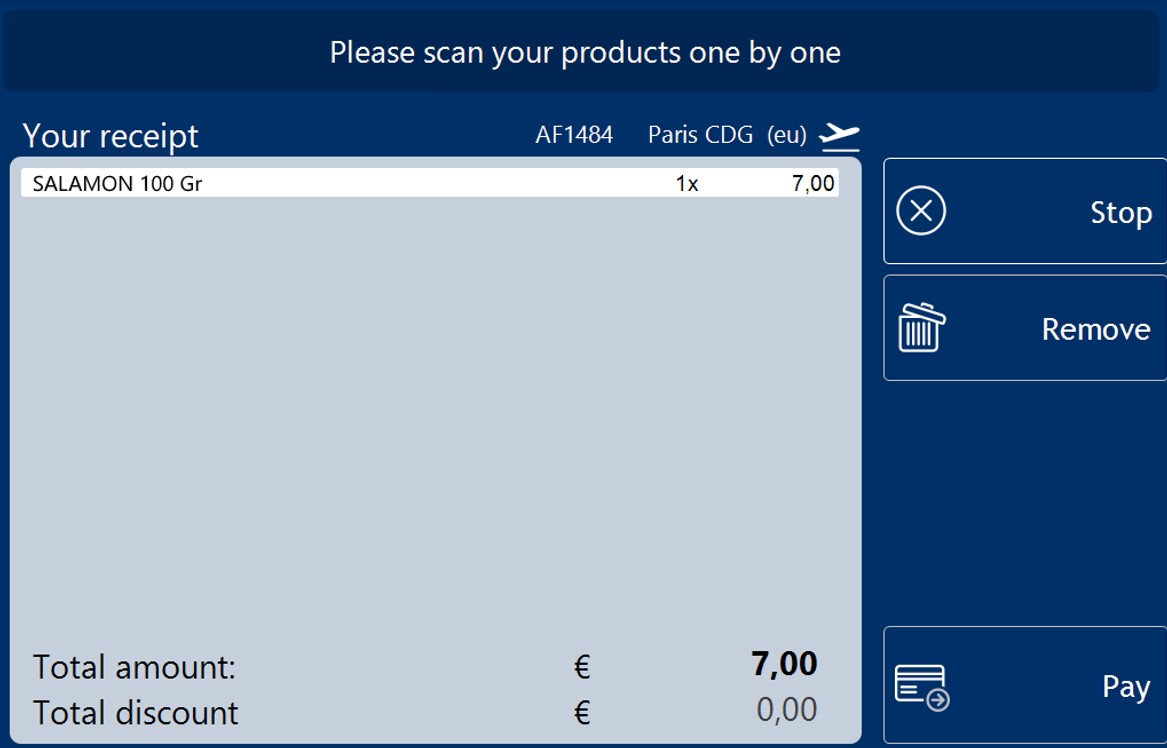
The customer scans an item and the item appears on the screen.

4A6 fig1a

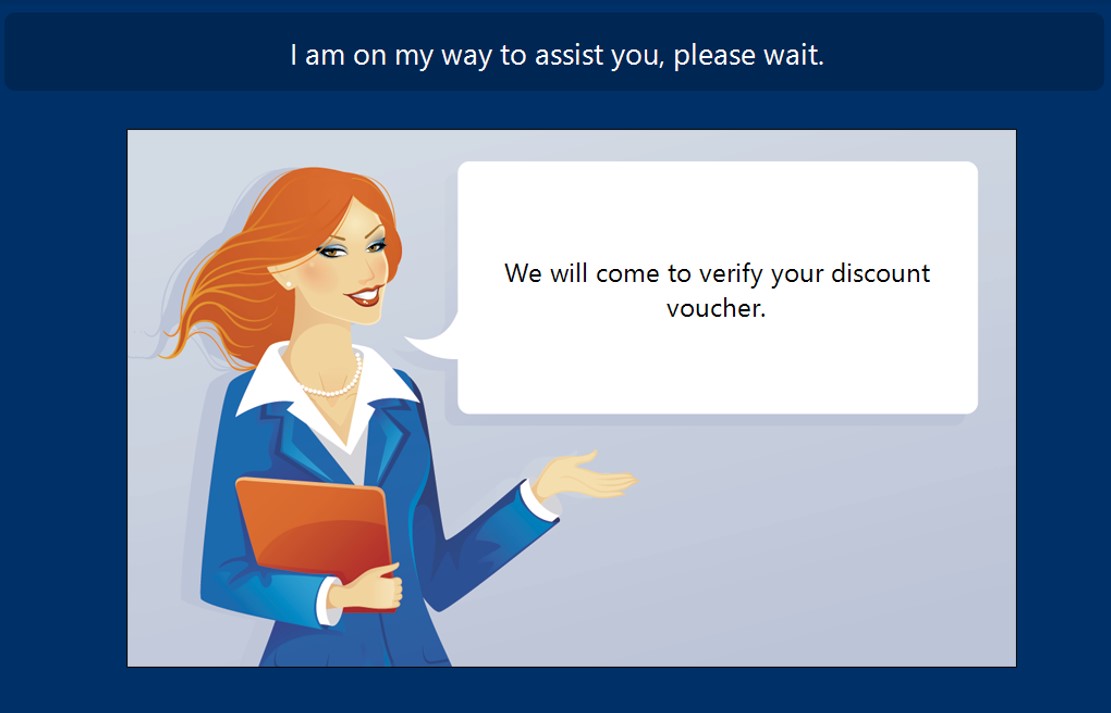
When the customer scans a discount voucher, the assistance screen will be shown explaining that the voucher must be verified.
4A6 fig2a

The assistant scans the employee/staff barcode (not the SCO barcode) to approve the discount. The discount is applied and on the selected sales line the attribute ItemSaleAttributes.StaffApproval is added.

Another option is that the SCO barcode is scanned to refuse the discount voucher (maintenance screen is shown and SCO can be unlocked).

The assistance screen can be closed with the cancel button as well.

The assistance screen is closed and the customer can scan additional products. When another voucher is scanned the procedure is repeated.

4A6 fig3a

Configuration

Discount vouchers are currently managed in a separate Bosclient module. To be able to use them in POS4 (and SCO) the LoadOldDiscountVouchers parameter has to be enabled. This works for both one-item and multi-item vouchers.

New discount vouchers should be managed in the new promotion module in Bosclient with an assigned triggered. Those will work in POS4 (and SCO) without additional configuration.

Perishable Discount

Applying a Discount for Perishable Items

On certain perishable items, a special discount can be applied.

The customer scans the perishable item, the item appears on the screen and the assistance button appears.
4A8 fig1a

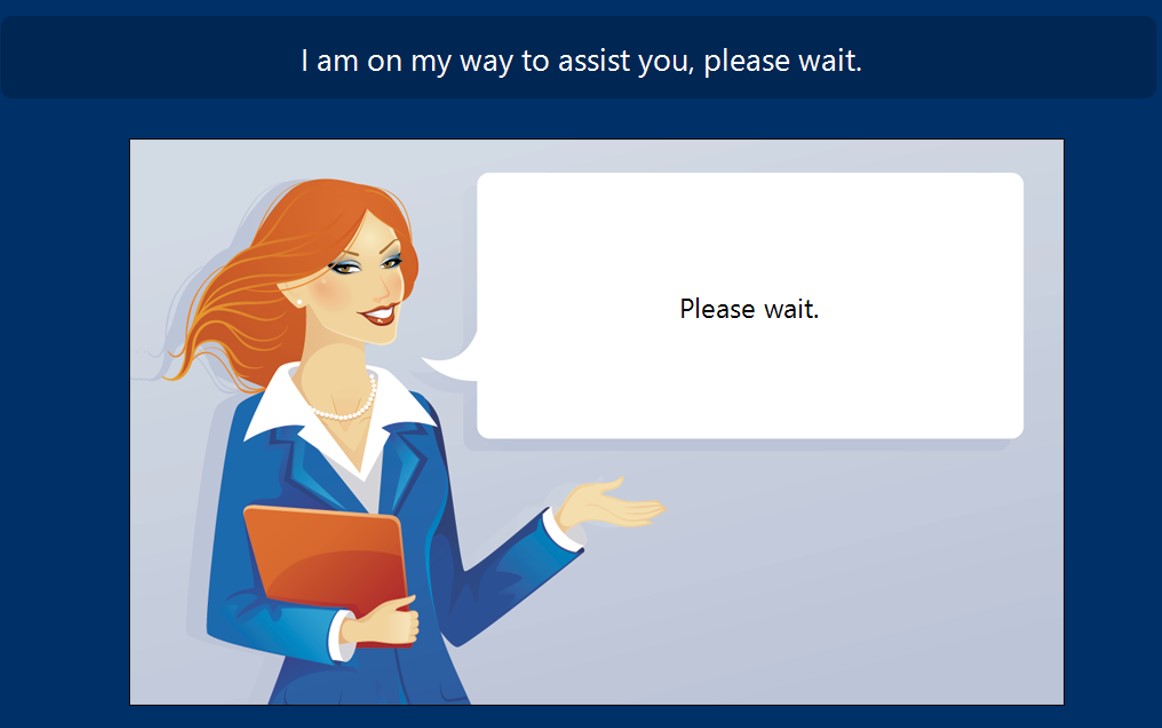
The customer taps Request assistance and the assistance screen appears.
4A8 fig2a

The assistant scans the specific discount perishable barcode.
If the selected item is perishable, the discount is applied. On the screen the discount is visible on the sales line and applied to the totals.
If a discount was already applied the assistance screen will close and the sale can continue.
4A8 fig3a

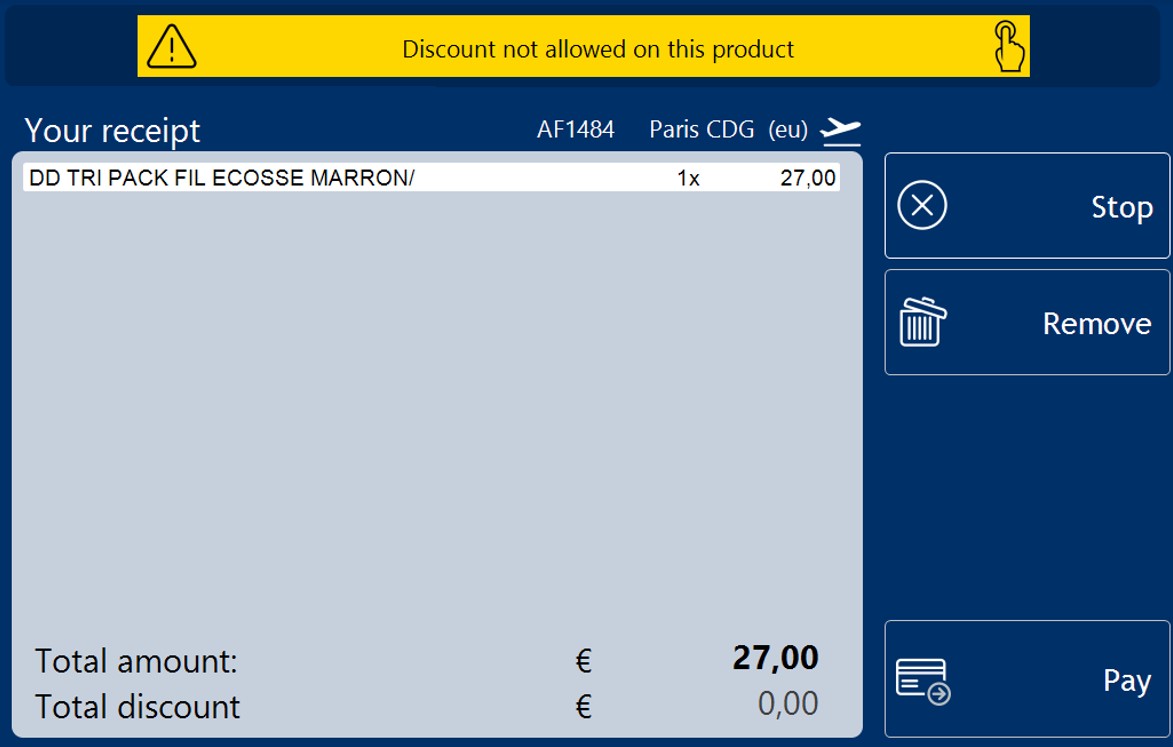
When the item is not perishable, a warning message appears:
“Discount not allowed on this product”.
4A8 fig4a

‘Ask Assistance’ for Promotions

Promotions can be verified by a staff member using the “Ask Assistance” function with a promotion. Here is how to set that up when using POS4 with either Resolut Online Portal or Resolut Back Office Client.

Resolut Online Portal

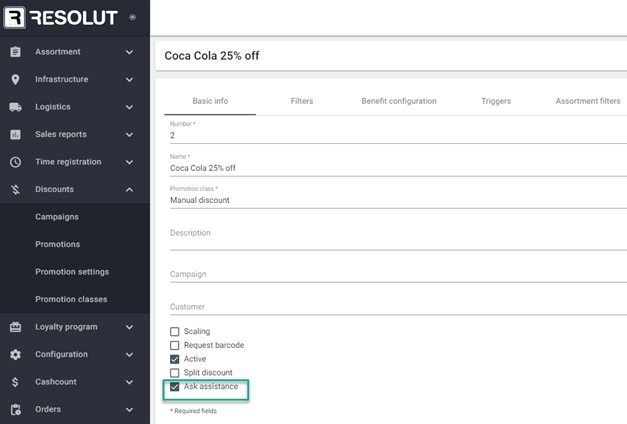
  1. To set-up the “Ask assistance” function, open the Resolut online portal and go to Discounts > Promotions then open an existing promotion.
    In the Basic info tab, check the “Ask Assistance” checkbox.
    4A11 fig1

  2. Go to the Trigger tab, and choose “BarcodeScan” from the drop-down menu. Set the Value for the barcode, then save your changes.
    4A11 fig2

  3. Open the POS4 Selfcheckout, add the product to the sales screen using the barcode to trigger the promotion. The assistance screen appears.
    4A11 fig3

  4. The employee enters their ID and the promotion is applied.
    4A11 fig4

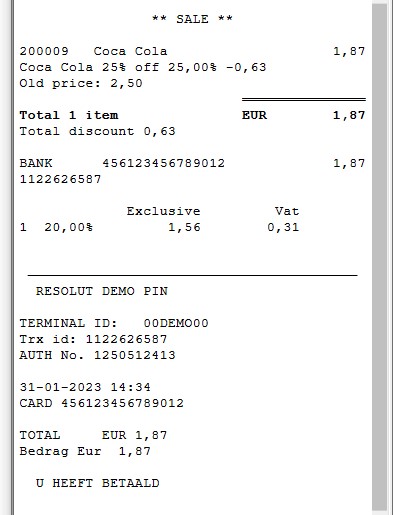
  5. Finish the sale, the promotion is shown on the receipt.
    4A11 fig5

Resolut Back Office Client

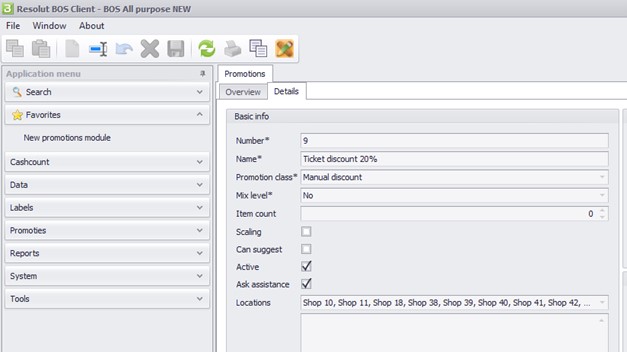
The same function works in POS4 connected to the Resolut BOS client. Go to Promotions > Details, check the “Ask assistance” box and under “Promotion triggers” set the manual trigger (BarcodeScan).
4A11 fig6 4A11 fig7

Upselling Screen

Set-up

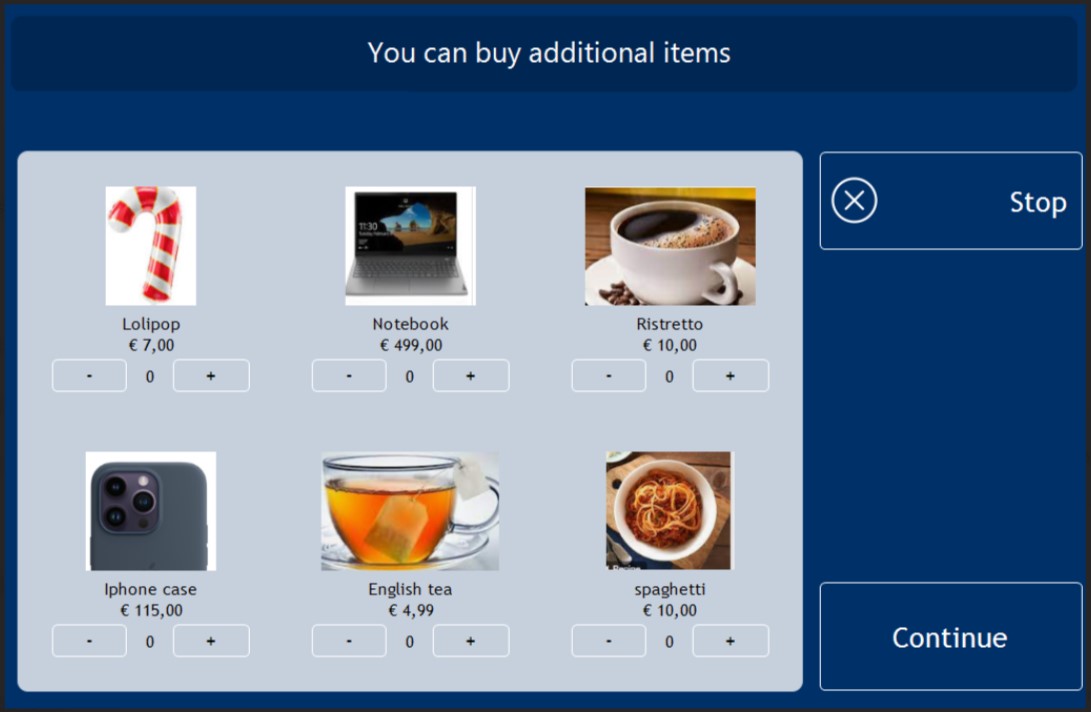
Upselling can be enabled using the new parameter SCO.UpsellingItemIds. The value is set to a list of items (ItemIDs) that will be upsold. We recommend a maximum of 6 items.

SCO.UpsellingItemIds - default empty

SCO.UpsellingScreenTimeout - default 30

If the parameter is not present, or the fields are empty, then the upselling screen will not be displayed.

Each upsold item should have an image file in C:\POS\Media\ with the filename “itemId.jpg” or “itemId.png”.

The configured item is not shown in the selfcheckout when:

  • itemId is not valid
  • item is not found
  • item does not have a price
  • item price is 0

The recommended product image resolution for SCO resolution is 1024x768:

  • up to 3 items: 194x209

  • 4-6 items: 194x113

The image resolutions can be different; the images will be proportionally adjusted to the available space on-screen.

Using the Upselling screen

  1. Scan the item to add it to the Selfcheckout sale. Click Pay.

  2. The upselling screen appears. The customer can add additional products to the sale or skip this step by clicking Continue.
    4A12 fig1

Selfcheckout GUI Configuration

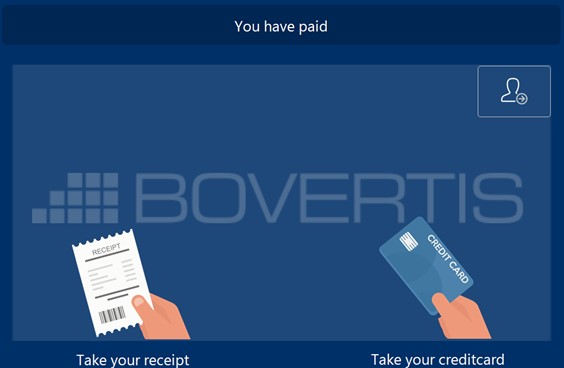
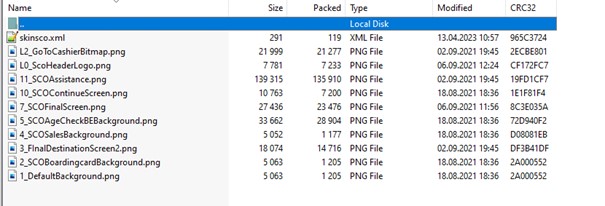
The locations of the “Take your receipt/card” images and text can be now configured using the skin .zip file SCODefaultSkin.zip located in C:\Pos\Media.
If needed, add the file skinsco.xml with the parameters:

<skinsco>
  <sale>
    <receiptBackColor>transparent</receiptBackColor>  
    <menuBackColor>#7c9777</menuBackColor>  
  </sale>
  <final>
    <takeReceiptImageLocation>127;393</takeReceiptImageLocation>
    <takeReceiptTextLocation>32;599</takeReceiptTextLocation>
    <takeCardImageLocation>677;386</takeCardImageLocation>
    <takeCardTextLocation>585;599</takeCardTextLocation>
  </final>
  <idle>
    <backColor>black</backColor>
  </idle>
</skinsco>  

Other images in SCODefaultSkin.zip can be changed by changing the number prefix of the image filename:

0 = Idle screen background

1 = Default background

2 = “Boarding card” background

3 = “Final destination” background

4 = Sales, Upselling and “Seal bag” background

5 = “Age Check” background

6 = Payment and configurable information screen background

7 = Final screens background

10 = Ask to continue background

11 = “Assistance needed” background

L0 = Header background and logo bitmap

L1 = Boarding card bitmap

L2 = “Go to cashier” bitmap (used when a sale cannot be finished)

L3 = Payment bitmap

L4 = Bitmap in configurable information screen

L5 = Idle screen bitmap

For example:

“1_Background.png” assigns that image as the default background.

“6_Payment,png” assigns that image to the Payment screen.

4A13 fig1

Generic Fields for SelfCheckout

In Resolut Backoffice Client, it is possible to create generic fields for Selfcheckout.
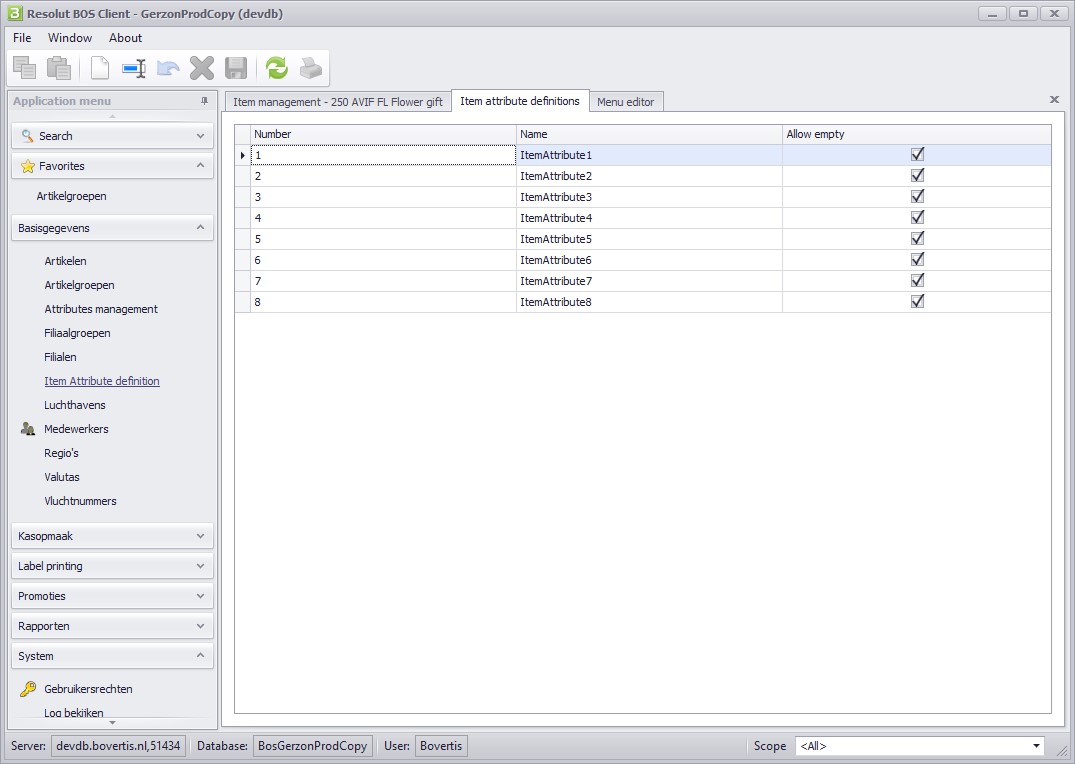
Go to Basisgegevens > Item Attribute Definition in the client menu to create general fields for all items:
4A16 fig1

Here you can add, edit or delete attributes of the generic fields for all items using the buttons in the upper toolbar.
4A16 fig2

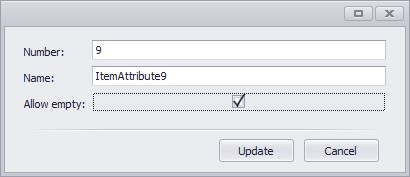
To create a new attribute, you must enter a Name and check the box Allow empty, if the value for a new attribute will stay empty.
4A16 fig3

You can set the attribute value for a specific item in the item detail. Go to Basisgegevens > Artikelen and double click on the specific item for which you want to add or modify the attribute value.

The Item details tab will open for the item. In bottom section, click Attribute values. Here you can add or edit attributes values for the specific item.
4A16 fig4

Configuration

Welcome to the POS configuration manual. This manual is intended for IT departments or resellers.

Subsections of Configuration

Generic

Parameter Description
AskPriceIfUnkonwn By default a product cannot be sold (added to the receipt) if price information is not available, a message ’this product cannot be sold in xxx’ where xxx is the priceline. If this parameter is enabled the pos will ask for a price.
BarcodeIsAltItemId The application will use the scanned barcode as item id to find the product by AltItemId
BarcodeIsItemId The application will use the scanned barcode as item id to find the product. There are two optional parameters related to this parameter, ItemBarcodePrefix and ItemBarcodeHasCheckDigit
DiscountRates Defines a list with default discounts for the AppDiscount function. For example 10; 20; 30 shows 3 buttons with 10%/20%/30%.
ItemBarcodePrefix Used when BarocdeIsItemId is set, it removes the prefix from the barcode. For example, if the barcode is 9912345 and this parameters is 99, the item id 12345 will be searched.
ItemBarcodeHasCheckDigit Used when BarocdeIsItemId is set, it removes the last digit from the barcode. For example, if barcode 123459 is scanned, item id 12345 will be searched.
PlaySounds By default sounds and alerts are played on the hardware sound card. If hardware does not have a sound card, but only a speaker, set this value to 0.
QtyAllowedCheck This parameter was added to enable the item QtyAllowed setting from the database. The value is default false.
TicketNumberMin The first ticket/receipt number that should be used, the default is 1. For fiscal countries a value 1 is mandatory.
TicketNumberMax The highest ticket number, when the number is reached the point of sale rolls back to TicketNumberMin. Default value is 999999.

Subsections of Generic

International

Resolut is developed in Dutch and English by default, but additional languages can be added.

Danish is available but not installed by default.

Parameter Description
DefaultLanguage The language of the user interface, ENG for English (default), DUT for Dutch, or a custom code when other languages are installed.
DefaultCustomerLanguage By default the customer lanuage (receipt and customer display) are set by DefaultLanguage, but can be overruled by this parameter.

Currencies

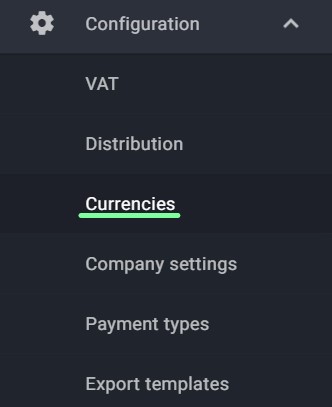
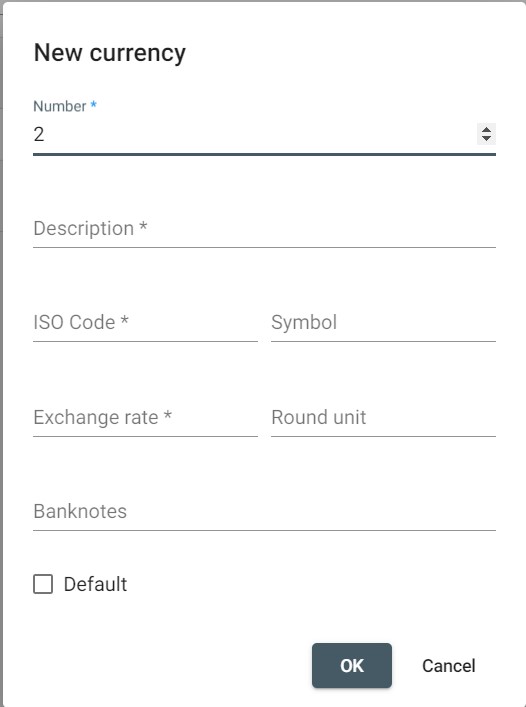
Resolut supports unlimited currencies but at least one currency must be defined under id 1. The currencies can be found in the Currency table and default currencies can be configured through the configuration screen.

The primary currency is the default currency of the country, or the default currency that is accepted (some countries for example may have USD as default currency).

There is only support for one rate, no purchase and selling rate.

Related parameters:

The following parameters set the rounding in the primary currency when foreign currencies are used for payment or change. It prevents the point of sale waiting for entering a small domination like 0,02 euro. For Euro or US Dollar the advised value is 0,05.

Parameter Description
CurrencyCashbackMin Rounding value for change/refunds
CurrencyCashbackMax Roudning value for payments (in most cases both parameters have the same value)

Commands

Commands (AppCommands) are used to trigger, or start, function in the application.

A command can be assigned to a button in the menu, a key on the keyboard (i.e. F5 or Shift-F2), or to a barcode. Use Ctrl + F6 to manually enter a command.

Some commands may have an optional or mandatory parameter. Keep in mind that commands can be specific for a particular mode, for example AppDiscount won’t work in the payment screen or main menu, but only in the sales screen.

Parameter Description
AppCalculator Shows the calculator
AppCleanScreen Locks the screen to clean it with a wipe
AppCurrencyList Shows the currency list, depending on the parameter AllowPrintCurrencyRates the rates can be changed.
AppDeposit Deposit screen
AppFinancialDrawerCheck Count the drawer without closing, only available when caschcount is used
AppGassanStockInfo Based on the connection it loads the data from table GassanStockInfo.The query can be changed in parameter GassanStockQuery (default: SELECT * FROM GassanStockInfo WHERE ItemRef LIKE ‘%{0}%’) and sorting using parameter GassanStockQueryOrder (default: ORDER BY LocationId).
AppPanelLeft Sets the navigation panel on the left (left handed mode)
AppPanelRight Sets the navigation panel on the right (right handed mode / default)
AppPosLock Locks the point of salve buttons, can be unlocked by code or barcode scan
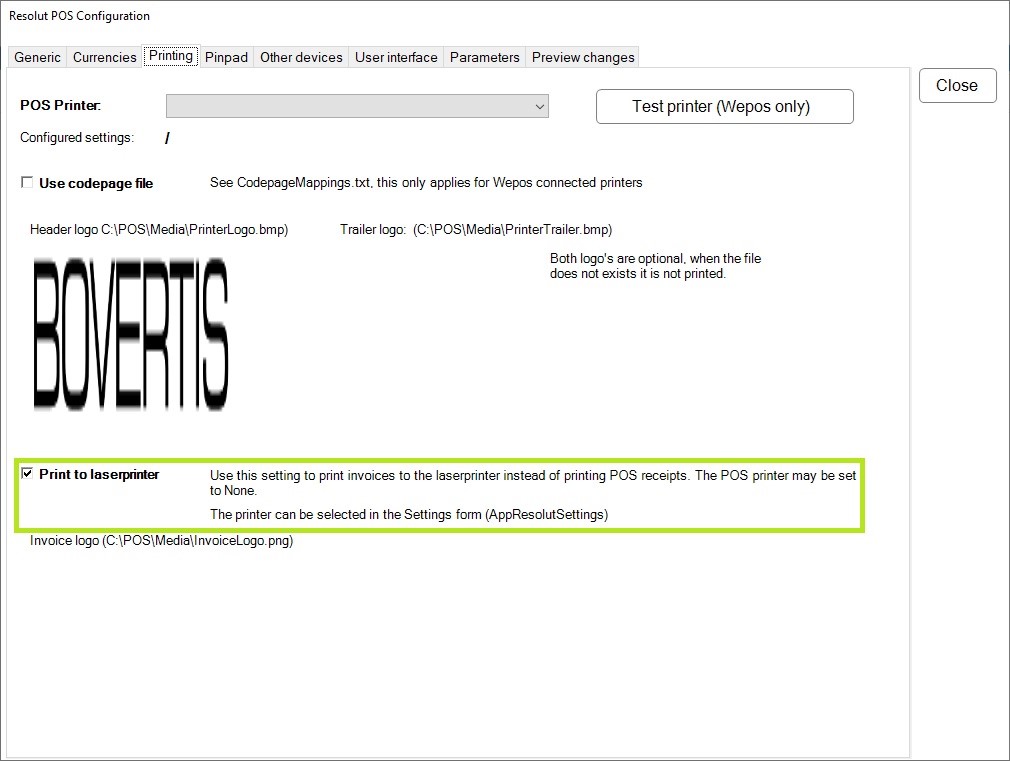
AppPrintInvoiceCopy Prints an A4 copy of the last receipt, only when laser printer is configured
AppPrintLastSalesTicket Prints the last sales receipt, this button is normally shown by default with receipt printing is off
AppPrintReceiptCopy Prints a copy of the last sales receipt
AppSelfCheckout Starts the self checkout

Subsections of Commands

Keyboard

In the file KeyMapping.xml a command can be assigned to keys or key combinations on the keyboard. It is currently not possible to send parameters with the command from the key mapping file.

(Note: the keyboard mapping is subject to be moved to the database and configration screen)

Create a file KeyMapping.xml in the /pos folder with the following text, and restart the application.


<posKeyMapping>

<keyMapping key="ESC">AppBack</keyMapping> <!-- BACK -->

<keyMapping key="Escape">AppBack\</keyMapping> <!-- BACK -->

<keyMapping key="ShiftF5">AppOptions</keyMapping> <!-- SHOW OPTIONS -->

<keyMapping key="ShiftF3">-\</keyMapping> <!-- Minus key -->

<keyMapping key="ShiftF4">AppBackspace</keyMapping> <!-- backspace -->

<keyMapping key="ControlF9">AppShellExecute</keyMapping>

<keyMapping key="F2">AppTotal</keyMapping>

</posKeyMapping>

Engineer and Support

For support and testing purposes it is advised to have a few [key mappings]/resolut/configuration/commands/r7-keyboard-md/) available.

Parameter Description
AppCommandInput Any command & parameter combination can be entered, useful to test a specific feature without adding it to the navigation menu.
AppManualAutoUpdate Start a manual update from the downloadserver
AppMenuEditor Opens the menu editor
AppPerformanceMonitor Opens the performance / memory window
AppOpenResolutLog Opens the Resolut.log in Notepad
AppShellExecute Allows to start a windows application, common eased commands are CMD or Explorer. Requires a connected keyboard.
AppSystemMaintenance Open a maintanence window (this is subject to be changed to the newer configuration screens)

Supervisor Function

Commands can also be set as a Supervisor Function. This means that the action must be authorized by a supervisor.

In the database, open the ApplicationCommands table.
Find the Command you need and set Supervisor Function to “True”.

When Supervisor Function is set to “True”, that command can only be performed by a supervisor.

R43 fig1

Parameters

ParameterName Description
AbortOwnSaleOnly Abort sale only by supervisor or the cashier who initiated the sale, default false
AcceptMilesAndMores Miles and More aan
AdvisorBarcodeTokenType Use password in Advisor Barcode
Aena.AenaConfigurationId Configuration id
Aena.AenaContractId Aena plugin configuration
Aena.AenaLocalId Aena plugin configuration
Aena.AenaNumberReceiptText If the ticket number doe not match we must add Nº Ticket Aena, but printer does not support
Aena.ContractCode Aena contract code
Aena.EnableFiscalModule Anea fiscal module
Aena.CheckTimer Aane timer can be set to 5 minutes
Aena.SequenceType If true, ticket sequence number set on true, count sale, refund and stopped transaction in a single sequence
AenaExport.ClientId Aena report service configuration
AenaExport.VarSalesPerc Aena report service configuration
AirportAkoSales Set button AKO Sales in scan boarding card menu
AirportAllowArrivalContinue No boardingpass button
AirportAllowArrivalSale If true arrival sale is allowed
AirportArrivalHeader If company id == 31 set Amsterdam else set Brussels to destination
AirportArrivalSaleDeparture Replaces the original departure code
AirportArrivalSaleFlightNumber Change boardingcard flightnumber
AirportArrivalSalePrefix Change boardingcard prefix
AirportAskAge If true ask for age of passenger
AirportAskForOrigin Set value to 1 to ask for origin/nationality of the user
AirportAskForTransit Ask for transit
AirportAskForTransitFlight Ask for transit flight number
AirportAskOrigin If true open register interview module
AirportAskSex If true ask for sex of passenger
AirportCode The origin (departue) airport code
AirportDepartureCode Airport departure code
AirportDepartureDateMaxMarging Allowed timeframe to buy depending on the departure date
AirportDepartureDateMinMarging Allowed timeframe to buy depending on the departure date
AirporteCommerce.ShopId Lagardere Belgium parameter
AirportMode Opposite for retailmode, if true application runs in airport mode.This parameter set by the RetailMode parameter, but can be overwritten
AirportOnlineFlightDetails Use realtime flight info
AirportPUORFloorlimit Pickup on return floor limit (airport only)
AirportScanSealbagsOnly Force scanning of sealbag barcodes. The menu function AppAirportSealbag is ignored is this parameter is set true
AirportSealbag If true, possible load item on scan barcode
AirportSealbagAfterSale Shows or hides Copy Sealbag button
AirportSealbagAllowReprintAllTickets If true, possible reprint all tickets
AirportSealbagDepartureCheck If true, set departure and hours to flight info
AirportSealbagDepartureCheckHours Number of hours in flight info
AirportSealbagPanelOnTop If true, set sealbag split receipt panel to top, default is bottom
AirportSealbags AirportSealbags
AirportSealbagsBarcode Configure a list of sealbag barcode delmited by a comma (,), for backwards compatibility the sealbag barcode of Schiphol airport are default
AirportSealbagsExportGV Only used for airport retail with liquid sealbag barcodes, default false
AirportSealbagsItemId List of items id in airport sealbag
AirportSealbagSplit Splitsen producten per sealbag
AirportSealbagsStockControl If true, load all items from the database
AirportShopCollectFloorlimit Pickup on return / shop and collect floorlimit
AirportVerifyDepartureDate If true boarding date check is enabled
AKO.TCSBypass AKO Giftcard to TCS
AkoWebshopOrderWebserviceUrl ako.nl prod url (moet worden https://kassawebservice.ako.nl/AkoKassaService.svc?wsdl)
AkoWebShopPurchaseItemId Artikelnummer waarop de weborder geboekt moet worden (default 7093872)
Alipay.ExtendInfo_SecondaryMerchantId AliPay config
Alipay.ExtendInfo_SecondaryMerchantIndustry AliPay config
Alipay.ExtendInfo_SecondaryMerchantName AliPay config
Alipay.ExtendInfo_StoreId AliPay config
Alipay.ExtendInfo_StoreName AliPay config
Alipay.GatewayUrl AliPay config
Alipay.Partner AliPay config
Alipay.PrintCNYAmount AliPay config
Alipay.RsaPrivateKey AliPay config
Alipay.RsaPublicAlipayKey AliPay config
Alipay.RsaPublicKey AliPay config
AllowCreditcardRefunds Online refund on creditcards
AllowEmployeeDiscountInput If true, update input state: length, type, description in pos gui main
AllowEmployeeDiscountSearch Searchfunction in employee discount
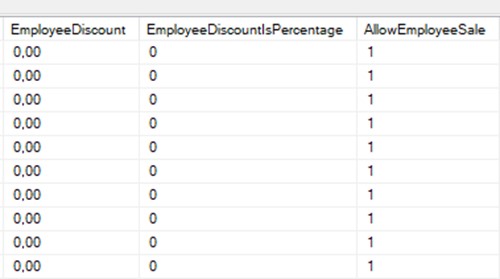
AllowEmployeeSale AllowEmployeeSale
AllowEmployeeSalePUOR If true and PUOR picture is visible, then hide this picture, otherwise set picture to input PUOR
AllowEmpPartnerDiscount Allow/deny employee sale discount on partner items
AllowChangeCurrencyRates Allow currency rate change
AllowItemIdInput If true its possible enter an item id
AllowMixedSaleRefund Allow to mix refunds and sales on a receipt. Depending on fiscal reguliations this could be disabled, or not.
AllowMultipleLogon UseExtraSignOn true will use the extra sign-on mode functions, otherwise sign-on of second and next users are automaticly extra sign-on.
AllowNoFlightSales Allows sales without boardingcard
AllowOfflineRefund Allow Offline Refund
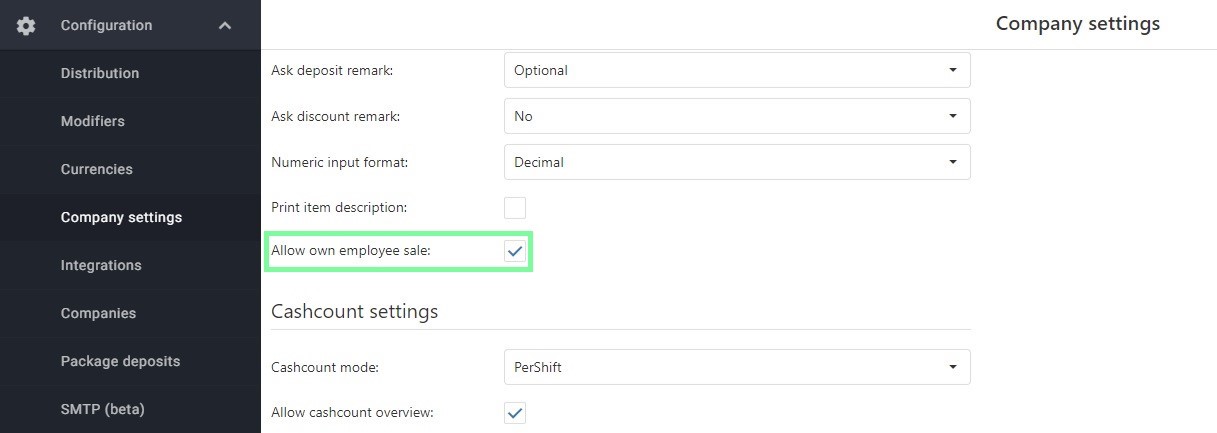
AllowOwnEmployeeSale Allow employee to start own employee sale
AllowNegativePriceInItemDetails If true, user can enter negative price in item details screen, default 1
AllowPrintCurrencyRates If true, set print function
AllowUserSignOff If true allow multiple logout users
AllowWeborderPickupRefunds If true, not allowed to refund lottery terminal items
AllowWeborderRefunds Weborder refund allowed
AppChangeLCDSkin Used in demo’s to change the skin, could be used in prod but no customer wants it
ApplicationIconImage Set picture to application icon file
ApplySecondBCScanStatus If true, set false to scanned in flight info result
AskCrashDetectedOnStartup If true, and application crash detected also, so restart on startup. Only applies to company 21 and 25.
AskNoBCSCanReason If true, and boardingcard include any scan reasons, show popup with reasons
AskPriceIfUnkonwn If true, ask for a price if the prices is not set, default false
AskSalesPersonPerItem If true, add a salesperson per salesline
AuthorisationMode If true user is authorised
AuthorizePincode Ask for pincode
AutoShowUserNotifications Message when exchange rates are updated
AviaBackofficeStockQuery1 Overrule AppAviaStockModule
BalanceReportCopies Number of receipt copies to print
BarcodeForceLocalSearch If barcode is item id but local barcode searched if forced, search local first
BarcodeIsAltItemId If true, set the scanned barcode will be search both on alternate item id as barcode
BarcodeIsItemId If true, barcode is item id
BarcodesNumericOnly BarcodesNumericOnly
BeepOnScannedItem POS will beep for every succesfull scanned item
BelgiumLottoPayoutId Button TAG in Belgium lottery is the itemid, where a negative item id = payout, default is -213001003
BelgiumLottoSaleId Button TAG in Belgium lottery is the itemid, where item id > 0 = sale, default is 213001001
BelgiumScratchPayoutId Button TAG in Belgium lottery is the itemid, where a negative item id = payout, default is -213001004
BelgiumScratchSaleId Button TAG in Belgium lottery is the itemid, where item id > 0 = scratch sale, default is 213001002
BlockArrivalSaleGroups Block item groups for arrival sales
BoardingcardExitMessage If not empty, show dialog with flight info result
BoardingcardExitMessageSeconds Time during which the dialog will be vissible
BoardingcardKnife1 Used for encrypting boardingcard data
BoardingcardKnife2 Used for encrypting boardingcard data
BoardingcardSalt Used for encrypting boardingcard data
BosExport BOS Export
BosExportTest Export counter for Resolut Export
Brunssum.ExpiryDateMandatory If true and expiry date not has value, show warning
Brunssum.IsMasterPos Brunssum master POS
Brunssum.MasterPosAddress Brunssum master POS ip address
BrunssumAlcoholPerc Its number for limit of percentage alcohol
BrunssumSoldierIdMinLength Input state for solider registration
BSBMessaging.Enabled If false, finish initialize bovertis service bus client
Calculator If true add item Calculator to browser menu
Cashcount.DepositAtEndOfDay Support deposit,end of day and transfer in a single screen. This option does not work when foreign currencies are enabled
CashcountCashOnly Only count cash
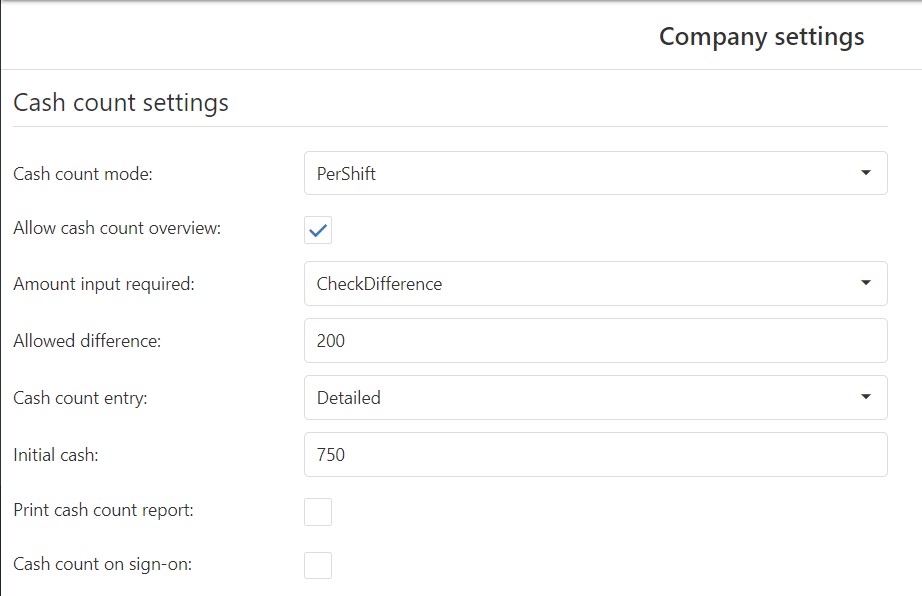
CashcountMaxDifference Set maximum allowed difference in cashcount
CashcountNotifyDifference Used for calculated the end of day different
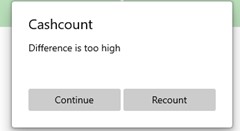
CashcountSignatures Print shopmanager signatures if difference is too high
CashcountSignOnCashOnly Do not allow other paymenttypes in cashcount signoff
CashcountUseNettoDifference Used for calculated the end of day different
CashcountUseQty Ask for cashcount qty
CashierInfoOnCreditcardSlip Print Cashier info on Merchant copy
ColWidthItemId Colwidth of the itemid column in search and sales screen. A value of 48 can show 12 digits, increase this value with 8 for each digit
CombiShopDatabase Database for pos management of combishop tables
CombishopMode If true set visible item id field else set item id
CombiShopPassword SQL password for combishop
CombiShopServer Combishop server or ip
CombiShopUser SQL login for combishop
CompanyAddress Company address
CompanyCountry Company country
CompanyId Company id
CompanyName Company name
CompanyPlace Company place
CompanyZipcode Company zip code
ContentPanelImage Picture with company logo
Countryid Country id
CountryIsoCode Country iso code
CPH.MinimumPointsCanBurn CPH Loyalty
CPH.MinimumPointsRequiredToBurn CPH Loyalty
CreditcardRefundSupervisorOnly If true, show warning, make payment is for supervisor only
CrewsaleFlightNumberEU Flight number from EU for POS flight info
CrewsaleFlightNumberNEU Non-EU flight number for POS flight info
CrewsaleFlightPrefix Flight prefix for POS flight info
CrewSaleReceiptCopy Is copy receipt required for Airport staff sales
CrewsalesLoyalty Indicates loyalty program connected to airport staff sales
CrewShopBackofficeDatabase CrewShop parameter
CrewShopBackofficePassword CrewShop parameter
CrewShopBackofficeServer CrewShop parameter
CrewShopBackofficeUser CrewShop parameter
CrewShopPlugin_URL CrewShop parameter
CrewshopSchiphol If true, scan boarding card avia
CrewShopStockQuery CrewShop parameter
CurrencyCashbackMax Maximum cash back value
CurrencyCashbackMin Minimum cash back value
CurrencyDrawerMode If true, its currency drawer mode
Datamatch.Key Api key for start up Datamatch loyalty plugin
Datamatch.Url Base URL for start up Datamatch loyalty plugin
DCCEnabled DCC
DCCInfoPanel.DCC_EuroOnBottom DCC
DCCRatesDifferentMessage Applies for LCD customer display only. Set label: exchange rates for creditcard payments can be different
DebugMode If true, debug mode is active
DebugTotals Used for testing csahcount, it will reveal all totals
DefaultCoupon.EndDate Default coupon end date printing
DefaultCoupon.FloorLimit Default floor limit on coupon
DefaultCoupon.PrintLogo If true, POS printer print image and feed
DefaultCoupon.StartDate Default coupon start date printing
DefaultCoupon.UploadCoupon If true, upload image to POS printer
DefaultEmployeeDiscount Default Employee Discount
DefaultLanguage Determines the default language
DefaultPriceLine Determines the default priceline
DefaultPriceLineFallback If true, load item on barcode from default price line
DeleteItemThreshold Set the maximum item value that can be removed without supervisor approval. Works for AppDeleteItem and AppQuantity
DepositCoinRolls Addes support for deposit coin rolls
DepositReport Parameter in financial reports
DepositSingleSealbag Single Sealbag
DepositType Its type of deposit
DeprecationReasons Afschrijvingsredenen
DeviceId Device id
DisableItemSearch Disables the search button in Resolut 4
DisableSalesScreenQty Disables the fast qty in the sales screen (5 + scanned product = 5x product)
DiscountRates Percentage discount in sale
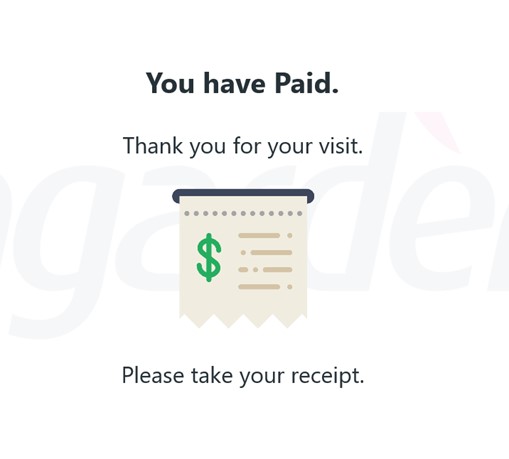
DisplayTextGoodbye1 Show goodbye text or U HEEFT BETAALD
DisplayTextGoodbye2 Show goodbye text or YOU HAVE PAID
DisplayTextWelcome1 Show welcome text or WELCOME AT KEUKENHOF
DisplayTextWelcome2 Show welcome text
DownloadChannel Channel shortcut name
DrawerCurrencyId Set currency drawer id in payment control
DrawerDevice The name of the drawer device
DrawerDevice2 The name of the second drawer device
DrawerDevice2Object Id of the second drawer device
DrawerDevice2Parameter Parameter name of the second drawer device
DrawerDeviceObject Id of the drawer device
DrawerDeviceParameter Parameter name of the drawer device
DrawerCheckDelay Delay for start making noise if the drawer is open
DrawerOpenBeep If true, a beep will be played when drawer is open
DrawerOpenBeepDelay Delay for beep in second, when drawer open
DrawerOtherId Set other drawer id in payment control
DrawerPrimaryId Set primary drawer id in payment control
DrawerSimulator If the drawer simulator is set then simulate a model dialog
DynakeyIconsAlignment Dynakeys alignement L=Left, (default) R=Right, C=invalid
DynakeyMode If true, then the dynakey screen loaded, otherwise touchscreen mode is loaded
DynakeyTextAlignment Dynakeys alignement (default) L=Left R=Right C=Center
eCardGiftBrands Travelcard vouchers
EftBankDescription Eft bank description, default the BANK payments are printed as BANK
EftDevice Device name
EftDeviceObject DLL name
EftDeviceParameter Parameters for device
EftDeviceSupportsDCC If true, show the DCC warning
EftMaxWithdrawalAmount Max Bijpinnen
EftPinpadAutoSignOnOff SIX
EftReferralEnabled SIX
EftStandaloneShowDefaultButton Added to hide default BANK button when parameter EftBankDescription has a value
EftTestPaymentAmount SIX
EmloyeeSaleOnlyOnAllowDiscount Only allow Employeesales when AllowDiscount = 1
EmployeeBarcodeCheckDigit If true last digit from employee barcode is removed
EmployeeBarcodeIsId If true, check password if the first n characters are numeric and the last not numeric
EmployeeBarcodeIsId If true, create password from barcode
EmployeeSaleMessage Text for employee sale message
EmployeeSaleOnlyOnAllowDiscount Only allow Employeesales when AllowDiscount = 1
EmployeeSaleOwnItemsOnly If true, employee sale is true, and company id != item company id, then show message: item cannot be sold to employees
EnableCUPRetry If true, set key function to browser in eft payment
EOLInterfacePassword Exact online
EOLInterfaceUrl Exact online
EOLInterfaceUsername Exact online
eTicketTemplateItemId Item id in event ticket
EuCountriesIsoCodes ISO codes of countries inside EU
EuPriceLine Eu airport price line id’s
Events.ParseContentFromDescription If true, parse the content from the product description
EVoucherProviders Evoucher providers
Exact.CanPayInvoices If true, remove invoice button is vissible
Exact.SaleHistory If true, history tab button not vissible and sale history tab page is removed from main tab pages
Exact.UseInvoicing If true, invoices tab button not vissible and invoices tab page is removed from main tab pages
ExporterKey_allpurpose Export for ResolutBos Germany
ExporterKey_allpurposeMSG Export for ResolutBos Germany
ExportGVision Export GVision on or off
ExportGVPuorCrewsaleOnTop If true, export GV Puor crew sale on top, else on end
ExportMappedCreditcardCode Export the mapped creditcard name instead of the cardname returned by the PINPAD
ExportTurnover Export turnover in sales receipts
FidsFlightInfoSvc flightinfo url (Schiphol)
FidsFlightInfoUseXamba If true, new integration of fids flight info service in Xamba will be used, default 0. If activated, url of the new service needs to be set in FidsFlightInfoSvc parameter.
FlightInfoControl If true, show label with gate info
FlightInfoOnline If true, actualize online flight number
FlightPassengerDetails If true, get flight passenger data
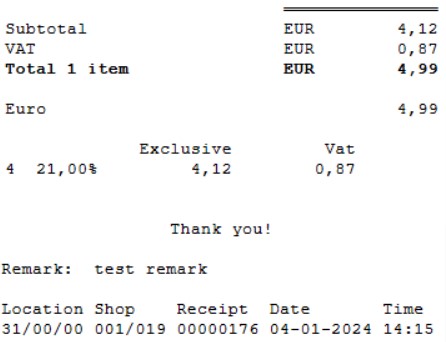
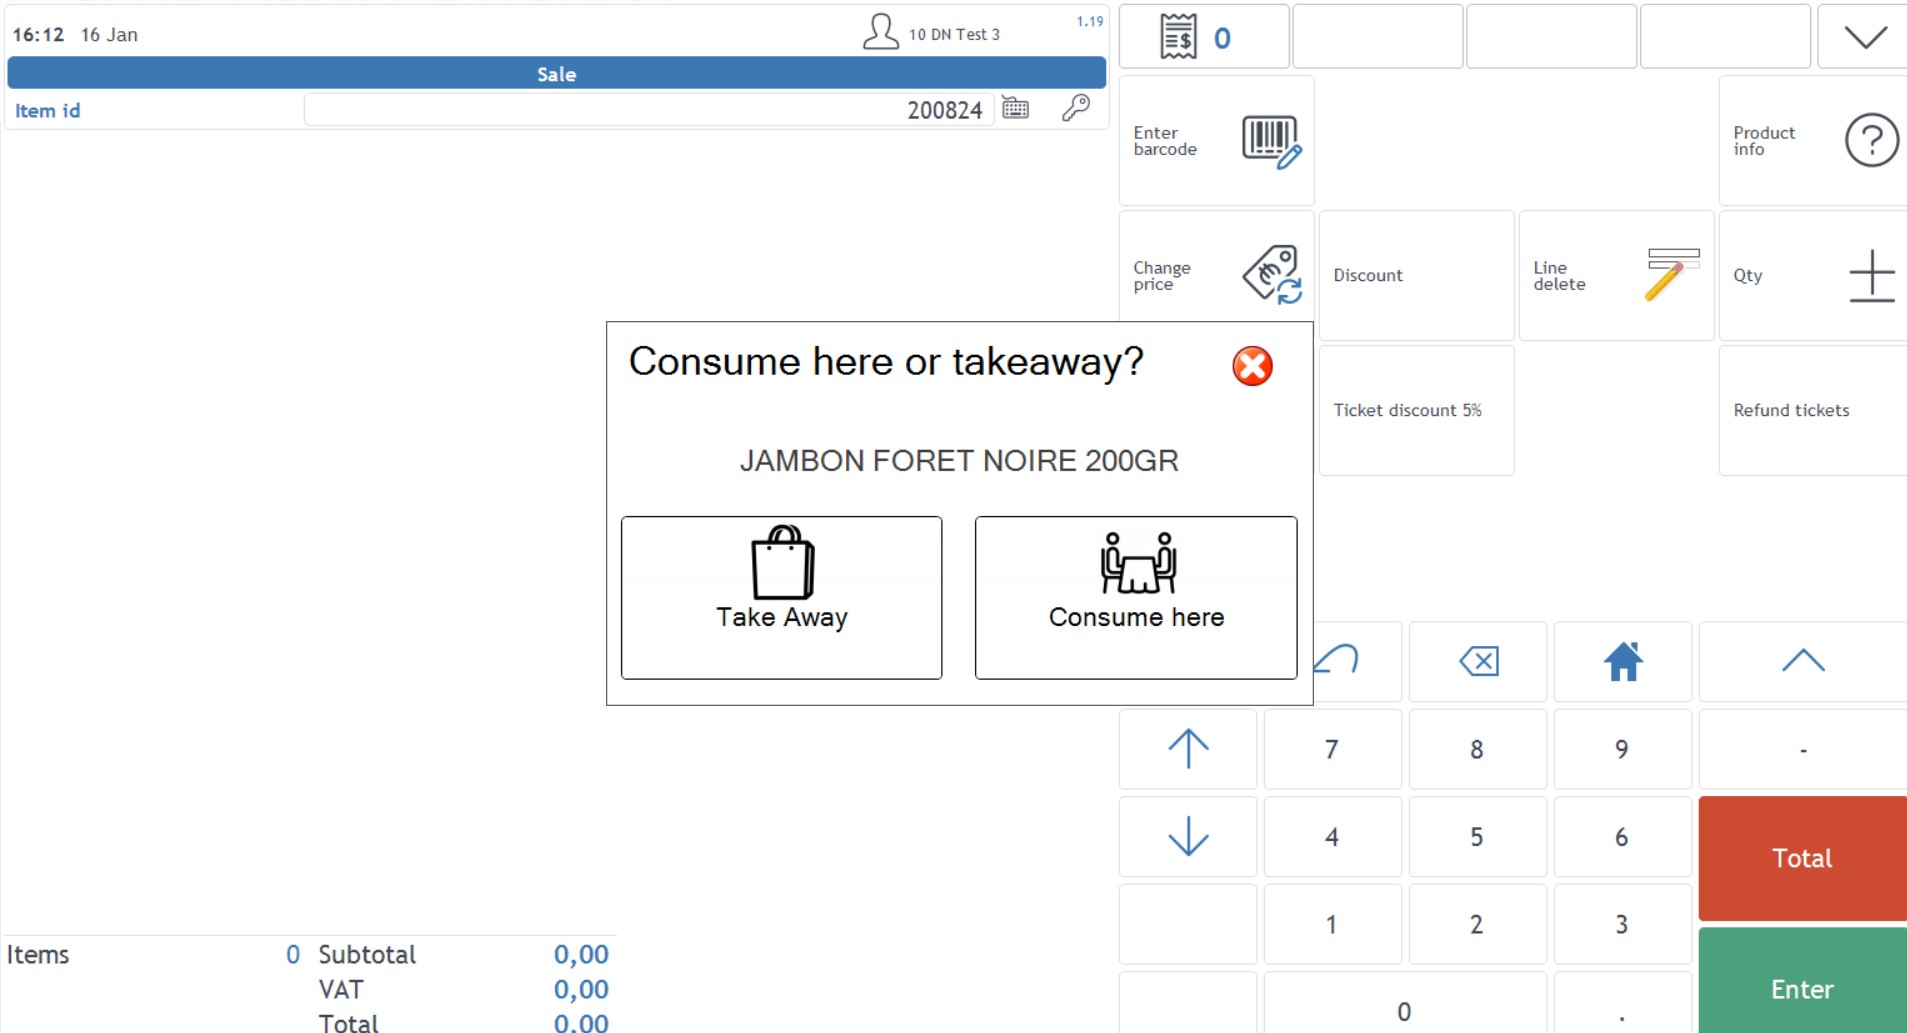
FoodMixedVat.Enabled If enabled, the question “take away/consume here?” is asked for every item (after modifier selection) with the attributes FoodServable, FoodServableVatCode, FoodServableVat, FoodServablePrice. These attributes are stored in the item column “Attributes” in the format “FoodServable,1
FreeGiftTicketAmount If free gift ticket > 1 load free gift exclude groups and description
FreeGiftTicketDescription Free gift ticket description
FreeGiftTicketExcludeGroups Free gift ticket exlude groups
FtpFolder Path to folder with FTP
FtpPassword Password for initialize FTP
FtpRemoteDownloadFilename Download file name with parameter: @s = shop @p = pos @c = country or give destination name for FTP
FtpRemoteUploadFilename Upload file name with parameter: @s = shop @p = pos @c = country or give destination name for FTP
FtpServer Server name for initialize FTP
FtpUser User name for initialize FTP
GassanStockDatabase
GassanStockServer
GassanStockPassword
GassanStockQuery Query to get information from Gassan stock info
GassanStockQueryOrder Part of query, default is order by location id
Gate Gate id
GiftcardsIgnoreOneCent If true, ignore one cent in gift cards
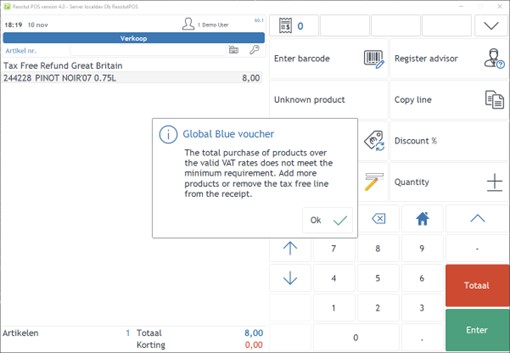
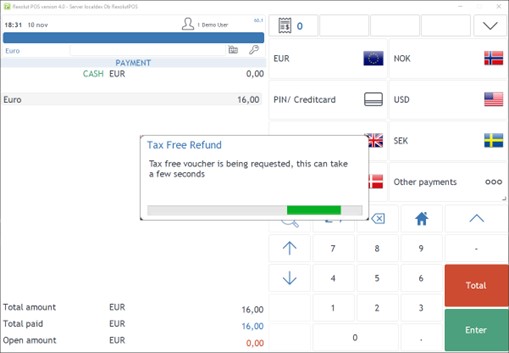
GlobalBlue.PrintReceiptCopy Added (default false) to print an extra sales receipt for global blue refunds
GlobalManagementServer Server name or IP
GlobalManagementServerTyp SQL=SQLServer, WEB=Webservice, empty=no export
GlobalWebServiceUrl Connection to central mediaservice
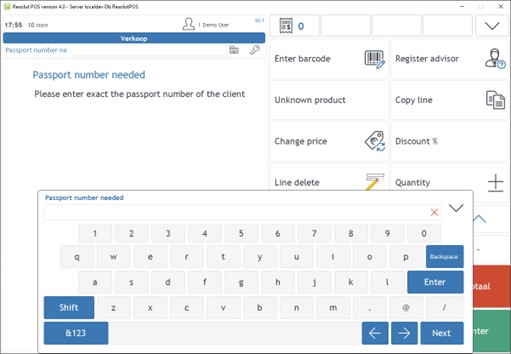
GripsAskPassportNumber Added to request passport number for tax free refund sales
GripsCountryCode Shop country code, default is 528
GripsMaxPassportNrLength Exact the passport max number of the client
GripsMinPassportNrLength Exact the passport min number of the client
GripsPassword Password for grips configuration
GripsPosId Pos id for grips configuration
GripsSenderId Sender id for grips configuration
GripsServerAddress Ip server address for grips configuration
GripsServerPort Number of server port for grips configuration
GripsShopId Shop id for grips configuration
GripsUsername User name for grips configuration
HANDEVOUCHER_ConfNR Volatile parameters for resolut configuration in POS 4
HANDEVOUCHER_PosId Volatile parameters for resolut configuration in POS 4
HANDEVOUCHER_PSIIGsmId Volatile parameters for resolut configuration in POS 4
HANDEVOUCHER_Url Volatile parameters for resolut configuration in POS 4
HideCreditcardNumber Probably obsolete because of EMV
HidePrinterIcon If true, the “printer out of paper” notification icon will never be shown, default 0
HideTaxFreeIconForNeuSales Default 0. If set, the tax-free icon for NEU sales is not shown.
ChainId Indicate sublocation
IconStyle DarkFlag is the only support theme
ICTTestmode If true, verify the result on the receipt
IdleTimeInMinutes Timeout in minutes when POS goes into idle mode
IgnoreItemPricesOnBarcodePrice Ingnore itemprice in case of barcode scan
IgnorePromotionsMaxHit this is a hot fix for import of gvision format, this will ingore the maxhit parameter
ImportDeleteTableOwnItemsOnly If true, delete all barcodes from actual company
ImportDynavision Obsolete parameter
ImportGVision GV import
ImportGVisionPath GV import
InitializePrinter If true, upload image with logo, only POS 2
InternalSaleAllowedGroups Used for internal sale and defines the item subgroups that are allowed for internal sale
InternationalPrinting Default off, use this for printing non latin charactersets. So far only Chinese is supported/tested
Intersolve.PaymentBins Identify giftcards that could be resolved by Intersolve (equalivent of TCS.PaymentBins)
IntersolveEvouchers_Password Intersolve password
IntersolveEvouchers_TimeoutInSeconds This parameter was used for certification to set a longer timeout
IntersolveEvouchers_TLS12 Inversolve
IntersolveEvouchers_Url Giftcard URL
IntersolveEvouchers_Username Intersolve username
Interview.DefaultOriginId Create default interview with specified OriginId if interview screen is skipped
Interview.NoDefault Default false, to not set a default selection in the interview screen. The cashier is madantory to select an option
InterviewZipNationalityNL Interview screen for Duch ZIP code or nationality can be switched on
Intralot.APIKey Api key for intralot
Intralot.BookPayouts For payout control in Intralot module, was removed as it is obsolete now
Intralot.ManualEntryWarningTimeout Control manual entry warning timeout to intralot, default is 15sec
Intralot.RESTRetailerId REST retail id for intralot
Intralot.RESTURL REST url for intralot
Intralot.Test.CloseSessionFail Used for re-testing the same session over and over again, if true, set REST api result
Intralot.Test.NoCloseSession This is used for re-testing the same session over and over again, a close session would remove it from host and pos
Intralot.UseRESTClient If true, reinitialize REST client
IntranetExplorer If true, show popup dialog with page from parameter intranet explorer url
IntranetExploreUrl Url for popup for intranet explorer
Invoice.CompanyAddress Volatile parameters for resolut configuration in POS 4
Invoice.CompanyContact Volatile parameters for resolut configuration in POS 4
Invoice.CompanyName Volatile parameters for resolut configuration in POS 4
Invoice.DateText Volatile parameters for resolut configuration in POS 4
Invoice.FooterText Volatile parameters for resolut configuration in POS 4
Invoice.InvoiceText Volatile parameters for resolut configuration in POS 4
Invoice.Layout Volatile parameters for resolut configuration in POS 4
Invoice.LogoFilename Select a different logo on the invoice. The logo must be in de media folder
ItemBarcodeHasCheckDigit If barcodes with item id has a checkdigit
ItemBarcodePrefix Barcode prefix for own items
ItemGroupDiscountEnd End date for one or more item groups discount
ItemGroupDiscountGroups One or more discount item groups
ItemGroupDiscountIsPerc For one or more item groups discount percentage
ItemGroupDiscountStart Start date for one or more item groups discount
ItemGroupDiscountText Description for one or more item groups discount
ItemGroupDiscountValue For one or more item groups discount value
ItemInfoAskPrintReport If set the item info module will ask to print a report before closing. Set this false and the module will close immediately, default true
ItemInfoShowEuNeuPrices If false, and retail mode is active, set default price line id
ItemStockDatabase Database name to create a connection
ItemStockPassword Password to create a connection
ItemStockServer Server name to create a connection
ItemStockUser User to create a connection
KeepBootWindow Keeps the boot Window open
KeepDrawerOpenAfterSignOff Keeps the drawer open after sign off
KeyboardAzertyMode Sets the keyboard to AZERTY mode
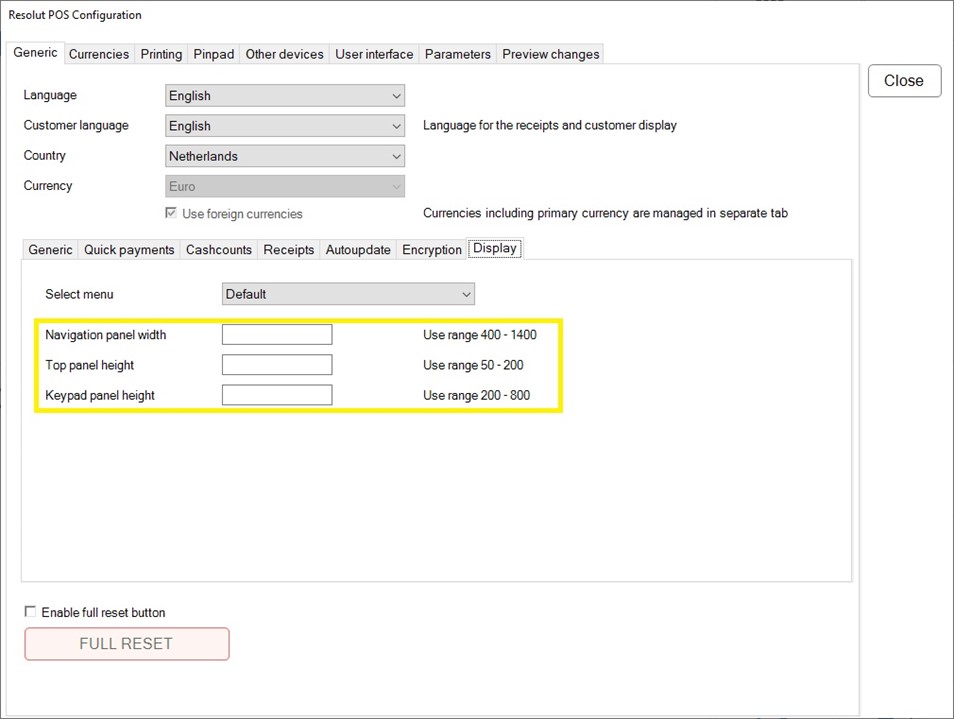
KeypadButtonPanelHeight Height of the keypad panel, allowed range is 200-800
LagardereBelgium.CleanEUPrices Used to delete 0,00 prices
LaserprinterName Laserprinter default name for A4 receipts
LaserprinterNameMobile Laserprinter name for A4 receipt from mobile terminals
LaserPrinterOnly If set all sales receipts are printed to the laser printer only
LCDCustomerDisplay.DCC_EuroOnRight DCC
LCDCustomerDisplayPlugin Customer display dll
LCDCustomerDisplaySkin Default AKO Skin
LCDGoodByMessage LCD message when the customer paid
LineDisplayDevice Name of line display device
LineDisplayObject Line display object
LiquidSealbagHeader Header voor de sealbag bonnen
LiquidSealbagTrailer Add extra lines to the liquid sealbag, see the documentation for details
LoadOldPromotions To enable old promotions on a V4 POS/SCO
LocalPriceMargin Margin price in ticket, default 0
LocationId Location id
LogFileExpiry Expiry date for logfiles
LoyaltyBarcodeMasterKey Set master key for loyalty barcode
LoyaltyCardInfoOnTop Can be set false to print the loyalty card info and totals at the bottom of the receipt, default true
MainMenuOnIdle When a input/screen dialog was open idle caused incorrect behaviour because idle dialogs keep the message loop
MarqueeScrollSpeed Scrollspeed in msec
MarqueeText Scroll text, blanks will be added by application
MarqueeTextScrollSpeed Marquee scroll speed is in mSec, default is 300
MaximumCashAmountValue Show alert when the total amount of cash payments reaches the specified value
MaximumCashAmountValueIsBlocking If true, total amount of cash payments cannot exceed value specified by parameter MaximumCashAmountValue
MaxDiscountAllowed Maximum allowed itemdiscount
MaxEvouchersPerTransaction Set max on evouchers sold per transaction
MaximumItemPrice The ‘change price’ allowed any amount to be entered, this is now limited by the MaximumItemPrice parameter
MaxReceiptAmount Limit the total receipt amount, default is 9.999.999
MaxSalesLinePrice Maximum price for a sales line
MaxTransactionAmount Max transaction amount
Media.DistributionInterval downloadinterval in minutes
Media.Password Get content from central mediaservice
Media.Username Get content from central mediaservice
Menu.AutosizeButtonText If true, buttons will be resize from swipe menu in retial navigation panel
MenuButtonBackColor Set back color, only POS 2
MenuButtonDisabledBackColor Disable back color, only POS 2
MenuButtonDisabledInnerBorderColor Disable inner border color, only POS 2
MenuButtonDisabledOuterBorderColor Disable outer border color, only POS 2
MenuButtonDisabledShineColor Disable shine color, only POS 2
MenuButtonDisabledTextColor Disable text color, only POS 2
MenuButtonInnerBorderColor Set inner border color, only POS 2
MenuButtonOuterBorderColor Set outer border color, only POS 2
MenuButtonShineColor Set shine color, only POS 2
MenuButtonTextColor Set text color, only POS 2
Menu.ColumnsCount Number of columns in the menu navigation, must be used together with Menu.RowsCount
Menu.RowsCount Number of rows in the menu navigation, must be used together with Menu.ColumnsCount
MMAllowEarnWithBurn Miles and More Interface
MMApiBaseUrl Miles and More Interface
MMApiKey Miles and More Interface
MMAwardCode Miles and More Interface
MMCreditRatio Miles and More Interface
MMDebitRatio Miles and More Interface
MMExcludeItemGroups Miles and More Interface
MMMinimalEarnAmount Miles and More Interface
MMProperty Miles and More Interface
MMTransactionTextTemplate Transactiontext template
MouseOn If false, cursor is hide
MPesa.ApiKey Api key for Mpesa client
MPesa.DemoMode For book payment in Mpesa, if false then confirm payment
MPesa.MerchantId If not demo mode, set merchant id
MPesa.ServiceURL URL for Mpesa client
MultiDrawerMode If true, more drawers is active
MultiLogon If true, more users can log in
NationalityListFontSize Font for seach result list box in select customer, default is 12
NationalitySelectorNoConfirmation If true, set nationality code
NavigationMenus Browser menu profil, default is “Default”
NavigatorPanelWidth Width of the navigation section in GUI (top panel, menu and keypad), allowed range is 400-1400
NeuDefaultPriceLine Non EU airport price line id’s
NewsItems Switch news items on
NoLiquidSealbagCopiesText If false, print count of sealbags
NonQuotaSalesOnly After command “AppNonQuotaSales” set this parameter to true, then show message about item cannot be sold without a quota registration, default is false
NumericBarcodesOnly If set all alfanumeric characters will be removed from the barcode
OfflineCCShowInformation If true, show CCInformation box in offline eft
OnScreenTouchKeyboard Configurat is the OSK must be used, default true
OpenAllDrawers Open all drawers
OpenDrawerAfterSignOff If true, open drawer after user sign off
OpenDrawerAfterSignOn If true, open drawer after user sign on
OpenDrawerNeedsSignon Only for single drawer mode this can direct POS to open the drawer only for signed on users. Default is false for backwards compatibility
OpenDrawerOnCompletePayment Defines when the drawer should be opened during payment.
OpenDrawerOnCreditcardPayment Opens the drawer after a creditcard payment where a signature is required
OpenDrawerOnEachPayment Defines when the drawer should be opened during payment
OriginAirportShortcuts Set airport shortcuts for default flags
OveruleAllowDiscount Overrule discount
OwnTransactionFromHoldOnly The sale from hold is only allowed by the cashier who put it on hold or from supervisor mode
PackageDepositItemId Default packge deposit item id (can be overidden by PackageDeposit.ItemId)
PackageDepositItemId If <=0, then message about package deposit item not configured, else set deposit ticket item
PaymentAutoCashback If true and open amount < 0, then add new pay to ticket, and update payment
PaymentOnAccountFields Add extra lines to payment on account receipt area
PayNL.IPAddress WeChat Pay IDF account
PayNL.Password WeChat Pay account
PayNL.ServiceId WeChat Pay account
PayNL.UserId WeChat Pay account
PerformanceMonitorLogInterval Logs memory usage to C:\Pos\Performance. Records the status every 15min by default, the interval can be changed by adjusting the value (15).
PlaySounds Alert sound when an unknown barcode is scanned
PlaySpeakerSound If true, alert sound when is alert, notify or message beep
PlazaDiscount Its discount in Plaza korting
POA.SortDefaultOnId If true, set default sort on current list showed in payment
PoliceMailAddress1 Rene
PosDataWebServiceUrl Webservice connector for POS
PosId Pos id
PosManagementDatabase Database for posmanagement import
PosManagementImport If 1/true use posmanagement import
PosManagementImportInterval Set interval for posmanagement import
PosManagementLastExportId Last export id from POS management
PosManagementServer POS management server name
PosManagementServer Servername of ip address of posmanagement import database
PosManagementType Its management type, whether xamba is used
PosNetRelease ip/server
PosRestartAllocatedMemoryLimitMb Amount of memory which when allocated by POS will cause the POS to automatically restart (only if no sale is currently opened), default value is 1024. Restart trigger can be overridden by parameter PosRestartAvailableMemoryLimitMb if set.
PosRestartAvailableMemoryLimitMb Minimum amount of memory which must be available in the system, otherwise POS will be automatically restarted (only if no sale is currently opened). Applies only if configured, in such case it overrides trigger from parameter PosRestartAllocatedMemoryLimitMb.
PosStateExportKey Export counter for Resolut Export
PriceBarcodePrefixes Price barcode prefixes, default 21,23,33
PriceLineEu Determines the default priceline
PriceLineNeu Determines the default priceline
PrintBalanceSignOnReceipts If true, balance sign on receipts will be printed, default 1
PrintCashierOnItemInfo If true, print cashier id and name on ticket
PrintCashoutReceipts If true, cashout (deposit) receipts ill be printed, default 1
PrintDateTimeOnTop Also print date on top of sealbags
PrintDeletedItems Don’t show deleted items on the receipt
PrintDepositSpecification Print the denominatoin on the receipt, default not set
PrintDiscountId Item discount id is shown in the journal browser and can be printed on the receipt but is default off
PrintEftTestTickets If true, print merchant receipt if not empty, and print current ticket
PrintEmployeeSaleTicketCopy Indicates if a copy receipt should be printed in case of a personnel sale
PrintItemDescription2 To have the short description printed on receipts and invoices, set this parameter to 1. The first 32 characters are the “short description”.
PrintItemDescriptionLong To have the long description printed on receipts and invoices, set this parameter to 1. The full 256 characters are the “long description”.
Printer.LaserPrinterOnly IF no printer is configured we force the configuration screen
PrinterDevice POS device for printing
PrinterDeviceObject Name of plugin for printer
PrinterDeviceParameter Parameter for printer device
PrintFailedEftLine If false, not print failed eft line, default is true
PrintFailedEftTicket If true, print current ticket
PrintFlightInfoType No your sale is vat paid free on receipt
PrintItemId If set the item id has higher priority for printing and displaying as the Alfanumeric item id. If the alfanumeric item id is empty the item id is shown anyway. Default valu is false.
PrintItemIdOnReceipt Dont print articlenr
PrintLineSeparator Prints a line separator between sales lines
PrintLocalPriceSavings If true, and is refund is false, then calculate all savings in total service
PrintLotteryPayouts Print lottery payout receipt
PrintModeEmptyLine If true, print empty line
PrintModeTicketItems If true, print description of ticket
PrintPaymentEftStandaloneReceiptCopy Print a receipt copy when the card payment was handled on a non-connected pinpad
PrintPrimaryOnCurrencyPayment Prints EUR (primary currency) on the receipt ex. Foreign Currency xxxx EUR yyyyy
PrintQrCodeOnReceipt If true, print QR code on receipt
PrintRefundSignature Ask customers signature for refunds
PrintRoundedAmount If true, print rounded amount for new law in Belgium
PrintSalesReceipts Print ticket option on / off
PrintSalesReceiptsItemGroups Groups for which receipt is obligatory
PrintSalesReceiptsItemSubgroups Define a list with product(sub)-groups that trigger the receipt to be printed
PrintSalesReceiptsNoFlagCheck Print sale receipts ignore item flag
PrintSignOffReceipts Print receipts after user sign off
PrintSignOnReceipts Print receipts after user sign on
PrintTrailerImageBeforeTicketDetails Control the location of the bitmap
PrintVatInfo If true, set body ticket for print
PrintVatInfoEmployeeSale If true vat info is printed on employee sales tickets
PrintWeightIndicator Set weight indicator g or kg
PrintWeightPriceOnReceipt If true, price per kg
PrintWeightPriceOnReceipt Print the total price per Kg on the receipt
PrintZeroVatType 0= default 1 = don’t print VAT 0% lines 2 = print only exclusive and vat print n/a
PromotionsAllDiscountOnCheapest If true, discount breakdown on lowest items
ProtectCreditcardNumbers Used in offline creditcards, not used anymore
QMatic.Connected If true, Qmatic next customer is vissible
QRCodeURL.Info Info about scan QR, default is “Scan QR code for a digital receipt”
QRCodeURL.URL URL for printable body ticket, include token and QR code
QtyAllowedCheck The item table has a property QtyAllowed that was never used in PosTicketItemSale. The check is added by by default false and can be switched on when customers needs it.
QuickCashbackMode Indicates cashback procedure, 1 = assume Euro
QuickCashPayment Set button to quick cash payment
QuickCashPaymentIconId Icon id for quick cash payment, default is 133
QuickCashPaymentPresets If true, show presets image in navigator cash
QuickCashPaymentText Text for quick cash payment
QuickEftPayment If true, show button for quick eft payment
QuickEftPaymentIconId Icon id for quick eft payment, default is 130
QuickEftPaymentText Text for quick eft payment
Quota.AllowAddRegistration Allow add registration
Quota.AllowNonQuotaSales Allow non quota sales only
Quota.BarcodeIsId Dispatch barcode to quota plugin
Quota.DefaultCategoryId Quota default category when adding members
Quota.ExportQuotaDF Export quota tickets as DF
Quota.MasterLastSyncId Read syncqueue start with number in this parameter, its last readed id
Quota.NonQuotaSalesFilter Filter for quota sales ContentType GIFT for kenia otherwise empty
Quota.NumericId Indicates that the quota id is always numeric
Quota.SkipDialog Skips the quota dialog when there are no quota sales
Quota.SqlDatabase Name of sql database for quota manager
Quota.SqlServer Name of sql server for quota manager
Quota.SqlSyncDatabase Name of sql database for quota manager, used if open sync stoarge
Quota.SqlSyncServer Name of sql server for quota manager, used if open sync stoarge
QuotaSkipNonQuotaItems Skip lines without quota information
ReceiptBitmaps If set the driver creates bitmaps for each receipt
ReceiptBitmapsToDisk If true, load file name for receipt image from sales receipt, depend on shop id, pos id and ticket number
ReceiptQrCodeHeight Height of receipt QR code, default is 173
ReceiptSaleHeader Header on top of the receipt
RefundAllowedShops Shops that are allowed to do refunds. Only shop in this list are allowed, if empty all allowed.
RefundBlockedShops Shops that are blocked on refunds, if the shop is in the list it is blocked.
RefundQualifier Always print refund ticket with NAW details
RefundSecondCashier Second cashier is needed for refund ticket
RefundTicketCopies Number of receipt for refunds
RefundTicketFields Receipt lines return ticket
RelatedItemIdIsDeposit All Related item ids are processed as package deposit
RemovableDrawerId If UseRemovableDrawer is true, set drawer id from this parameter, default is 1
ResolutBosDatabase Bos Server database
ResolutBosPassword Bos Server database
ResolutBosServer Bos Server database
ResolutBosUser Bos Server database
ResolutDataFilename Users for multiboot only
ResolutDCCReporting_Url DCC
ResolutLoyaltyAllowedIds Public schema, check if we can accept this company id
ResolutLoyaltyProvider_Url Connection to Bovertis eCardPortal
ResolutNewsItems Switch resolut news items on
ResolutPlugins Plugins list, only POS 2
RetailMode 0=Airside, 1=Landside
RISWebServiceUrl Activeer RIS export
RunInWindow If true, POS screen run in window with width 1024 and height 768
SaleChannelId Integer value
SaleMarkDeletedItems Grays out deleted items from the receipt
SaleReceiptCopies Set the number of sales receipt copies to print. Set a value from 0 to 9.
SaleReceiptEftCopies Set the number of sales receipt copies to print for sales with EFT payment only. Set a value from 0 to 9.
SalesAdvisorBarcodePrefix SalesAdvisor Prefix
SalesAppCommandsSVCheck Defines witch POS functions are only accessible to supervisor
SalesItemDescriptionMode How the description is shown in the sales screen on the ticket. 0-mix 1-large 2-small
SalesItemSubLinesSmall Sublines in sales 0-large 1-small
SalesModuleFont Font name in sales AR control
SalesScreenQtyMax Maximum qty that is allowed by fast qty (default 20)
ScaleInterfaceSupportZero If true, scale zero button is vissible
ScannerDevice Prefixes for PSC scanner
ScannerDevice2 Prefixes for PSC scanner 2
ScannerObject Name of plugin for scanner
ScannerObject2 Name of plugin for scanner 2
ScannerParameter Prefixes for PSC scanner
ScannerParameter2 Prefixes for PSC scanner 2
ScanRemovableDrawer Used for Kappe
SCO.AgeCheckScreenTimeout Timeout for age check, default is 20sec
SCO.AskForFinalDestination this is probably already set to 1
SCO.AskForFinalDestinationTimeout Timeout for asking final destination, default is 30
SCO.AssistanceAirportSealbagsMode this will allow the customer to scan L&G products, when 0 the SCO will abort the sale on the first L&G product
SCO.AutoStartup If true, self cheackout start automaticaly
SCO.BlockConnectedFlights If true the sale is not allowed for connected flights
SCO.BoardingcardTest Default screen
SCO.ContinueScreenTimeout Timeout for screen in seconds, default is 10
SCO.DefaultLanguage Shortcut of deafult language, default is ENG
SCO.EmployeeId SCO employee id
SCO.FinalGoToPosScreenTimeout Timeout for final screen go to pos in SCO, default is 5
SCO.InterviewScreenTimeout Timeout for interview screen in SCO, default is 30
SCO.Languages Shortcuts for languages, which will used in POS, default is CHN
SCO.MenuProfile Name of menu profile in SCO
SCO.PaymentScreenTest If true, add SCO payment test screen to SCO screen
SCO.PaymentScreenTimeout Screen timeout for payment
SCO.PrintReceipt Added option printing in SCO, deafult is true
SCO.SalesMenu Name of sales menu, default is “Sales”
SCO.SalesScreenTimeout Timeout for sales screen in SCO, default is 30
SCO.ScanBoardingcard Screen setup for boarding card mode
SCO.ScanBoardingScreenTimeout Timeout for scan boarding screen in SCO, default is 30
SCO.ScreenHeight Height for SCO, default is 768
SCO.ScreenWidth Width for SCO, default is 1024
SCO.ServiceBarcode Servis barcode for SCO, default is 26837847
SCO.ShowIdleMovieControl If true, setup SCO idle movie screen saver to SCO screen, else setup SCO idle screen saver
SCO.SkinFilename Skin name for selfcheckout
SCO.UsePinpadSignOnOff CCV OPI DLL was not compliant with the sign on status in the self checkout module. This is fixed by setting SCO.UsePinpadSignOnOff to false/0
SCO.WarningTimeout Timeout for message label, default is 10, minimum is 5
SCO.YouHavePaidScreenTimeout Screen timeout for final screen
ScratchLotteryBarcodeRule Barcode rule parameter, which barcode will be acept
SealbagAccountCurrency Company sealbag account currency number
SealbagAccountEuro Company sealbag account euro number
SealbagReceiptCopies Number of receipt copies to print
SecondScreen.ShowDeletedItems If true, deleted lines will be print
SelectNationalityFlags Deafult nationality flags for select, default is NL,Netherlands.png
Selfcheckout.Connected If true, starting selfcheckout connector
Selfcheckout.IPList If IP list is empty, connector not started, else self checkout connector thread start
SerialNumberRestrictedCharacters Edit to restrict specific characters, default is @”.-!@$%^&*()=+][}{;’?/><
ShopAndCollectUrl Shop and Collect webservice
ShopCollectAskMobileNumber If true, set function for SMS notification on/off
ShopCollectBitmap Shop and Collect airport map
ShopCollectLockers Shop and Collect lockers disable/enable
ShopCollectLockers S&C lockers disable/enable
ShopCollectMaximumDays Maximum days until customer returns at shiphol, deafult is 60
ShopCountryCode Shop country ISO code
ShopId Shopnummer
ShopName Name of shop
ShowAcceptGiftcardMessage If true, show payment option info
ShowContentPanel If true, show and set up info panel
ShowDigitalTime Does not show the analogue clock anymore when this parameter is true
ShowNavigationButtons Used to show navigation buttons in the swipe panel
ShowRelatedProducts Show related products, deafult is false
ShowScalePanel Uitzetten weegschaal panel (niet nodig maar scheelt ruimte)
ShowSettingsButton If true, show settings button in browser menu
ShowWeightForScannedProducts If true, calculate and show weight for item in priceline
SchengenNoSealbagsMode It is not EU flight, default is false
SignoffReport Financial cashcount
SignonReport Financial cashcount
SingleSalesMode Return to main screen after sale if 1
Skyshops.AllAllowPromotions Allow promotions when allowdiscount = 0
Skyshops.EmployeeEndDateCheck Restrict Employee sales
SoldierRegistration.Supervisor Adding a new soldier requires a supervisor ID scan, can be switched of by this parameter = 0
SortBarcodesSelectionOnVariants If true, sort barcode list, by the schema id in the item
SoundVolume Set the application volume
SqlUseIntegratedSecurity If false, use quick connect to database, else use integrated security
StaffSalesServiceEnabled Use staff sale webservice
StaffSalesServiceUrl Address of Staff sales web service
StartSalesCommand Start quota sale
StoreAddOnBarcode Indicates if we should store the complete add-on barcode or only the clean barcode
StoreDrawerOpenedByPosReceipts Store ‘open drawer’ receipts if the drawer was opened and the action was aborted
StoreEftSignOffReceipts If true, its possible store receipt about eft sign off to database
StoreEftSignOnReceipts If true, its possible store receipt about eft sign on to database
StyleDefaultFontFamily Style default font family for gui resources
SupervisorOnDrawerOpen Supervisor is needed when the drawer was opened but action is cancelled. Overrules SupervisorOnDrawerOpenSale and SupervisorOnDrawerOpenCashcount
SupervisorOnDrawerOpenCacheCount Supervisor is needed when the drawer was opened but action is cancelled. Overrules SupervisorOnDrawerOpenSale and SupervisorOnDrawerOpenCashcount
SupervisorOnDrawerOpenSale Supervisor is needed when the drawer was opened but action is cancelled. Overrules SupervisorOnDrawerOpenSale and SupervisorOnDrawerOpenCashcount
SyncDateTime Sync date and time with ticketserver
TableManager.TableList List with table numbers (optional)
TableManager.Tables Defines the number of tables
TaxFreeDeclarationImage Image of airport tax free declaration
TaxFreeDeclarationText Tax free declaration text
TaxFreeFloorLimit If this parameter > total gross sales without discount, then show warning about minimum amount is this parameter, default is 300
TaxFreeRefundModule Its DLL name for plugin tax free refund module
TaxFreeRefundPreferredCountries In country list add preferred value first
TaxFreeTicketText Text for tax free ticket, default is TAX FREE
TCSBinsWithoutRollbackSupport TCS bins without rollback support in voucher provider
TCSEVoucherProvider_MerchantId Merchant id for gift cards in TCSE voucher
TCSEVoucherProvider_SecureCode Secure code for gift cards in TCSE voucher
TCSEVoucherProvider_Url URL for gift cards in TCSE voucher
TestExportKey Export counter for Resolut Export
ThresholdGiftcardVouchers Voucher barcodes that use a Threshold amount
TicketBarcodeHeight Hieght of the ticket barcode, default 48
TicketDiscountReceiptCopy Print extra receipt copy for ticket discounts
TicketingEnabled If true ticketing throught the tickethub is enabled. The parameter is default false.
TicketNumberMax Maximum number of ticket
TicketNumberMin Minimum number of ticket
TicketStorageDb Database or empty to use default
TicketStorageServer Ticket storage server
TicketStorageType SQL=SQLServer, WEB=Webservice, empty=no export
Tikkie.Token Api token for startup Tikkie payment
Tikkie.URL URL for startup Tikkie payment
Timeclock.PrintTickets Default 1
TimeRegistrationBreak If true, set key function for break start and end
TNTBarcodesEnabled Enable scanning of TNT barcodes
TNTBarcodesItemId Article ID corresponding with TNT transactions as agreed with customer
TNTBarcodesPrefix Unique prefix agreed with TNT for this customer
TopButtons.CopyReceiptPosition Position for copy receipt, default is 2
TopButtons.InvoiceCopyPosition Position for invoice copy, default is 3
TopButtons.MinimizeMode If true, pos GUI main minimize
TopButtons.NewsItemsButtonIndex Index for news items button, default is 4
TopButtons.OnHoldButtonPosition Position for on hold button, default is 1
TopButtons.PrintReceiptButtonPosition Position for print receipt button, default is 4
TopButtons.UseCopyReceipt If true, initialize copy receipt button with print receipt copy index
TopButtons.UseInvoiceCopy If true, initialize copy receipt button with print invoice copy index
TopButtons.UseNewsItems If true, initialize news item button with news items button index
TopButtons.UseOnHold If true, initialize on hold button with on hold button location
TopNavigationPanelHeight Height of the top navigation panel, allowed range is 50-200
TotalizeContent The content of saleslines (KG, Gram) can be totalized
TouchKeyboard If true, adds a keyboard for touchscreens
TouchScreen If true, picture box with Ok is visible, only POS 2
TransfersAllowLocationInput Switch manual input on
TransfersOwnItemsOnly By default only own items can be transferred only, can be switched of with this parameter
TransfersOwnShopOnly Allow only transfers TO or FROM this shop
UpdateChannelToken Token what is needed for ACC or PRD configurations
UseAddonBarcodes If true, parsing specific barcode
UseBarcodePrices Use barcode prices
UseCombiShopServer If true Resolut is connected to a combi shop server
UseCommissionCrm IF true, initialize load query about select Crm ID from commission CRM
UseCurrencies Can be set false to disable currency/valuta functions. Does not apply for menu, default true
UseEftPrefetch EFT Pre-swipe or pre-fetch
UseExternalCouponing If false, can delete selected item
UseExtraSignOn If true, will use the extra sign-on mode functions, otherwise sign-on of second and next users are automaticly extra sign-on
UseFiscalSalesInfo Use fiscal info / sequential number for sales
UseFtp If true, inicialize FTP to comunication handler
UseIntralotServer If true use the intralot connection
UseInvoicePrinter If true, set checked true in use invoice printer cheackbox, else set checked false
UseKitchenOrders If true, add kitchen object with ticket in total servis
UseLCDCustomerDisplay Start LCD Customer display
UseLocalPrice If true, use local price label, list and margin for sale
UsePasswordChars If true show password char when the user enters ID, PIN code for access. If false use digits. Use by Sign-on module.
UseRemovableDrawer If true, load drawer id from parameter removable drwer id, default is 1
UseRenderedVouchers If true, set use rendered vouchers in grips config while initialize tex free pos interface, default is false
UseResolutMessenger 0 = messenger not active, 1 = messenger active
UseScratchLotteryBarcodes If set scratch lottery administrion is active
UseTouroperatorCommissions For check touroperator commission, if true, then initialize this manager
VatPaidTicketText Text for vat paid ticket, default is VAT PAID
VatText VAT description printed on receipt
VerifyScratchLotteryBarcodeDigit Geen checkdigit control
VoucherCashbackMessage When a voucher is given as payment this cashback message is shown when not empty.
VoucherCashbackMessageAmount Minimum amount cash back to show voucher cashback message
WaitForDrawerClose Wait for the drawer to close after each sale and other functions
WebApiPort Port for hosting web api in POS4 (currently used by ROPOS for sending invoices to print), default is 9800
WebBrowserKeyboard Keyboard for browser
WebBrowserLink Link naar website
WebBrowserLink1 Link naar website
WebBrowserLink2 Link naar website
WebBrowserLink3 Link naar website
WebBrowserLink4 Link naar website
WebBrowserPixelsScroll Web page scrolling in pixels, deafault is 30
WebbrowserScrollbars Enable/disable webbrowser scrollbar
WeborderTrailerLine Print at the bottom of a weborder
WebShopConnector If is not empty, and parameter == internal, inicialize resolut web shop, otherwise it is loaded as plugin and initialize itself
WebshopConnector.ShowCounter If true, initialize web orders changed
WeightBarcodePrefixes Prefixes for weight barcode
XambaLocationId Location id in xamba ticket
XpressSpa If not empty, run xpress spa, sales function Xpress Spa - not contracted employees could be selected
YourSaleIsTicketText Customize header text printed on ticket in flight info section above TAX FREE/VAT PAID information text (default is “Your sale is”)

Sales Screen

Available commands

Parameter Description
AppApplyLoyaltyCard Activates a loyalty card to this sale. The loyalty cards must be setup correctly and the cardname must be set as parameter.
AppDiscount
AppEnterBarcode Asks the cashier to enter the barcode manually.
AppMilesAndMoreCard Miles & More cards can be scanned, in case the card is not scannable the number can be entered. This requires a correct setup of the miles & more plugin.
AppReturnItem Sets the current selected item as refunded.
AppSaleItem Adds an item to the receipt, see Add item button for all details.
AppSetDiscount Activates a percentage discount set in the parameter on the selected item. This can be useful to add a button -10% or assign it to a perishable barcode.
AppSetPerishableDiscount Equalivent to AppSetDiscount, but this is only allowed on Perishable items.
AppTaxFreeRefund Activates a Global Blue tax refund for this sale. This requires a correct configuration of the tax free plugin.
AppTicketDiscount Activate a percentage or amount discount for the whole sale. The parameter has 3 fields: description|value|type where value is the percentage of amount, type 0 means amount and type 1 means percentage.
AppTotal AppTotal, EFT AppTotal, CASH Activates the payment screen, or shows a warning if the current receipt cannot be totalized/paid. The parameter EFT will bypass the payment screen and start a card payment. The parameter CASH will bypass the payment screen and directly book the paid amount as cash.

Parameters

Parameter Description
AllowItemIdInput This option allows the cashier to enter the item/product/sku number and is default true.
QuickEftPayment QuickEftPaymentIconId QuickEftPaymentText This is a temporary solution to activate the quick EFT button on the 4th button left of the keypad until the keypad buttons are programmable. Set QuickEftPayment to 1 and optionally set the icon id and text. When the icon id is not set icon 130 is used, set it to 0 to disable the icon.
QuickCashPayment QuickCashPaymentPresets QuickCashPaymentIconId QuickCashPaymentText This is a temporary solution to activate the quick CASH button on the 5th button next to the keypad. Shows presets amounts to select from, this value is default true.
ScaleInterfaceSupportZero Only when a scale is connect - if the scale support ‘zero’ from the cash register set this option to 1, it will show a zero button on the scale panel.
ShowScalePanel Only when a scale is connect - If set a panel with weight info is shown

Subsections of Sales Screen

Add Item Button

To add an item to the receipt the command AppSaleItem can be used, and this command has two variants:

Parameter Description
AppSaleItem Adds the item set in the parameter to the receipt.
AppSaleItemMainMenu When the item is added the application returns to the sales menu. This is useful when menu groups are used and the user prefers to return directly to the sales menu instead of pressing the back button.
AppSaleItemReturn This will add the item to the receipt as ‘returned’.

The command will not work without a parameter specifying which product should be added:

Parameter Description
ItemId Numeric only - specifies the item id i.e. 10090 will add item 10090 to the receipt.
#AltItemId Adds the item id to the receipt that has this alternate item id set. Please note that this id is not unique, in case multiple items has the same alternate item id the first found record will be added. Example #XX-1111 will add the item to the receipt with this AltItemId.
@Barcode Adds the item id to the receipt with the given barcode, for example @871234567890123 will find this barcode and add the item to the receipt.

To add a button to the payment screen:

  1. Hold Shift + Right Click on the key button to open the configuration window, and select Menu Editor.
    4A9 fig1a

  2. Choose a menu, for example; Menu:Payments, then Add button.
    4A9 fig2a

  3. Fill in the required parameters. The button is shown in “Preview – Payments”, click the green tick to confirm.
    4A9 fig3

  4. The button is added to the menu. Click the green tick to confirm again.
    4A9 fig4

  5. Click OK.
    4A9 fig5

Sales Reports in POS4

To enable sales reports to be displayed directly in POS4, set-up plugins SalesReport and ShopSalesReport in POS4, connected to the Resolut Back Office Client.

Setup

To download plugins, insert the following records into the Plugins table in the local database:

Filename Name Version Description Active
1 SalesReportPlugin.dll SalesReportPlugin 1 SalesReportPlugin 1
2 ShopSalesReportPlugin.dll ShopSalesReportPlugin 1 ShopSalesReportPlugin 1

The plugins should be downloaded next time you start POS4.

Next, create the buttons for Sales reports in the Menu editor. You will need to create a “Sales Reports” button, and a “Shop Sales Reports” button.
Open the Menu editor by holding down the Shift key and right-clicking on the key symbol, then click Menu editor.
R41 fig1

Under Tree Editor, select Menu: Main and click Add button to configure a new button.
R41 fig2

Configure the “Sales Reports“ button as follows:

Function: App

Definition: AppSalesReport

Text: Sales Report R41 fig3

Configure the “Shop Sales Reports“ button as follows:

Function: App

Definition: AppShopSalesReport

Text: Shop Sales Report R41 fig4

After configuring the buttons, they will be visible on the POS4 main screen.
R41 fig5

Easy Quantity

Easy quantity allows the cashier to type a number followed by scanning or adding the product to the sale. By default this feature is switched off but can be changed in the configuration menu or parameters.

For example, by entering 5 + scanning a product it will directly add 5x product to the sale.

Parameter Description
EasyQty.Enabled By default switched of, set this true to enable easy qty
EasyQty.MaxValue The maximum value that is accepted, default is 9.

Packaging Deposit

The Packaging deposit can be implemented in 2 ways.

The preferred way is to use the packaging deposit table, but additionally the related item id can be used. The packaging deposit is automatically added when a product with a deposit is scanned.

In both ways a deposit item must be created and the item id must be linked to the parent product. It is possible to use a single item with open amounts, or use an item for each value.

If the deposit can be returned in the store there are also two ways:

  • define one of more buttons with the AppSaleItemReturnDeposit command

  • use the deposit return screen where products must be scanned by AppPackageDepositReturns

When using buttons specify a buttons with AppSaleItemReturnDeposit and parameters \<itemid\> or \<itemid\>\|\<price\>.

For example when only an item id is specified the price will be taken from the price information, otherwise the price configured in the parameter will be used.

AppSaleItemReturnDeposit, 1001\|0.35 uses item 1001 with 0,35 price override.

If the parameter PackageDepositReturnButtons is set (default off), buttons are shown in the deposit return screen. With the minus button the quantity can be decreased. R12 fig1

Discounts

Resolut supports various type of discounts on a single item or group of items (also known as promotions, multisales or multibuys) or on the whole receipt. Discounts can be automatically applied by scanning a product, by scanning a loyalty card, or manually.

Discounts can be configured in the ERP or accounting system, portal or backoffice where the product assortment is kept, and those discounts will be applied automatically.

For single products an amount or percentage discount can be set. For promotions various type of combinations can be configured in the discount engine, for example:

•buy 3 products and get % or € discount

•buy 3 products from a group or list of products and get discounts

•buy 4 and get 1 free, or buy 5 and get the 2 cheapest products free

•buy 3 products from a list or group for 10 euro

•buy one product from group A and another product from group B and get a discount

There are a few options to trigger manual discounts by commands:

Parameter Description
AppDiscount Select or type a percentage discount to apply on the selected item.
AppSetDiscount Set a percentage discount to the select product, the parameter is the discount percentage.
AppSetPerishableDiscount In fact the same as AppSetDiscount, but this is only allowed on perishable products (tht).
AppTicketDiscount Sets a discount for the receipt, this can be either e percentage or amount. A percentage discount is given to every single product, an amount is divided equally over all products on the receipt.*
AppLoyalty It is possible to manually apply a loyalty card to the receipt by using the AppLoyalty command. This needs configuration of the loyalty card and configuration of discount schema’s.

*The parameters of this command have 3 fields: description|value|type where value is the percentage of amount, type 0 means amount and type 1 means percentage. For example: Xmas promotion|10|1 which gives 10% discount on the receipt.

Note: The ticket discount does not apply on ‘protected’ products, which are products that can get discount. For example, an iPad does not qualify for discounts, so buying an iPad and iPad cover with 10% ticket discount might result in a 1000 euro sale with only 6 euro discount on the cover, instead of 160 euro for both items.

Parameters

Parameter Description
DiscountRates A list of discounts that can be selected in the AppDiscount command. Example: 10;20;30
MaxDiscountAllowed The maximum allowed percentage allowed for AppDiscount. In AppDiscount it is possible to enter any percentage, but not higher than this value. The default value is 100 which is 100% discount allowed.

Employee Sales in POS4

Employee sales are sales with an employee discount.

  1. Employee sales can be triggered from the Sales Screen using the command AppEmployeeSale or by configuring a button with this app command via the menu editor.

  2. Once triggered, the user will be asked to scan their employee ID.
    R45 fig1

  3. The sale can then be processed as usual. Additional Employee sale info is shown.
    R45 fig2

  4. The Employee discount amount or percentage is configurable for each item in the database ItemsTable.
    R45 fig3

Add Remark from the Sales screen

Use the AppRemark command to add a remark to the receipt from the Sales screen in POS4.

  1. Open the sales screen in POS4 and add at least one item to the sale.
  2. Use Ctrl + F6 to open the Command window.
    Under “Command” enter AppRemark and click Execute or press Enter.
    R57 fig1
  3. The “Remark” field and on-screen keyboard will appear. Enter your text and click Enter or OK. You can enter a maximum of 32 characters.
    R57 fig2
  4. Complete the sale and the remark will be printed on the receipt.
    R57 fig3

Takeaway/Consume here

Through POS4 it is possible to set an item or sale to be marked either “Takeaway” or “Consume here”. During the sale the cashier makes the selection, and the result is then printed on the kitchen ticket.

Setup

Parameters

The “Takeaway/Consume here” feature is enabled by adding one of these 2 parameters to your list of parameters in POS4:

Parameter Description
FoodMixedVat.Enabled Per Item: The selection will be displayed every time an item with the correct attributes is added to the sale. Set value to 1.
FoodConsumeOrTakeAwayPerSale.Enabled Per Sale: When an item with the correct attributes is added to the sale, the selection will be displayed once and will apply to the entire order. Set value to 1.

Attributes

Only items with the correct attributes will trigger the “Takeaway/Consume here” selection.

The attributes are: FoodServable, FoodServableVatCode, FoodServableVat, FoodServablePrice

Items with these attributes can be imported into the Resolut Online portal using the SAP integration, or added to the “Attributes” column in the database manually using the following string:

“FoodServable,1|FoodServableVatCode,1|FoodServableVat,0|FoodServablePrice,3”

Use

Once the parameter and attributes are set-up, the selection will be displayed when a configured item is added to the sale.

R58 fig1

The choice of either “Takeaway” or “Consume here” will also be added to the kitchen ticket when the order is printed.

Change price

From the Sales screen, you can manually adjust the price of an item using the “Change price” button.

  1. Make sure you are in Supervisor mode, then select the item from the sale that you wish to change the price of, and choose Change price. R59 fig1

    You can also Enter the command manually. Use Ctrl + F6 to bring up the “Enter Application Command” window, enter the command AppChangePrice and hit Enter.
    R59 fig2

  2. Input the new price, then hit Enter.
    R59 fig3

    The item is now listed with the new price, and the original price is displayed underneath.
    If your prices are set to exclude VAT, the price excluding VAT will be changed and VAT then calculated afterwards.
    R59 fig4

  3. Continue with the sale.

Payment Screen

The payment screen can handle partial payments, cash payments, card payments, foreign currencies, giftcard payments, vouchers and QR / barcode payments.

The application can be configured for quick payments which enables a cash or card payment directly from the sales screen, or when pressing the Total button the payment screen is shown. The payment screen has its own menu to select all payment types.

R14 fig1

In the payment screen there are multiple flows that can be followed:

  1. Enter the amount and select the payment type:

10 + Cash: 10 euros is cash was paid

10 + Creditcard: Starts an EFT payment for 10 euro

10 + Giftcard:10 euro from the giftcard is deducted from the total

The steps above can be repeated during a sale, allowing a customer to pay with multiple payment types (this is also known as “partial payments”).

  1. Select an option to pay the remaining amount

•Selecting Cash may round the amount, choosing a foreign currency might result is a small change amount

•Selecting Creditcard starts an EFT payment for the remaining amount

•Scanning a Giftcard will try to pay the full amount, if there is not enough balance on the card the balance is redeemed

•Scanning a QR code (Alipay, WeChat Pay, PayConiq) to pay the open amount

Menu

Parameter Description
AppPaymentCash Indicates a cash payment, the parameter defines the currency that must exist in the defined currencies
AppPaymentVoucher Indicates a voucher payment, the parameter defines the type of voucher in the payment types table.
AppPaymentEft Starts a payment on the creditcard terminal for the open amount
AppPaymentEftStandalone Used to inform the point of sale a payment was taken on a standalone pinpad, addtional the type of card must be selected
AppCustomerOnAccountPayment Payment is on account (invoice), the user must select a customer from the list. Note: on account payments cannot be partial, if any other partial payments was added this method will not work
AppPaymentGiftcard This will open the giftcard screen to get a card balance and do partial payments, but this screen is rarely used as a giftcard can be scanned directly in the payment screen and in most cases customers redeem the full balance of a giftcard.
AppPaymentVoucher Adds a voucher payment to the receipt with a variable (open op entered amount) of a fixed amount, or a selection of amounts. Parameter options:: the first (or only) parameter is the type of voucher which should exists in the payment types table. After the first parameter options may apply: amount defines a fixed amount, i.e. GIFT|10.00 books 10 euro as payment with the voucher type GIFT ask will ask for an amount and will not take the open amount, i.e. GIFT|ASK list will show a list of amounts that can be selected from, i.e. GIFT|LIST|5.00|10.00|15.00 ref will ask the cashier to enter the number on the voucher, this number is not verified anywhere but just printed on the receipt
AppMilesAndMoreCard Opens the miles and more payment module
AppMPesa Starts an MPesa payment

Parameters

Parameter Description
AllowCreditcardRefunds If set refunds can be transferred to the creditcards. Refunds of amounts depends on the creditcard terminal and contracts with the acquirer. For creditcards additional costs may apply.
AllowCreditcardReversals Allow to reverse creditcard or other electronic payments from the refund receipt. Applies only for refunds. Cancallation of reversal depends on the creditcard terminal and contracts with the acquirer. It is common that reversals are only allowed on the terminal where the previous transction took place.
EftBankDescription Default description for card payments, default BANK. Most creditcard terminals and electronic paymens types return the type of case that was used, for example VISA or AMEX. If no card type was returned, the default is used. For the Netherlands the default can be set to PIN.
EftMaxWithdrawalAmount Indicates the maximum amount that can be changed cash after a creditcard payment (extra pinnen). If this amount is 0 only the open amount can be paid.
OpenDrawerOnEachPayment The name of the parameter is a bit misleading, when set it will open the drawer after a card payment.
OpenDrawerOnCompletePayment Opens the drawer only when the full amount is entered, and opens the drawer for all payment, also card-voucher-QR code payments.
QuickCashbackMode If set to 1 the point of sales directly books the change in the primary currency. For example, if the customer has to pay 8 euro, and the cashier enters 10 + EUR, the point os sale directly books -2 euro as cash and finalizes the sale.

Table Management

Resolut POS supports limited table management for hospitality and uses the “on hold” functionality to have multiple tickets on standby.

Sales lines can only be booked or added to the table through the “Table Management” screen, but can be retrieved by both the Table Management and the “on hold” function. In the example below the products are booked on table 4:

R15 fig1

The ticket can be retrieved by the default “on hold” function, or by the table management screen.

R15 fig2

Commands

There are two buttons required to store and get receipts.

Parameter Description
AppTableManagerAdd Opens the table management screen to add changes to a closed or open table..
AppTableManagerGet Opens the table management screen to get a stored ticket and close the table

Parameters

Parameter Description
TableManager.Tables Numeric value of the number of tables, i.e. if this value is 10 table 1 to 10 are created.
TableManager.TableList A list with tables comma seperated (don’t use , in the name), i.e.: Inside t. 1, Inside t. 2, Terrace t. 1, Terrace t. 2 When this parameter is set the TableManager.Tables parameter is overruled.

Printing

The application supports printing to a point of sale printer or laser printer with the following options:

• Print the receipt on the point of sale printer (optional printing can be enabled)

• Print to the point-of-sale printer and optionally show a button to print to the laser printer

• Always print to the laser printer (don’t use the point of sale printer)

Depending on local law and regulations it is also possible to print receipts only on request.

Only sales receipts are printed on the laser printer.

Commands

Parameter Description
AppPrintReceiptCopy Prints a copy of the last sales receipt, this is not registered in the journal.
AppPrintInvoiceCopy Prints the last sale to the invoice printer.
AppPrintReceipt Print the sales receipt (this only applies if the parameter PrintSalesReceipts is disabled).

Parameters

Parameter Description
Invoice.CompanyAddress Address of the company, use \n for a new line, use \n\n for an empty line.
Invoice.CompanyContact Contact details printed on the right of the invoice.
Invoice.CompanyName Defines the company name on top of the invoice
Invoice.FooterText Additional free to use footertext
Invoice.Layout Filename of a invoice layout in the Invoices folder, default is DefaultInvoice.repx
Invoice.LogoFilename Defines a different filename to be used for the logo, default is InvoiceLogo.png
LaserprinterName Network name of the laser printer
PosPrinter.LaserPrinterOnly Use the laser printer only, this applies for sales only. The application will not print other tickets to the laser printer.
LaserprinterNameMobile Additional laser printer used by mobile devices
PrintItemId If set the item id (product number) is printed on the receipt, this setting is true by default.
PrintRefundSignature
PrintSalesReceipts If this option is disabled (false) the pos will not print sales receipt but shows a button to print the ticket once.
PrintZeroVatType If set there will be no 0% VAT specification printed on the bottom of the receipt.
RefundTicketCopies
RefundTicketFields
TicketQrCodeHeight
TopButtons.UseCopyReceipt Enables a button on top to print a receipt copy that uses the command AppPrintReceiptCopy.
TopButtons.UseInvoiceCopy Enables a button on the top to print an optional invoice (laser printer) copy
UseInvoicePrinter Enables invoice printing plugin at started, use the TopButtons.UseInvoiceCopy parameter to enable a button on top

Subsections of Printing

Invoice Printing with a POS4 Device

It is possible to print invoices generated a configured Resolut POS4 application connected to a printer.

Set-up

You will need a correctly configured Resolut POS4 installation with the “Print to laserprinter” option enabled. To do this:

  1. In System configuration, Select Printing and tick the “Print to Laserprinter” checkbox.
    D6 fig1a

  2. Then go to Settings and turn on the “Use invoice printer” option with the toggle switch and select the printer from the drop-down menu.
    D6 fig2a

  3. In Configuration > Parameters enter the parameter WebApiPort. Set the value to “9800”.
    D6 fig3b

Invoice Templates

It is possible to use multiple invoice templates when printing invoices through POS4.

Invoice templates are files with the .repx extension and should be placed in the folder C:\Pos\Invoices.

To set the invoice template, in POS4 use the Invoice.Layout parameter- the value will be the name of the template file located in C:\Pos\Invoices. If there are several templates, they will be separated by a semicolon. D6 fig5

When multiple invoice templates are set in POS4, the Invoice layout template selector will be displayed before printing the invoice from Resolut Online POS. The Names in the selector are names of files of the templates. D6 fig6 Select the required layout and click OK. The invoice will be printed with the selected template on the set printer for POS4.

Resolut Online

To print via Resolut Online, you will then need to configure the Resolut Online POS app:

In the Resolut Online Portal, go to Infrastructure > Devices and under “Applications” select the application Resolut Online POS to expand it. Under “Invoice printing POS” select the required POS device.

Note Turn off the firewall on Windows with POS4

D6 fig4a

Show Prices Excluding VAT

To print invoices and receipts with your POS4 device where prices are shown exclusive of VAT you will need to make some changes in the Resolut Online Portal.

By Device

If you need all your invoices and receipts from a device to exclude VAT, you can change the default price line for that device.

  1. Go to Assortment > Price lines and create a new price line.
  2. Make sure to check the Show prices excluding VAT checkbox then click Save.
    P2 fig1
  3. Next, go to Infrastructure > Devices and open the device you need.
  4. Scroll down to “Applications” and expand Resolut Online POS. Select the new price line from the drop-down menu, then click Save.
    P2 fig2
  5. Restart your POS device. Prices should now be displayed and printed excluding VAT.
    R52 fig1 R52 fig2

By Customer

If only some of your customers need prices to exclude VAT, you can change the price line used for that customer.

  1. Go to Assortment > Price lines and create a new price line.
  2. Make sure to check the Show prices excluding VAT checkbox then click Save.
    P2 fig1
  3. Go to Customers and open the customer you need.
  4. Scroll down to “Other” and under Price line select the new price line from the drop-down menu. Click Save.
    P2 fig5
  5. Now, when you use the AppSelectCustomer command to make a customer sale,the Excl. VAT price line will be used, and prices will be displayed excluding VAT without changing the default price line for the device.
    R52 fig1 R52 fig2

NOTE: If a discount is applied to the sale, it will be applied to the Total including VAT, not only to the subtotal that excludes VAT.

Selfcheckout

Once a device is set-up to exclude VAT, the same VAT breakdown will also be displayed when the device is put into selfcheckout mode. R52 fig3

Long Item Description

Resolut Online

In the Resolut online portal, each item has a description.
The first 32 characters are the “short description”. The full 256 characters are the “long description”.

Short and long descriptions are shown in the product info screen.
R48 fig1

To have the short descriptions printed on receipts and invoices, set the PrintItemDescription2 parameter to 1 in the parameters table.

To have the long descriptions printed on receipts and invoices, set the PrintItemDescriptionLong parameter to 1 in parameters table instead.

The long description as shown on a receipt:
R48 fig2

Menu & Navigation

The navigation menu has 3 areas: the top navigation buttons, the dynamic buttons and the keypad.

On the top navigation the following features can be programmed:

Print receipt, use when receipt printing is optional (if allowed by fiscal laws)

Print receipt copy, this prints a copy of the last sale receipt

Tickets on hold, this is by default positioned on the left button (see parameter TopButtons.UseOnHold).

Print receipt, print receipt to a laser printer

To the right, the downward arrow icon V is used by default to show the main “Handies” drop-down menu, but can also be used to minimize the application when used as a Windows application (see parameters).

R17 fig1

Subsections of Menu & Navigation

Parameters

Parameter Description
Menu.AutosizeButtonText Enabled if the text on the buttons is resized to fit. If the text on the button is large it might get unreadable.
TopButtons.MinimizeMode Change the default behavior of the upper-right buttons (V) to minimize the application.
TopButtons.OnHoldButtonPosition Defines the position of the onhold button on the top navigation buttons, this is default 1 (first button on the left).
TopButtons.UseInvoiceCopy If set a button on top is visisble when a sales receipt (last sale) is available, the button will print the invoice on the configured laser printer. Default is not set
TopButtons.UseOnHold Enabled the tickets onhold/standby on the top navigation and this value is default true.
TopButtons.PrintReceiptButton Shows a button to print the last sales receipt after a closed sales. This feature depends if the parameter PrintSalesReceipts is set, if this parameter is not set this parameter is ignored. The value is default set.
MultiDrawerMode Settings this value allows multiple drawers to be used per cashier of shift, this means one or more cashiers can work on drawer 1, one or more cashiers can work on drawer 2, etc. This setting must be disabled to yse CurrencyDrawerMode mode. Default value is false, this means a shift or cashier can only sign in on ’the drawer’, or in case of a currency drawer, on both drawers.
WaitForDrawerClose When enabled the point of sales waits for the drawer(s) to be closed before the cashier can continue with the next customer or other functions. The option is disabled by default but it is recommended to enable this feature as the cash drawer cannot remain open.

Menu Editor

Resolut POS supports multiple configured menus (menu profiles) that can be changed in the configuration. The menu editor can be opened with AppMenuEditor.

The menu “Default” should always be available, but additional menus can be installed and configured in the parameter NavigationMenu.

With the menu editor it is possible to quickly change the navigation menu in the interface, or by editing a text file. Text can also be pasted into the text area.

R19 fig1

The menu text has the following structure:

\$Profile=Default

@Main\|Main

1\|App\|AppSignOn\|Text\|Sign-on

2\|App\|AppSignOff\|Text\|Sign-off

3\|App\|AppOpenDrawer\|Text\|Open drawer

@MainOptions\|MainOptions

1\|App\|AppBrowseJournal\|Text\|Journal viewer

@Handies\|Handies

1\|App\|AppPrintLastSalesTicket\|Text\|Last receipt copy

2\|App\|AppCalculator\|Text\|Calculator\|IconId\|1002

The first line should always start with \$Profile=\<name\>, this is the name of the menu which can be configured in the parameter .

There are a few pre-defined menu names:

@Main the main menu.

@MainOptions the menu behind the options (^) button.

@Handies the menu that opens on top-left (V) button.

@Sales the sales menu.

@SalesOptions the menu behind the options (^) button in the sales screen.

@Payments the menu in the payment screen

@Boardingcard the menu in the boarding cards screen (airports only)

@BoardingcardOptions the menu behind the options (^) button

Each menu can have one or more buttons in the following format where the parameter and icon id are optional:

<button>|<button action>|<Command or menu>|(Parameter | VALUE)|Text|<menu text>|( IconId |<number>)
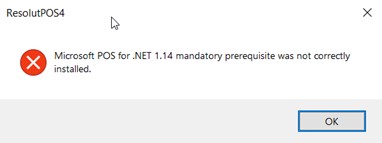

This example sets the 4th button with command AppSales and Text “Sales” with icon 12:

4|App|AppSales|Text|Sales|IconId|12


This example sets the 4th button with command AppSales and Text “Sales” with icon 12:

8|Menu|OptionsMenu|Text|Other options|IconId|20

Handies Menu

The Handies menu is opened using the top-right downward arrow icon V and can be configured with the @Handies menu section: R20 fig1

@Handies\|Handies

1\|App\|AppPrintLastSalesTicket\|Text\|Last receipt copy

2\|App\|AppCalculator\|Text\|Calculator\|IconId\|1002

3\|App\|AppSupervisor\|Text\|Supervisor\|IconId\|1003

Font Size

Font size in POS4 is configurable in the Skin editor. Open the Skin editor by holding down the Shift key and right-clicking on the key symbol, then click Skin editor.
R40 fig1

On the right side of the “Resolut Skin editor” window you can see an overview of fonts in each of the basic sections.
You can set the Default font on the top right. Below you can select an individual Section, for which you can set text properties such as size, color and the properties of other visual elements.
R40 fig2

Resizing Panels

The height and width of the POS4 navigation panels can be adjusted.

These panels are:

  • The Top Navigator Panel
  • The Navigator Panel
  • The Keypad Button Panel

R54 fig1

To adjust these panels, hold down the Shift key and right-click the key symbol. Go to System configuration > Generic > Display.
Enter a number for each panel that is within the range given. When you are happy with your changes, click Save. You will need to restart POS4 for the changes to be visible.
R54 fig2

You can also resize the panels by directly adjusting the value of the parameter.

Parameters for configuring respective widths/heights:

Parameter Description
NavigatorPanelWidth width of the navigator panel - default 0
TopNavigationPanelHeight height of the top navigator panel - default 0
KeypadButtonPanelHeight height of the keypad button panel - default 0

Cashiers and Drawers

Resolut POS can work with a single drawer and single user, multiple drawers and multiple user configurations, or with a separate drawer for foreign currencies.

Parameter Description
DrawerOpenBeepDelay When the parameter WaitForDrawerClose is set the application will start beeping when the drawer stays open to warn the cashier. This parameter sets the time in seconds that the drawer will remain open before the beeping starts. The default is 10 seconds but can be adjusted to give the cashier more time to close the drawer.
DrawerSimulator This value is only needed when using the drawer simulator in test environments, in any other environment don’t set this parameter.
WaitForDrawerClose When the sale is finished the application will wait for the drawer to be closed before accepting the next customer, Default value is “false”.
DefaultCustomerLanguage By default the customer language (receipt and customer display) are set by DefaultLanguage, but can be overruled by this parameter.

Subsections of Cashiers and Drawers

Authorisation

Cashiers can authorize in 3 ways:

•Enter the employee id

•Enter the employee id + password

•By scanning a barcode (can be overruled by a supervisor)

By default, cashiers can enter the employee id. To enable a password set the parameter AuthorizePincode.

Parameters

Parameter Description
AllowMultipleLogon Settings this value allows multiple users to work on a shift or drawer. Default value false.
AllowUserSignOff Allows a single user to sign off, applies only when AllowMultipleLogon is set.
AuthorisationMode This value may have 2 values: 0 (default) - cashiers must authorize by barcode only, the employee id cannot be entered 1 - cashiers can enter their id,, optional a pincode can be requesed when parameter AuthorizePincode is set.
AuthorizePincode If set the cashier should enter the employee id and pincode, this value is ignored when AuthorisationMode is set to 0.
CurrencyDrawerMode Use this setting to configure a separate drawer for foreign currencies. Related to this setting are: DrawerPrimaryId (the primary currency drawer id, for example Euro’s) DrawerCurrencyId (the foreign currency drawer id) DrawerOtherId (drawer for vouchers or other valuable papers) The drawer id’s should be configured in the DrawerDevice settings.
MultiDrawerMode Settings this value allows multiple drawers to be used per cashier of shift, this means one or more cashiers can work on drawer 1, one or more cashiers can work on drawer 2, etc. This setting must be disabled to yse CurrencyDrawerMode mode. Default value is false, this means a shift or cashier can only sign in on ’the drawer’, or in case of a currency drawer, on both drawers.
WaitForDrawerClose When enabled the point of sales waits for the drawer(s) to be closed before the cashier can continue with the next customer or other functions. The option is disabled by default but it is recommended to enable this feature as the cash drawer cannot remain open.
OpenDrawerAfterSignOn Opens the drawer after a succesful sign on
OpenDrawerAfterSignOff Opens the drawer after a succefsul sign off

Cashcount & Deposits

If Cashcounts are enabled, the money in the drawers can be counted at the start and end of a shift. Resolut keeps track of all cash payments in all currencies that flows in and out of the drawer and can detect cash differences at the start or end of the shift.

Deposits make it possible to take money out of the drawer and put it into a safe or sealbag. Bank sealbags with barcodes can be used to match transfers to the bank account.

Parameter Description
Cashcount.DepositAtEndOfDay If set deposit and cashcount can be entered in a single screen. This works only without foreign currencies.
CashcountCashOnly If set true (paper) vouchers and paper giftcards, as specified in the PaymentTypes, are counted automatically. The default is false.
CashcountSignOnCashOnly IF set true only cash can be counted at sign on.
DepositType Valid values: Sealbags (default) - the cashier is asked to enter of scan the sealbag number. Set this value to None to skip this step.

Cash Out (POS4)

Setup

The “Cash Out” function allows you to record cash withdrawals.

To use Cash Out, the “CashOutCodes” table in the POS4 database must first be filled in.
Be sure to enter a CashOutId and CashOutCode for each description.
R46 fig1

Using Cash Out

  1. Cash out can only be run from the Main menu using the app command AppCashOut.
    Select the “Type” from the menu.
    R46 fig2

  2. “Third party expenses” requires you to fill in: Reference, Description, Amount and VAT.
    R46 fig3

Click OK. A “Third party expenses” receipt is printed.
R46 fig4

  1. For “Deposit fee” you are required to enter a Reference, Description and Amount.
    R46 fig5

Click OK. A deposit receipt is printed.

R46 fig6

  1. For “Staff expenditures” no additional information is required.
    R46 fig7

Click OK. A Staff expenditures receipt is printed
R46 fig8

Customer Display

The customer display is fully configurable, and can be configured by adding bitmaps and an .xml file into a .zip file and saving it in the /pos/media folder.

Advertisements and a playlist can be placed in the media folder in two .zip files. One is for advertisements when the cash register is in the main screen (not in the sale screen), the other advertisements are usually smaller and shown on the second half of the customer display.

The customers display can be enabled in the configuration screen or by adding the following parameters:

Parameter Description
UseLCDCustomerDisplay Set this value to 1
LCDCustomerDisplaySkin The name of the file in the media folder, for example “SkinBovertis.zip”
CustomerDisplayLeftScreenLocation Set X position of the customer screen

A sample customer display can be downloaded from https://download.bovertis.nl/SkinBovertis.zip.

Customer display XML

The file “skin.xml” shows you where all the parts of the customer display will be displayed, in which color and font, and which features should be selected.

Device Set-up

Resolut POS supports the following devices:

• One receipt printer (optional when laser printer is connected, otherwise mandatory)

• One laser printer (optional)

• One or more barcode scanners (optional)

• One pinpad (creditcard terminal) (optional)

• One or more Cash drawers (optional)

Subsections of Device Set-up

Payment Terminals

Resolut supports a wide range of payment terminals (AKA EFT terminals).

Parameter Description
EftDevice Specific configuration depending on terminal
EftDeviceParameter Specific configuration depending on terminal
EftDeviceObject The plugin/dll name.
EftBankDescription Most payment terminals return the name fo the card that was accepted like Visa or Maestro. In case the terminal does not return this information (rare) this description will be used. Default NL; PIN Default: BANK

Available plugins:

Payplaza

Adyen Pinpad

Subsections of Payment Terminals

Payplaza

For test devices set EftDeviceParameter to the ECR id given by payplaza followed by 2 empty options, this will automatically select the defaults for test, for example:

EftDeviceParameter="ECR_BOV12345|||"

For production devices, use the following configuration where the first part is the ECR id (replace [PASSWORD] with the production password):

EftDeviceParameter="ECR_BOV12345|Bovertis_Client-2020.p12|[PASSWORD]|"

Adyen Pinpad

This is a guide to installing Adyen pinpad plugin dlls and configuring them correctly in POS4.

Installation

The latest signed version of the Adyen pinpad integration plugin can be downloaded from the Bovertis downloads page:

https://downloads.bovertis.nl/downloads.html

Use your Bovertis domain account to access the downloads page and find “AdyenEFtDevice plugin (ZIP)”. R42 fig1

The following 3 dlls are needed from the zip package:
Adyan.dll

AdyanEftDevice.dll

System.ComponentModel.Annotations.dll
R42 fig2

Copy the dlls to C:\POS\Plugins.

Configure the EFT device in posconfig.xml, as follows:

\<parameter name="EftDevice"\>Adyen pinpad\</parameter\>

\<parameter name="EftDeviceParameter"\>S1EL-000150204800715;192.168.2.XX;8080;POS01_01;BovertisBV;test_key;mK9Bgz8N;TEST;EUR;172.20.16.1\</parameter\>

\<parameter name="EftDeviceObject"\>AdyenEftDevice.dll\</parameter\>

Mandatory parameters:

TerminalID

TerminalIP

LocalPort

LogicalPOSID

MechantAccount

encryption_key_name_from_adyen_portal

encryption_key_value_from_adyen_portal

Optional parameters:

TEST/PROD

curency_iso_code

PRINT_MERCHANT_RECEIPT

Local_IP_Override

More info:

PRINT_MERCHANT_RECEIPT - this triggers to print also merchant receipt, if not provided in parameters, POS will not print it even if it is available.

Important: The first start of POS4 must be done using the administrator privileges. This is because POS4 installs the Adyen certificates into the local certificate store in order to communicate with the pinpad in a secure way.

Troubleshooting

Security error in the devices.log

Unblock dlls in the windows file explorer. Right click on every dll and click details > unblock.

Null reference after payment button is clicked in POS

Please ensure that you see these lines in devices.log (in bold):

29/07 11:22:15.410> AdyenEftDevice Adyen certificates are already installed

29/07 11:22:15.424> AdyenEftDevice Local IP:10.14.XX.144

29/07 11:22:15.424> AdyenEftDevice Local IP overrided from parameters:10.14.XX.144

29/07 11:22:15.424> AdyenEftDevice Setting up listener on IP:10.14.XX.144 and port:8080

29/07 11:22:15.427> AdyenEftDevice Http listener task started

29/07 11:22:15.427> AdyenEftDevice Environment:PROD

29/07 11:22:15.427> AdyenEftDevice Currency set to:EUR

29/07 11:22:15.427> AdyenEftDevice Print merchant receipt:False

29/07 11:22:15.427> AdyenEftDevice Terminal URL:https://10.14.XX.140:8443/nexo/

29/07 11:22:15.427> AdyenEftDevice Merchant account:POS-Capi-Lux-Venetie

29/07 11:22:15.427> AdyenEftDevice Encryption details created

Payment notifications not visible in POS

Please ensure that the IP address of the POS is the same as used for http listener started by the POS:

29/07 11:22:15.410> AdyenEftDevice Adyen certificates are already installed

29/07 11:22:15.424> AdyenEftDevice Local IP:10.14.XX.144

29/07 11:22:15.424> AdyenEftDevice Local IP overrided from parameters:10.14.XX.144

29/07 11:22:15.424> AdyenEftDevice Setting up listener on IP:10.14.XX.144 and port:8080

29/07 11:22:15.427> AdyenEftDevice Http listener task started

29/07 11:22:15.427> AdyenEftDevice Environment:PROD

29/07 11:22:15.427> AdyenEftDevice Currency set to:EUR

29/07 11:22:15.427> AdyenEftDevice Print merchant receipt:False

29/07 11:22:15.427> AdyenEftDevice Terminal URL:https://10.14.XX.140:8443/nexo/

29/07 11:22:15.427> AdyenEftDevice Merchant account:POS-Capi-Lux-Venetie

29/07 11:22:15.427> AdyenEftDevice Encryption details created

Error setting up the notification http listener

In case there is a network error or “access denied” error when setting up the notifications http listener, use “netsh” command to allow access to set this up:

netsh http add urlacl url=http://+:8080/ user=Everyone

netsh http add urlacl url=http://169.254.XX.4:8080/ user=Everyone

Payment can not be started, transaction failed

Please ensure that the testing transaction amount is higher than 1Eur. In POS4 you can use this parameter: EftTestPaymentAmount (app command: AppEftTestTransaction)

Drawers

The drawer can be configured by one or more sections of the following parameters:

Parameter Description
DrawerDevice Wepos: the logical configured name in Opos or Wepos For other devices this parameter may be empty.
DrawerDeviceParameter Empty if only a single drawer is used, or a unique id for multiple drawer configurations.
DrawerDeviceObject The DLL name to be used (plugin)
DrawerSimulator This parameter is only neccessary in test environments when using the drawer simulator. Never enable this option in productional environments.

Available plugins:

Parameter Description
DrawerSimulator.dll Used for test enviroments, a virtual drawer is shown on the screen. For this plugin the parameter either the parameter WaitForDrawerClose must be disabled, or DrawerSimulator must be enabled.
WeposCashDrawer.dll Use for real cashdrawers in OPOS or WePOS configurations. DrawerDevice must be set.
PosDeviceDrawerMoneyBoxV2.dll A virual drawer that is not connected, but can be used for cashcounts.

Note: if multiple drawers are used the configuration must be stored in the PosConfig.xml instead of the database, currently the database is not support duplicate parameter names.

Public Transport Card Reader Configuration

  1. Add the Parameter to the Database

Copy the parameter PublicTransportPlugin.dll to C:\POS\Plugins, and add it to the POS database in the “Plugins” table

Public Transport parameters are loaded from QChessOvcSettings.xml. If needed, they can also be added manually to the POS4 parameters. 

ParameterName Description
PublicTransportWebUrl Example: https://xyz.nl/
PublicTransportRestUrl Example: https://xyz.nl/ovhost/rest
PublicTransportMerchantCode Example: XYZ
PublicTransportCashRegisterId Example: XYZACC01
APublicTransportReaderSerialNumber Example: XYZACC01
  1. Install the card reader (Windows)

Note: you will need to use a real reader, not a simulator

Download, unzip and Install CPR-USB-driver-build20161102.zip and Feig dependent libraries.zip from our Public Transport folder. R39 fig5

Note: Contact our Support Team if you need access to this folder.

Insert the Feig Reader into a USB port. The drivers will be automatically installed.

Install usbreader 1.7.0 from the Public Transport folder:

usbreader_windows_1_7_0.exe

Directory: C:\usbreader

Unzip the Reader configuration file and place the configuration files usbreader.properties and QChessOvcSettings.xml in the folder C:\usbreader.

Double click on c:\usbreader.exe

This will connect the reader to the backend. You should see a green display and the message “Klaar voor gebruik” (Ready to Use).
R39 fig1

You will also see a green dot in the system tray. An orange dot indicates a connectivity error. A blue dot indicates “in progress”.
R39 fig2

The log file is located in C:\usbreader\log\info.

  1. Create buttons in POS4 using the Menu editor

Hold Shift + Right Click on the key button to open the configuration window, and select Menu Editor. Then choose a menu and click Add Button.
4A9 fig1a 4A9 fig2a

Add the buttons:

“AppPublicTransportCardInfo”

“AppPublicTransportCardLogs”

R39 fig3

  1. Test the Card reader

    1. Login to the test company, and start the POS with a card reader
    2. Place a test card on the card reader
    3. Click Card info
    4. The receipt is printed
    5. Click Log
    6. The receipt is printed

R39 fig4

  1. Printing Additonal Information

In order to print additional information for subscription products on the receipt, such as “Centrumzone”, “Star value”, “Valid from”, and “Valid until”, set the parameter PrintItemDescriptionLong to “1”.

R39 fig6

Accounting Integration

Exact

With Exact online integration the following features are implemented:

•Retrieve debtors

•Retrieve open invoices

•Retrieve sales history

•Pay invoices

•Create orders from sales

Parameter Description
Exact.CanPayInvoices If set invoices can be paid
Exact.SaleHistory If set the tab sales history is shown in the Exact screen
Exact.UseInvoicing If set the tab Invoices is shown in the Exact screen

Branding

For customers and Resellers it is possible to brand the Resolut POS by replacing images. All images can be downloaded here. It is important to not change the size of the images to ensure they have the correct look.

It is also possible to change colors and the default font in the POS application itself in the configuration menu.

Only Resellers can change the application name, and different image file names are used to prevent them be overwritten in updates.

Subsections of Branding

Startup

The startup window is visible when the application starts (It will remain only in case of an error). There are two bitmaps that can be configured by the parameters below:

Parameter Description
BootLogoImage Name of the filename in /pos/media, default is ResolutBootLogo.png. The logo is placed on position 1.
BootInfoImage Name of the filename in /pos/media, default is ResolutBootInfo.png. The logo is placed on position 2.

The copyright info can be changed for resellers on request. The default filename for resellers is ResolutBootLogo\<Code\>.png where code is the reseller code, but if the parameter is set the file name is overruled by the parameter.

R31 fig1

Main Screen

Depending on the configuration the main menu has an empty area where a bitmap can be shown. To enable this area, set the following parameter:

Parameter Description
ShowContentPanel Enables the content panels and show by default CompanyLogo.png
ContentPanelImage The file name of the image, default is CompanyLogo.png

For reseller the default file name is CompanyLogo\<Code\>.png.

R32 fig1

Application Icon

The application icon is shown in some screens and can be replaced by a different application icon, the size is 64x64 pixels:

Parameter Description
ApplicationIconImage The filename of the application icon or image.

For reseller the default file name is CompanyLogo<Code>.png.

R33 fig1

Resellers

Resellers will receive their own reseller code and activation code that should be placed in the file /pos/rsinfo.

This will change the copyright signs and product name in the POS software.

The 3 letter reseller code is used to load the correct bitmaps if not overruled by the bitmap parameters.

Piggy Plugin

Configuration for POS4:

  1. Have PiggyPlugin.dll in POS/Plugins file (you’ll need to unblock PiggyPlugin.dll in Properties)

  2. In database table Plugins, add the following:
    R35 fig1a

  3. In the POS4 menu configuration, in the Sales Menu, create these buttons:
    R35 fig2 R35 fig3

Configuration without Resolut Online Portal:

  1. Directly in POS4 shift+right-click on the key button and select System configuration
    R35 fig3a2

  2. Under Parameters, add the following parameters:

    PiggyBaseUrl https://api.piggy.nl/api/v3

    PiggyPosApiKey R35 fig3b3

Piggy reward matched to ROP promotion

If a user wants to trigger a Resolut Online Portal promotion after using a Piggy reward, he can do so by setting identical trigger values.
R35 fig3c2

  1. In the Piggy portal, go to Loyalty > Rewards > Select reward > Advanced and set the DiscountTrigger code.

  2. In the Resolut Online Portal go to Discounts > Promotions and select a promotion. Then under Triggers set the “Trigger type” to “ManualAction” and set an identical Value from piggy portal.
    R35 fig3d2

  3. Now if a user selects this reward manually via the PiggyReward button, the Resolut Online Portal promotion will be applied.

Selecting Piggy contact by scanning email:

A user can select a Piggy contact by scanning their email. To do this, first create a contact identifier by signing in to https://bovertis.app.piggy.eu/ with an email address that is connected to the Piggy account. Once this is done, it will be possible to scan a Piggy contact’s email directly from the salescreen and the Piggy contact will be selected.

Using Piggy in POS4:

  1. In the Sales screen, select Piggy. R35 fig4a

  2. Search and select a contact. Users can also scan a contact’s email address directly from the salescreen instead of searching for the contact via the Piggy button.
    R35 fig5a

  3. In the Sales screen, choose a reward with PiggyReward. A contact must be already selected.
    R35 fig6a

  4. The chosen contact, their points and the chosen reward will be displayed on the Sales screen.
    R35 fig7a

  5. The contact’s remaining points will be shown on the receipt.
    R35 fig8a

Piggy giftcards in POS4:

  1. To set up the Piggy giftcards plugin, create a record in the parameters table. (EVoucherProviders / ROPOSLoyaltyProvidersPlugin.dll) R35 fig9

  2. Then copy the .dll file in the plugins folder (default is C:\Pos\Plugins) and unblock it in Properties.

  3. Piggy giftcards can then be used for payment by scanning the CardNumber in the payment screen. R35 fig10

Subsections of Piggy Plugin

Cancel Loyalty Payments (POS4)

Discounts added to a sale using Piggy or other loyalty schemes, can be cancelled before the sale is complete.

Setup

In order to cancel partial payments in POS4, first add a “Cancel” button to the Payments menu.

Open the Menu Editor, select Menu: Payments and click Add button > Edit.
R49 fig1

Set the definition as ‘’’AppDeletePayment’’’, then click the green tick to save the new button.
R49 fig2

Use in POS4

To cancel a partial payment on the Sales screen, click on the line you want to cancel, and press Cancel.
R49 fig3

The discount will be removed, and you can continue with the sale.

Create a Piggy Contact

It is possible to create a Piggy contact, and link an identifier to it, directly in POS4.

Create a Contact

Select Functions > Piggy. The contact search window will appear. Select Add contact.
R50 fig1

In the “Add Contact” form, only the Email field is mandatory. Only one Piggy account can be created per email address.
Fill in the additional fields if needed, and select Create to save the contact.
R50 fig2

If the email address has already been used, the message “Contact already exists” is shown:
R50 fig3

In the Menu editor, add a new button to the Sales menu. The definition is AppPiggyLinkIdentifier.
R50 fig4

Then from the Sales menu, once a Piggy contact is selected, a link identifier can be assigned by selecting Piggy Link Identifier.
R50 fig5

The “Please scan the identifier” popup window appears. Scan the identifier with the scanner.
R50 fig6

If the link identifier has already been used, the message “Contact identifier already exists” is shown:
R50 fig7

If the linking was successful, the Piggy contact can now be selected from the Sales Screen by scanning the linked identifier.

Add Piggy Credit

It is possible to check the balance of a Piggy gift card and print a balance overview, as well as add credits to the Piggy gift card.

Make sure you already have the Piggy integration configured.

Configuration

Before you can add credits to Piggy gift cards via POS4, you must first configure the item for them in the Resolut Online Portal.
Open the portal, go to Items, and create a new item. Check the checkbox Ask price and select a Min. and Max. price.
J25 fig1

Go to Configuration > Integrations > Piggy and select the item in the Item for change amount operation field.
J25 fig2

Setup in POS4

In POS4, open the Menu editor and create a new app command button for the “Top-up” function. Enter the parameter AppManageGiftcard.
R51 fig1a

Check the Balance and Add Credits in POS4

From the Sales screen, click the Top-up button that you created in the previous step. The card number screen is shown, ready for the gift card to be scanned. You can also enter the gift card number manually.
R51 fig2

Once the gift card is scanned, 2 options appear: Print Balance or Top Up the card.
R51 fig3

Selecting Print Balance prints a reciept with the balance shown.
R51 fig4

To add credit to the gift card, select Top Up and choose the amount to be added to the card. You can also input the amount manually. The preset values can be configured via the menu editor.
R51 fig5

Select Enter to add the item to the sale. Then complete the sale to finish topping-up the gift card.

Transfers

The Transfer function allows the transfer of stock from one location to another to be managed through the POS4 system.

Setup and requirements

  1. Setting up the database:

    In the ResolutPOS database add the following lines to the Parameters table:

    • ItemTransfer.AllowCancelTransfer

    • ItemTransfer.AllowEnterReference

    • ItemTransfer.AllowEditTransfer

    • ItemTransfer.AllowQty

    • ItemTransfer.InvalidateWrongTransfer

    • ItemTransfer.ScanItemsOnReceival

    • ItemTransfer.SendingEmployeeCanBook

    If items should be scanned on recieval, set ItemTransfer.ScanItemsOnReceival to “1”. R36 fig1

    If items should not be scanned on recieval, set ItemTransfer.ScanItemsOnReceival to “0”. R36 fig15

    In the POS database add the “AppItemTransfersV2” line to the ApplicationCommands table. R36 fig2a

    In the BOS database add the “POS Transfer” line to the “ClientMenu”.
    R36 fig2

    In the BOS database apply patch: 365_PosInventoryList_Patch01.sql

    In the Ticket storage database apply patch: StockDocumentTable_Patch01.sql

  2. Setting up the Resolut BOS Client

    The transfer report module can be added through the menu editor. Go to Menu Editor > New Record and add module code 422.
    R36 fig3a2

    A cashier that wants to do transfers must be assigned a role that has the POS Transfer access key and Transfer report key allowed. When the access right is synchronized to POS, it will be applied to the user on his next signon to the POS.
    R36 fig3b2 R36 fig3c2 R36 fig3d

  3. Setting up in POS4

    In the menu editor, the transfer button must be configured.
    R36 fig4

  4. Incorrect transfer notification

    When a transfer is incorrect, the user can be notified by email. This can be configured in “PosModuleExporter”. E-mail addresses can be added to the last key.

    <appSettings\>
    
    <add key="MailServer_Host" value="mail.bovertis.nl" /\>
    
    <add key="MailServer_Port" value="25" /\>
    
    <add key="MailServer_UserName" value="" /\>
    
    <add key="MailServer_Password" value="" /\>
    
    <add key="ItemTransfer_NotificationsEnabled" value="1" /\>
    
    <add key="ItemTransfer_NotificationsAddresses" value="test1@bovertis.nl , test2@bovertis.nl" /\>
    
    </appSettings\>
    

Usage

  1. Creating a transfer

    A user with the right to transfer can create a transfer by selecting Transfers > New Transfer
    R36 fig5 R36 fig6

Select a destination store.
R36 fig7

Then scan the products with a scanner or manually input the barcode. Lines can be removed.
R36 fig8

After confirming the transfer, it is stored and the receipt is printed. The barcode on the bottom will be scanned when receiving the transfer.
R36 fig9

  1. Cancel a transfer

    To cancel the transfer before the items are sent to the store, open the transfer module and scan the transfer barcode. The transfer must be canceled in the same shop where it was created. After confirming, the transfer is canceled.
    R36 fig10

  2. Receiving a transfer

    Open the transfer module and scan the transfer barcode. If the shop id does not match the destination of the transfer, the transfer is canceled and must be returned to the sending store. If the transfer was already booked or cancelled, a message is shown.

a) Scan items on Recieval The user must scan all the items and confirm.
R36 fig11

When there is a difference the message ‘transfer incorrect, please correct or cancel’ is shown. When the transfer is incorrect, the employee can cancel the transfer and the transfer must be returned to the sending store.
R36 fig12

b) Full booking of transfer on Recieval The user must verify the items in the transfer. If the content matches, the transfer can be booked. R36 fig16

  1. Cancel an incorrect transfer (returning)

    When a transfer was delivered in the wrong store, or if there was a difference upon delivery, the goods must be returned to the sending store.

    In the sending store, open the transfer module and scan the transfer barcode. The POS recognizes that the transfer was created in this store and cancelled in another store, and asks;

    “Transfer was delivered to the wrong store. Can you confirm all items returned?”

    or

    “The receiving store found differences. Can you confirm all items returned?”

    When this is confirmed, the transfer is cancelled.
    R36 fig13

  2. Transfers report

    In the ResolutBOS client, in the Transfer report module, the user can see information about finished transfers.
    R36 fig14

Promotions

  1. Promotions can be created in the Resolut BOS client using the new Promotions module. Open the Resolut Back office client and go to Data > New Promotions Module. Click the “New record” button to create a new promotion.
    R37 fig1

  2. In the Details tab, under “Basic info”, give the promotion a Number, Name, and Promotion class. You can also enter Locations and a Description at this stage.
    R37 fig2

Next, set the Mix level:

  • No mix – eligible items must be mixed only from one list

  • Half mix – eligible items can be mixed from any lists

  • Full – eligible items must be mixed from all lists

    The Item count sets how many items need to be added to a sale to apply the promotion.
    Check the Scaling checkbox to apply the discount to more than the added items.

    The Active checkbox determines whether the discount is active or inactive. Check the checkbox to activate the discount, uncheck to deactivate.

  1. Next go to the “Filters” field to enter your general settings for the promotion.
    R37 fig3

    Start date/End date – Make sure to enter a Start date. Then fill in the other fields you need.

    Start time/End time – The promotion is only applied during certain hours (e.g. happy hour from 15:00-16:00).

    Day of week – The promotion is only applied on the chosen day.

    Min. amount/Max. amount – The promotion is only applied if the total amount of the included items is within the amount range.

  2. Benefit configuration
    R37 fig4

    Select a benefit type from the Type drop-down menu:

    Perc – percentage discount
    Amount – amount discount
    ForAmount – fixed price

    Split benefit – Check this box to spread the benefit across all added items.

  3. Promotion triggers
    R37 fig5

    Click Add to create the new trigger.

    Select from the Trigger type drop-down menu:

    BarcodeScan – employees can scan a barcode to trigger the discount.

    BarcodePattern – a barcode with certain pattern triggers the discount:

  • 123* pattern triggers all barcodes starting with 123 (123 can be set to any number)

  • *123 pattern triggers all barcodes ending with 123 (123 can be set to any number)

    ManualAction – a manual action is needed to trigger the discount.

    LoyaltyCard – customers get a specific discount when they use their loyalty card.

    Multi use – Check this checkbox to allow the discount to be used multiple times in one sale.

  1. “Price line benefits” are benefits applied to specific a price line.
    R37 fig6

    Click Add to create a new price line benefit.

    Select a Type from the drop-down menu:

    Perc – percentage discount
    Amount – amount discount
    ForAmount – fixed price

    Add an Amount and Item count then choose a Price line from the drop-down menu.

  2. Promotion details
    R37 fig7

Min. hit/Max. hit – range of items included in the current list.

Min. amount/Max. amount – amount range for the current list.

Advantage – item is allowed to apply benefit.

Item, Subgroup, Group or Brand can be chosen from the list.

Exclude – items will not be included in the list.

Promotions Validation when using POS2

If using Resolut Back office with POS2, you will need to add the parameter POS2Validations to the database.

When enabled, a warning will be displayed if a promotion is created which is not compatible with the POS2 system.

Subsections of Promotions

Basic discounts

Here are some examples of 5 different types of discounts your can create in the Resolut Back Office Client.

  1. Discount X% on all items from group, triggered by a button

    Basic info – fill in the Name, and Promotion class. Set the Mix level to “No”, the Item count to 1, and make sure the Active box is checked.

    Add Locations and a Description if required.
    R38 fig1

    Filters - make sure to fill in a Start date. The other fields are optional.
    R38 fig2

    Benefit configuration: Set the benefit Type to “Perc” (percentage), and under Benefit amount set a percentage.
    Benefit count should be set to 0.
    R38 fig3

    Triggers: Set the Trigger type to “ManualAction”, enter a Barcode number, and make sure the Multi use box is checked.
    R38 fig4

    Assortment filter - fill in a Name, and make sure the Advantage box is checked.
    R38 fig5

    Details, choose a Subgroup or Group from the drop-down menu.
    R38 fig6

  2. Buy 3 pay for 2 of the same product, automatically triggered

    Basic info – Add a Name, and Number. Set the Promotion class to “Free Gift”, the Mix level to “No”, and the Item count to 3. Make sure the Active box is checked. Add Locations and a Description if required.
    R38 fig7

Filters - make sure to fill in a Start date. The other fields are optional.
R38 fig2

Benefit configuration: Set the benefit Type to “Perc” (percentage), and the Benefit amount to 100%. Set the Benefit count to 1.
R38 fig8

Triggers: There is no need to add a trigger, this promotion is applied automatically.

Assortment filter - fill in the Name, and make sure the Advantage box is checked.
R38 fig5

Under Details, Enter the Item.
R38 fig9

  1. Buy 3 products from a group, get the cheapest for free, triggered automatically

    Basic info – fill in Name, and Number. Set the Promotion class to “Free gift”, the Mix level to “No”, and the Item count to 3. Make sure the Active box is checked. Add Locations and a Description if required.
    R38 fig10

Filters - make sure to fill in a Start date. The other fields are optional.
R38 fig2

Benefit configuration: Set the benefit Type to “Perc” (percentage), and the Benefit amount to 100%. Set the Benefit count to 1.
R38 fig8

Triggers: There is no need to add a trigger, this promotion is applied automatically.

Assortment filter - fill in the Name, and make sure the Advantage box is checked.
R38 fig5

Under Details, Select a Subgroup from the drop-down menu.
R38 fig11

  1. Buy product A, get product B for free

    Basic info – fill in a Name, and Number. Set the Promotion class to “Free gift”, the Mix level to “Full”, and the Item count to 2. Make sure the Active box is checked. Add Locations and a Description if required.
    R38 fig12

Filters - make sure to fill in a Start date. The other fields are optional.
R38 fig2

Benefit configuration: Set the benefit Type to “Perc” (percentage), and the Benefit amount to 100%. Set the Benefit count to 1.
R38 fig8

Triggers: There is no need to add a trigger, this promotion is applied automatically.

Details – Enter the Name “1”, then enter the Item. The Advantage box should be unchecked.

Details –Enter the Name “2”, then enter the Item. The Advantage box should be checked.
R38 fig13 R38 fig14

  1. Buy product A (€2,50) + B (€3), pay €4

    Basic info – fill in a Name, and Number. Set the Promotion class to “Free gift”, the Mix level to “Full”, and the Item count to 2. Make sure the Active box is checked. Add Locations and a Description if required.
    R38 fig15

    Filters - make sure to fill in a Start date. The other fields are optional.
    R38 fig2

    Benefit configuration: Set the Benefit type to “ForAmount”, the Benefit amount to 4, and the Benefit count to 1.
    R38 fig16

Triggers: There is no need to add a trigger, this promotion is applied automatically.

Details- Enter the Name “1”, then enter the Item. The Advantage box should be checked.

Details- Enter the Name “2”, then enter the Item. The Advantage box should be checked.
R38 fig17 R38 fig18

Partial Invoice Payments

  1. Invoice payments in POS4 must be enabled in the database.

    Hold Shift and right-click the key icon, then select Database Tool.
    Under Parameters, set the parameter Exact.UseInvoicing to 1.
    R44 fig1a

  2. In sale select a customer using AppSelectCustomer and Search for a customer with invoices

  3. Go to the Invoices tab. Use the amount input field, and the + and - buttons to select invoices.
    R44 fig2

There are 4 ways how to create an invoice:

  1. No invoice selected – create a payment without an invoice by entering the amount to the input field, but do not choose any invoice
    R44 fig3

  2. One invoice is selected – create either a full or a partial payment of an invoice

    • Full payment- Select the invoice using the plus button and pay the whole amount (cash or EFT)
      R44 fig4

    • Partial Payment- Select the invoice using the plus button and enter the amount in the input field
      R44 fig5

  3. Multiple invoices are selected and the amount input matches the selection – create a payment for the selected invoices

  4. Multiple invoices are selected and the amount input does not match – not possible, an error is displayed.
    R44 fig6

“World of Delights” BOS Terminal

Pick order

Orders can be assigned to a terminal or a user for picking in the Resolut Back office Client.

In the side menu select Handheld Tools > Handheld order management.
Select the item for picking under Ax orders and assign it to a specific user or terminal under Handheld order. Click Preview order to view a preview.
Click Create order to finish the assignment.
R47 fig1

To pick the assigned order tap pick order in the Bos Terminal.
R47 fig2

At the location chosen from the list, scan the item barcode and confirm the picked quantity. Repeat for every item on the list.

If the delivery is in crates, scan the crate barcode as well. Barcodes on crates used for the current pick list can be displayed by tapping the blue CRATES button. When a crate barcode is scanned, the text of the CRATES button will be changed to the count of scanned crates, i.e. (2) for 2 scanned crates.

The finished pick order has to be uploaded to the server.
Tap UPLOAD. You will be asked to scan all the barcodes of the crates used by picking the order. If a barcode doesn’t match, you will be asked to scan all the barcodes of the crates again. If barcodes match, the order will be uploaded to the server.

Current pick order can be canceled by tapping CANCEL.

Locked items

An item becomes locked, when it cannot be picked or there is not enough stock during the pick order procedure.

A list of locked items can be displayed by tapping locked items.
R47 fig3

Items from the list can be selected by scanning the item barcode or by tapping on the cell containing the item.

Once you have selected a locked item tap OPTIONS and choose from 3 options:

  1. Unlock item – this option will unlock the selected item in this location.
  2. Order from bulk – will send an order to Axapta.
  3. Set quantity – option to change quantity in this location. Enter the real quantity of the Item.

Once you have changed the state of the locked item, the list must be uploaded to the server by tapping UPLOAD. If you want to cancel the status change for the item, tap CANCEL. The list will be closed and changes to items will be canceled.

Planned movements

The hand terminals can be used to move stock of items from the bulk to the pick location.

To assign a planned movement, open the Resolut Back Office Client and click Handheld Movements Management. Under Ax Movements select the items for the planned movement. Under Handheld movement assign the selected items to a Terminal or Employee and click Create movement. For a preview of movements click Preview movement.
R47 fig4

The assigned movement can be opened in the BOS Terminal app by tapping planned movements. In the upper right corner of the button the count of assigned planned movements is shown.
R47 fig5

In the list of movements, select an item by scanning the barcode or tapping the item cell. Next, enter the quantity of the item for the movement.
Approve the upload of the movement by tapping YES or cancel the movement with CANCEL.
R47 fig6

Crate loading

For loading crates tap load crates in the Bos Terminal.
R47 fig7

Next, scan the barcodes of loaded crates from the list. Scanned crates will be marked with a checkmark in the list.
R47 fig8

Unload a crate by scanning the crate barcode or tapping on its cell in the list and tap UNLOAD. The checkmark for the unloaded crate in the list will be deleted.

After loading crates from the list, the list must be uploaded to the server by tapping FINISH. To cancel the list tap CANCEL.

Using handheld device physical buttons

Instead of tapping the colored buttons on the screen, physical buttons on the device, of the same color, can be used.

Instead of scanning, you can enter a barcode by pressing the physical . (dot) button. After that, the barcode can be entered using the physical keypad.

Global Blue Tax-free Module

Global Blue tax-free module functionality allows cashiers to register customer’s sales as tax free.
The customer pays full price including VAT, however when the sale is finished a tax refund request receipt is printed.
Using this document, the customer can ask for a tax refund at a designated location.

Configuration

Global Blue tax-free module is provided by plugin dll Bovertis.Grips.dll. This plugin dll needs to be configured in the Parameters table. Since plugin connects to an external Global Blue service (GBS), connection to this service needs to be configured in as well.

Mandatory parameters

Parameter name Value Description
TaxFreeRefundModule Bovertis.Grips.dll Configures plugin dll
GripsServerAddress string GBS address
GripsServerPort numeric GBS port
GripsSenderId string GBS sender indentificator
GripsUsername string GBS username
GripsPassword string GBS password
GripsShopId string GBS shop identificator
GripsPosId string GBS pos identificator; placeholder @shopid@ can be used within parameter value, ShopId parameter value will be replaced there

Optional parameters

Parameter name Value Description
GlobalBlue.PrintReceiptCopy boolean If set, an extra copy of sale receipt will be printed (default false)
GripsAskPassportNumber boolean If set, customer’s passport number needs to be entered when initiating tax-free sale (default false)
GripsMinPassportNrLength numeric Minimum length of the customer’s passport number, used only with parameter GripsAskPassportNumber (default 6)
GripsMaxPassportNrLength numeric Maximum length of the customer’s passport number, used only with parameter GripsAskPassportNumber (default 20)
GripsCountryCode numeric Code of country where shop is located (default 528)
GripsServiceId numeric GBS service ID (default 8)
TaxFreeRefundPreferredCountries string Comma-separated list of numeric country ids, which should be listed first in the customer country selector (default empty)
UseRenderedVouchers boolean If set, tax refund form rendered by GBS is printed, otherwise the form is generated on POS (default false)

Plugin installation

Plugin dll Bovertis.Grips.dll can be installed either manually into C:\POS\Plugins directory or (having parameter TaxFreeRefundModule properly set) it will be automatically downloaded when POS is started.

Logo for tax-free form receipt

To configure a logo to print at the beginning of the tax refund form receipt, create file TaxFreeLogo.bmp in the C:\POS\Media directory.

Trigger for tax-free sales

Create a button with command AppTaxFreeRefund in POS sales menu.

Tax-free flow in POS4

To start the tax-free sale, press configured button with command AppTaxFreeRefund in the sales menu. Selector for customers country will be opened. Select a country and confirm.
R55 fig1

If entering of customers passport number is configured, enter the passport number and confirm.
R55 fig2

After confirmation, the tax-free sale is initiated and the tax-free indicator is shown in the receipt area.
R55 fig3

NOTE: Pressing the AppTaxFreeRefund button again will deactivate the tax-free sale and the tax-free indicator will be removed.

When products are scanned and entered in the payment screen the minimum total amount requirements for the sale are checked. This minimum requirement amount is provided by Global Blue service. If the requirement is not met a warning is shown.
R55 fig4

If the minimum amount requirement is met the sale can be completed. After successful payment a request for the tax-free voucher is made to Global Blue service.
R55 fig5

When the request is successful, sale receipt is printed together with the tax refund form.
R55 fig6

Tour Operator Commissions

Tour operator commissions allow cashiers to register a customer’s sales for a particular tour operator. From each sale the tour operator can receive a commission as an incentive for bringing in the customer. This motivates the tour operator to bring in more tour participants and support them in their purchases, which in the end will increase total turnover of the shop as well.

Database configuration

Parameters

  • UseTouroperatorCommissions (mandatory) - set to 1 to activate tour operators panel in sale screen
  • UseCommissionCrm (optional) – if set to 1, tour operators will be loaded from table CommissionCrm instead of default table Touroperators. Only records with ContactType = 1 will be loaded.
  • TouroperatorMaxCommission (optional) – maximum commission amount for a session can be specified per tour operator in format: operatorId1|maxCommission1,operatorId2|maxCommission2

Plugin

Configure and activate plugin CommissionSales.dll in Plugins table.

If installing plugin manually, copy plugin dlls CommissionSales.dll and UdpDiscovery.dll into C:\POS\Plugins directory.

Tour operators configuration

Tour operators need to be configured manually in POS database. By default, they are loaded from the table Touroperators.

Alternatively, they can be loaded from table CommissionCrm if parameter UseCommissionCrm is set. In such a case, table columns are almost identical.

Column name Values Description
OperatorId numeric ID of the tour operator, will be exported on posticket
OperatorName string Name of the tour operator, will be exported on posticket
CommissionAmountVisitor Not used
DefaultCommissionPercentage 0-100 Default commission percentage (only for CommissionRule = 0)
CommissionRule 0, 1, 2 Type of commission calculation
ScaleValues e.g., 0 - 7.50 = 5% | 7.50 -99999 = 7.5% Commission percentages specified for various total amounts (only for CommissionRule = 1)
IsOnAccountPayment bool Specifies whether tour operator is paid out immediately when visit ends or later on account

Data synchronization

All data related to tour operator commissions are automatically synchronized between all tills in the local network. This for example means that when a tour operator session is opened on one till, it will be automatically opened on other tills as well. Similarly, when the tour operator session is being closed and the commission for the tour operator is being calculated, transactions registered to this tour operator from all tills are aggregated. After closing the session, it is closed on all tills.

Data synchronization is performed via an underlying UDP connection. No configuration is necessary, POS automatically searches for other tills in the local network. IP addresses of discovered tills are stored in file C:\POS\Data\CommissionSalesIpAddresses.xml. To check the connection status of the POS, this file can be manually inspected.

Commission calculation

The commission is calculated at the end of the tour operator session. Commission amount is always calculated from total net amount of all sales registered on that tour operator during this session. Total commission amount is calculated using the formula below, the exact commission percentage depends on the tour operator setting in the CommissionRule column.

  • commissionAmount = totalNetAmount * commissionPercentage / 100

The maximum total amount of commission paid out for session can be limited per tour operator using the parameter TouroperatorMaxCommission.

CommissionRule = 0

Fixed commission percentage is taken from DefaultCommissionPercentage setting of the tour operator.

CommissionRule = 1

Commission percentage depends on the average total amount calculated over the tour operator group size:

  • averageTotal = totalNetAmount / groupSize

Then, the commission percentage is by default resolved as follows:

  • averageTotal < 7.5 => commissionPercentage = 5%
  • 7.5 <= averageTotal < 10 => commissionPercentage = 7.5%
  • 10 <= averageTotal < 15 => commissionPercentage = 10%
  • averageTotal >= 15 => commissionPercentage = 12.5%

Custom total amount ranges and commission percentage values can be specified in ScaleValues setting of the tour operator. If ```averageTotalv will not fit any range, the resulting commission will be 0%.

CommissionRule = 2

Commission percentage depends on the average total amount calculated over performed transactions:

  • averageTotal = totalNetAmount / totalTransactions

Then, the commission percentage is by default resolved as follows:

  • averageTotal < 7.5 => commissionPercentage = 0%
  • 7.5 <= averageTotal < 11 => commissionPercentage = 7.5%
  • 11 <= averageTotal < 14.5 => commissionPercentage = 10%
  • averageTotal >= 14.5 => commissionPercentage = 12.5%

This setting currently does not support custom ranges.

Commissions flow in POS4

To start the tour operator session, go to the sales screen and tap the magnifying glass icon on the tour operator panel to open the Tour Operator management screen.
R56 fig1

Start a new tour operator visit by tapping Start visit.
R56 fig2

Enter guide name, group size, select tour operator and confirm by pressing Start visit again. Group size is mandatory only for tour operators with CommissionRule = 1.
R56 fig3

The tour operator session is now open. Operator-commission-started transaction is created. Transaction ticket is not printed, it is visible only in BOS.
R56 fig4 R56 fig5

Multiple tour operator sessions can be opened, each tour operator can have only one session open at a time.
R56 fig6

To register the current sale to a tour operator, click on the tour operator icon. To not register the current sale to any tour operator, click on the User icon on the right side of the tour operator panel. The active tour operator can be identified by the green light and can be changed at any time.
R56 fig7

Once the sale is finished, no tour operator information is visible on the customer receipt. Tour operator information is visible only in Back Office.

Customer receipt: R56 fig8 Back Office: R56 fig9

To end the tour operator session, navigate to the tour operator management screen by tapping the magnifying glass button in tour operator panel in sale screen. Select the tour operator you want the session to end for and tap End visit.
R56 fig10

Once the session is closed, an operator-commission-ended transaction is created and the transaction receipt is printed. If the tour operator has IsOnAccountPayment set to 0, a copy of the transaction receipt is printed first with the Signature section.

A copy of the operator-commission-ended transaction receipt is printed only if the tour operator has IsOnAccountPayment = 0. This copy contains a Signature section:
R56 fig11

Standard operator-commission-ended transaction receipt, printed on each session closing:
R56 fig12

If the tour operator has IsOnAccountPayment set to 0, a cash out transaction is created as well to pay out the tour operator. A cash out ticket is printed.
R56 fig13

Finally, the tour operator is removed from the list of opened tour operator sessions.
R56 fig14

Export to BOS

When a tour operator session is opened or closed in POS, a ticket transaction of type OperatorCommissionStart or OperatorCommissionEnd is created. PosModuleExporter processes these transactions and creates/updates records in the BOS table PosTouroperatorCommission.

Note: Database patch creating table PosTouroperatorCommission seems to be missing and should be recreated. Only patch 279_PosTouroperatorCommission_Patch001.sql exists, adding additional columns.

Resolut Backoffice Client reports

There are two reports in Resolut Backoffice Client that work with the PosTouroperatorCommission table:

  • TouroperatorCommissionReport – report module, access key 4083
  • ManagementInfoCommissionReport – XtraReport document, access key 4087

These reports can be used when paying out commissions to tour operators with on account payment configured (IsOnAccountPayment set to 1).

Client Information Interview

In POS4 if the parameter InterviewZipNationalityNL is set to 1, it enables the customer interview dialog before every sale.

If the parameter PrintInterview is set to 1, values from the interview are printed on the receipt, and also available in the pos interview RBC report.

When this dialog is shown, the user inputs values into the fields (Postcode, House number etc), and confirms with the green tick. If the user clicks “Geen Antwoord” the values remains empty and no value is shown on receipt.

R60 fig1

After completing the sale, the values are printed on the receipt.
R60 fig2

There is also an option to set the parameter DoNotAskForInterviewZipNationalityHouseNumber to 1, which will hide the “Huisnummer” input field in the interview.
R60 fig3

Troubleshooting

To begin troubleshooting any issues in POS4, start by checking the Performance log.

You can find the Performance log on your machine, by navigating to C:\Pos\Performance.

4B1 fig1

Open the file to see a record of the recent status of your POS4 setup.

4B1 fig2

By default, the performance log records the status of the app every 15 minutes. However, this can be adjusted by changing the value of the parameter in the database.

Subsections of Release Logs

POS4 Release Notes Sprint 61

POS4 – v. 4.0.8363.2

General Information

A new version of POS4 is now available on the Bovertis downloads page:

Upgrade Steps

New Features

  • Parameters from posconfig are automatically migrated into the POS Parameters table on POS startup (only parameters not present in the database are inserted); parameters are then removed from posconfig.
    This does not apply to the parameters SqlServer, SqlDatabase, SqlUseIntegratedSecurity and ResolutDataFilename. (TFS4113)

Improvements

  • The assistance button is now in the corner of the screen, and the selected language is highlighted (TFS4115 SCO)

Bug Fixes

  • If a printer problem is detected on POS startup, a message is shown and the application is closed (I2209-0161) (TFS4114)
  • Fixed tax free sales with discounted items (I2210-0025) (TFS4201)
  • Fixed webconnector icon (TFS4366)
  • Resolut Online - fixed importing prices with sales channel

Other Changes

  • None

POS4 Release Notes Sprint 62

Release Notes POS4 – v. 4.0.8385

General Information

A new version of POS4 is now available on the Bovertis downloads page:

Upgrade Steps

New Features

  • Added parameter BlockedAirports to block sales for customers flying to or passing through specified airports (TFS4240).
  • Added command AppBusinessSale to mark ticket as non-fiscalizing to skip the Italy fiscalization process (TFS4314) (I2211-0177).
  • If plugin ArrivaTransportPlugin is configured and active, POS is automatically reconfigured to use plugin ‘’’PublicTransportPlugin’’’ instead (if new plugin is available) (TFS4322).
  • Resolut Online - Current parameters configuration is synchronized to the Resolut Online portal on each POS startup

Bug Fixes

  • Adjusting employee sales screen to current screen resolution (TFS4366)
  • Added parameter LoadOldEmployeeDiscounts to process employee discounts specified on an item or item subgroup level (TFS4402) (I2212-0108)
  • Fixed using employee discount triggered by command AppPlazaDiscount (TFS4483) (I2212-0126)
  • Resolut Online - Fixed validating transactions before uploading to the portal
  • Resolut Online - Fixed importing prices with location id specified
  • SCO - Fixed AdminType value on EFT sign-off transaction tickets
  • Fixed build version comparisons in POS autoupdate process
  • Fixed importing airports with long airport name
  • Fixed logging exceptions into seq
  • If error occurs when mapping data field on data import, name of the field is properly logged

Other Changes

  • Improved readability of the current date and time shown by the POS (TFS4442) (part of I2211-0272)

POS4 Release Notes Sprint 63

Release Notes POS4 – v. 4.0.8391.1

General Information

A new version of POS4 is now available on the Bovertis downloads page:

Upgrade Steps

New Features

  • None

Bug Fixes

  • Freezing POS4 (slow discount engine) I2212-0061 (TFS4408)
  • Adding menu not working I2212-0174 (TFS4528)
  • Adding customers not working I2212-0173 (TFS4551)

Other Changes

  • None

POS4 Release Notes Sprint 64

POS4 – v. 4.0.8438.0

General Information

A new version of POS4 is now available on the Bovertis downloads page:

Upgrade Steps

New Features

  • Active plugins are automatically updated to the latest version on POS startup (TFS4268).
  • Selfcheckout - scanned boarding cards are encrypted in the log file (I2212-0042)(TFS4409).
  • Font size for Menu Buttons can be scaled using the parameter MenuScale (decimal value, by default 1). Scaling can be also configured in the Configuration screen in the User interface tab (I2211-0272)(TFS4438).
  • Selfcheckout - added support for upselling items. List of item ids can be configured using parameter SCO.UpsellingItemIds (TFS4459).
  • Selfcheckout – a second boarding card can be requested to scan by configuring parameter SCO.ScanSecondBoardingCard to 1 (TFS4484).
  • Selfcheckout - added support to also require cashier confirmation for discount engine promotions.

Bug Fixes

  • Fixed editing menu with no icon selected (I2212-0174)(TFS4528).
  • Fixed adjusting journal browser screen to higher resolutions (TFS4529).
  • Fixed localization of customer management screen (TFS4530).
  • Fixed layout of tax free merge screen (I2212-0307)( TFS4554).
  • Fixed loading POS2 promotion sales when connected to CombiShop (I2301-0071)( TFS4677).
  • Fixed adding customer to the receipt in cases where the customer does not have a default price line set.
  • Fixed scanning customer email in piggy payments.
  • Fixed calculations of discount value and final price in the item info screen for “for-amount” item price discounts.

Other Changes

  • Changed warning message when attempting to refund ticket with promotion sale created on POS2 (I2212-0040)(TFS4482).

POS4 Release Notes Sprint 65

Release Notes POS4 – v. 4.0.8462.0

General Information

A new version of POS4 is now available on the Bovertis downloads page:

Upgrade Steps

New Features

  • Added support for partial and unassigned invoice payments (TFS4460)

  • Added MYoMY VAT-free integration (TFS4480)

  • Added new field Tax ID to Debtors. Field value can be managed in

    Select debtor screen and if set it prints on the sale ticket below debtor name (TFS4488)

  • Selfcheckout - added parameter SCO.ScreenSaverBlockedTime to control

    when screen saver will be disabled (I2301-0026) (TFS4549)

  • Added new parameter ItemTransfer.AllowEditTransfer to control

    possibility to modify transfer on receival, by default true (I2212-0259)( TFS4550)

  • Added new parameter PrintItemDescription2 to control printing of

    ItemDescription2 of the item on sale ticket, by default enabled (I2301-0198)( TFS4685)

  • Resolut online - added support for alphanumeric VAT IDs

  • Resolut online - exporting employee sale ticket objects to portal

  • Added new parameter AllowPluginsAutoupdate to control autoupdating of

    plugins, by default enabled

Bug Fixes

  • Fixed handling duplicates in old promotion ids (I2301-0071)( TFS4677)
  • Fixed GUI layout when opening employee sale (I2301-0229)( TFS4688)
  • Improved error handling in autoupdate process (TFS4805)
  • Fixed clearing form when new debtor is being created (I2211-0064)( TFS4807)
  • Selfcheckout - fixed loading upselling items in Resolut Online environment
  • Fixed handling of loyalty selections in Select debtor screen

Other Changes

  • In Select debtor screen changed button text “Add debtor” to “New debtor”

  • Changed default minimum seq loglevel from warning to message and added

    additional contextual information

POS4 Release Notes Sprint 68

Release Notes POS4 – v. 4.0.8495.0.

General Information

A new version of POS4 is now available on the Bovertis downloads page.

Upgrade Steps

New Features

  • Resolut online - Added export of deposit and balance sign-on tickets to the Resolut Online portal, exporting a wider range of data for balance sign-off tickets. (TFS3399)

  • Added item info to the “scan boarding card” menu (I2302-0089)( TFS4739)

  • Added new parameter MaximumCashAmountValueIsBlocking to prevent the total amount of cash payments going above the value specified by the parameter MaximumCashAmountValue. (I2302-0194)( TFS4802)

  • Added new field “Vat registration number” to Debtors. Field value can be managed in the “Select debtor” screen. (TFS4888)

Bug Fixes

  • Resolut online - POS can only be successfully activated if the assigned device number has a maximum of 2 digits. (TFS4831)

  • SCO - fixed loading of submenu in menu-buttons sales screen (I2303-0194)( TFS4906)

  • Fixed handling of localization messages file in cases where the old one is still present on the disk

Other Changes

  • New field “Vat registration number” is now printed on both ticket and invoice receipts instead of the original “Tax ID” field. (TFS4888)

We have also released some new plugins for POS4:

  • PublicTransportPlugin - 1.3.4.0: Improved performance
  • ResolutInvoicePrintingModule - 1.0.3.0: Added VatRegistrationNumber to customer info. Updated Devexpress to 19.2.11.
  • VatfreePlugin - 1.0.2.0: Changed Newtonsoft.Json dependency from version 13.0.2 to 13.0.1 to unify it with other plugins and POS4

POS4 Release Notes Sprint 70

Release Notes POS4 – v. 4.0.8522.1

General Information

A new version of POS4 is now available on the Bovertis downloads page.

Upgrade Steps

New Features

  • SCO - added a configurable information screen just before the payment screen (TFS4261)
  • Added support for Norway fiscalization (TFS4353)
  • SCO - scan boardingcard screen image is now configurable (I2301-0026)( TFS4852)
  • Resolut online - Long version of item Description is now shown on the item info screen and can be printed on receipts and invoices if configured using parameter PrintItemDescriptionLong (TFS4934)
  • SCO - added possibility to configure location of take-your-receipt/card images in the final screen after payment (TFS4938)
  • SCO - added possibility to configure location of the amount label on the payment screen (TFS5081)
  • Added management of parameters PrintItemDescription2 and PrintItemDescriptionLong to configuration screen
  • Copying public transport tag attribute to refund ticket
  • Resolut online - exporting discount details from sales lines
  • Resolut online - importing Intersolve item configuration

Fixes

  • SCO - fixed adjusting screen controls to screen resolution (TFS4938)
  • SCO - showing actual primary currency symbol/isocode (I2304-0149)( TFS4997)
  • Fixed mapping old promotions to new discount engine promotions (I2304-0220)( TFS4999)
  • Fixed configuration of “Print to laser printer” setting in the configuration screen
  • Fixed handling of giftcard payment cancellation
  • Resolut online - fixed exporting empty balance sign on/off reports
  • SCO - fixed background configuration of the “sealbag” screen and ask-for-final-destination screen

Other Changes

  • “ApplicationStart” ticket is now created after loading of plugins has been initiated, showing full version including revision number in POS about screen.

Resolut Plugins

Grips - 4.2.1.0:

  • Updated refund receipt header and declaration

NorwayFiscalizationPlugin - 1.0.0.0:

  • Implemented Norway fiscalization

PublicTransportPlugin - 1.3.5.0:

  • Fixed date info when printing card logs
  • Fixed plugin error during payment with no card present (TFS5093)

ResolutInvoicePrintingModule - 1.0.4.0:

  • Added printing of ItemDescriptionLong if enabled by parameter PrintItemDescriptionLong, ItemDescription2 is now printed only if parameter PrintItemDescription2 is set

ROLoyaltyPlugin - 1.2.1.0:

  • Added transaction cancellation and updated purchase transaction

POS4 Release Notes Sprint 72

Release Notes POS4 – v. 4.0.8545.0

General Information

A new version of POS4 is now available on the Bovertis downloads page.

Upgrade Steps

New Features

  • Added command AppManageGiftcard to allow giftcard balance top-up and printing the giftcard balance overview (TFS4917).

  • SCO - Assistance screen is now automatically closed if “out-of-paper” problem is resolved (I2303-0033)( TFS4937)

  • Added support for unit “Tons” and entering item weight in kilograms (I2301-0047)( TFS5021)

  • Extended possibilities of QRCode sales including processing boarding cards (I2302-0033)( TFS5035)

Fixes

  • Fixed discount calculation for specific old promotion sale (I2304-0220)( TFS4999)

  • Improved performance of discount engine calculations (I2303-0074)( TFS5055)

  • Resolut online - Fixed restoring promotion name when loading a ticket for refund

  • Setting DiscountId on sales lines only for promotions sales (I2304-0248)

Other Changes

  • Resolut online - Importing AskPrice settings from the item price level instead of the original item level (TFS5002)

Resolute Plugins

PiggyPlugin - 1.1.2.0:

  • Added support for creating contacts

PublicTransportPlugin - 1.3.8.0:

  • Fixed card activation message

  • Fixed saldo printing on receipt

ROLoyaltyPlugin - 1.2.2.0:

  • Added support for giftcard balance top-up (TFS4917)

POS4 Release Notes Sprint 74

Release Notes POS4 – v. 4.0.8577.1

General Information

A new version of POS4 is now available on the Bovertis downloads page.

Upgrade Steps

New Features

  • Added WebApi for Resolut Online POS to retrieve a list of available templates for printing invoices (TFS5069)
  • Resolut online - exporting primary and currency sealbag numbers from deposit tickets now possible (TFS5090)
  • SCO - added support for configuring and triggering demagnetizer after payment (parameters SCO.DemagnetizeSeconds, SCO.DemagnetizeToken and SCO.DemagnetizeUrl) (TFS5113)
  • Resolut online - including cashouts in balance signoff ticket export (TFS5310)
  • Resolut online - including POS application version in communication with portal

Fixes

  • Fixed item selection for Gassan stock information (I2107-0121)( TFS4854)
  • QRCode sales barcodes with invalid boarding card are now handled correctly (TFS5337)
  • Resolut online - Fixed exporting deposit total value

Other Changes

  • Question text about final destination can be configured for each case separately: 1. flight destination is EU - MessageId 1318; 2. flight destination is NEU, in Shengen and parameter SchengenNoSealbagsMode is set - MessageId 1406; 3. flight destination is NEU and destination airport is specified in table AirportExportInformation - MessageId 1407 (I2303-0084)( TFS4864)

Resolute Plugins

PiggyPlugin - 1.1.3.0:

  • Fixed layout of create contact screen

PublicTransportPlugin - 1.4.1.0:

  • Fixed centrum zone reference in card info
  • Validity of product is printed on receipt in local time
  • Various stability improvements

ResolutInvoicePrintingModule - 1.0.6.0:

  • Added support for multiple invoice templates (TFS5069)

POS4 Release Notes Sprint 76

Release Notes POS4 – v. 4.0.8607.0

General Information

A new version of POS4 is now available on the Bovertis downloads page.

Upgrade Steps

New Features

  • Added parameter AllowNegativePriceInItemDetails (default 1) to control possibility to enter negative price in the “get item details” screen (I2303-0346) (TFS4969)
  • Added parameter FidsFlightInfoUseXamba (default 0) to use new flight information service. If activated, url of the new service needs to be set in FidsFlightInfoSvc parameter. (TFS5059)
  • Added button to change the country of soldier registration in the soldier registration information screen (I2305-0251)( TFS5211)
  • SCO - Added total quantity label to the standard sales screen (I2306-0056)( TFS5252)
  • Added parameter HidePrinterIcon (default 0) to permanently hide “printer out of paper” notification icon, managable also in configuration screen. (I2306-0223)( TFS5302)

Fixes

  • Fixed tax free sales with discounted items in Denmark (having CountryId set to 45 and using command AppDenmarkTaxFreeAirport) (I2210-0025)( TFS4201)
  • Fixed VAT amount calculations for sales lines with decreased quantity (I2304-0196)( TFS4841)
  • Fixed handling of an error when retrieving system volume settings in “user preferences” screen. In such cases the volume controls in this screen are disabled. (I2305-0263)( TFS5190)
  • SCO - Boarding card image in “scan boarding card” screen is now correctly centered (I2301-0026)( TFS5216)
  • Synchronization of soldier registration changes (I2306-0255)( TFS5306)
  • SCO - Deposit items (e.g. content bottles) are now not counted into total sale items quantity (TFS5316)
  • Fixed alignment of some notification icons in header panel to not overlap the name of currently signed on user (TFS5320)

Other Changes

  • None

Resolute Plugins

BrunssumSoldierPlugin - 1.3.4.0

  • Removed identity insert handling when syncing BrunssumSoldierCountries (TFS5306, I2306-0255)

PiggyPlugin - 1.1.5.1:

  • Fixed link-identified layout issue
  • Fixed interaction with on-screen keyboard in “create contact” screen
  • Fixed issue with on-screen keyboard overlapping user controls when entering customer details (I2308-0062)

PublicTransportPlugin - 1.4.3.0:

  • Fixed initiating session in order screen
  • Fixed returning payment result
  • Fixed starting session (TFS5465)

ResolutInvoicePrintingModule - 1.0.8.2:

  • Printing AltItemId on invoices by default instead of ItemId. Printing of ItemId can be forced by setting parameter PrintItemId to 1. Also, if ItemDescriptionLong is being printed on invoice, no other item description is further printed for that item. (TFS5315, I2301-0166)
  • Printing weight of the weighted items on invoices (TFS5321)
  • Content and Remark sales line fields are now aligned with the Description column instead of the ItemId column
  • Total weight is now printed in normal font style instead of bold
  • Window border of invoice template selector form is now shown only if running in window mode (parameter RunInWindow = 1)

POS4 Release Notes Sprint 78

Release Notes POS4 – v. 4.0.8629.0

General Information

A new version of POS4 is now available on the Bovertis downloads page.

Upgrade Steps

New Features

  • Now possible to handle triggers from Resolut Online portal or Resolut Backoffice Client to auto-update the POS application next time it is started (TFS5325)
  • Migrated plugin ResolutInvoicePrintingModule from the “Invoices” folder to “Plugins” folder and enabled auto-updating (TFS5329)
  • New parameters PrintCashoutReceipts and PrintBalanceSignOnReceipts (default 1) control printing of receipts from corresponding transactions (I2307-0073)( TFS5377)
  • New parameter HideTaxFreeIconForNeuSales (default 0) to hide the tax-free icon in non-EU sales (I2306-0172)( TFS5449)

Fixes

  • Ordering invoices by invoice ID in Debtors module (TFS5435)
  • Removed unnecessary regeneration of autogenerated item/(sub)group menus to speed up menu loading (I2307-0072)( TFS5439)
  • Executing “application restart” command if old version of command is configured in menu
  • Logging exceptions if error occurs when processing QRCodeURL requests

Other Changes

  • The number of items shown in autogenerated menus is now limited to 100. Menus that would have more items are trimmed and a warning is shown when displaying them.

Resolute Plugins

PiggyPlugin - 1.1.5.2:

  • Missing parameters message is logged on application startup if required parameters (PiggyPosApiKey and PiggyBaseUrl) are not configured.

PublicTransportPlugin - 1.4.4.0:

  • Fixed processing restitution payments

POS4 Release Notes Sprint 80

Release Notes POS4 – v. 4.0.8670.0

General Information

A new version of POS4 is now available on the Bovertis downloads page.

Upgrade Steps

New Features

  • Added database patch to set “db_owner” as owner of db_owner schema (TFS4275)
  • Added possibility to have prices shown excluding VAT, in such case also the netto subtotal and VAT total are shown together with total amount (I2301-0092)(TFS5262)
  • Resolut online - performing database data checks before device activation to help prevent unintended activation on existing device database (TFS5244)
  • SCO - idle screen background and image made configurable (I2306-0219)(TFS5301)
  • Added possibility to enter barcode manually in payment screen using command AppEnterBarcode (I2307-0162)(TFS5430)
  • BovertisGuiComponents 19.2.11 are automatically installed on application startup if they are not yet present in the POS system and any configured plugin needs them(TFS5501)
  • Resolut online - importing SCO autostartup and default-user settings(TFS5518)

Fixes

  • Fixed managing sales line in crew sales (I2307-0146)(TFS5428)
  • Changed datatype of CountryId column in “TransactionJournal” table to support higher values up to 32,767 (I2308-0254)(TFS5546)
  • Fixed handling online flight info result when entering flight info manually

Other Changes

  • Adjusted GUI in payment screen and EFT maintenance screen to fit long EFT messages (TFS5434)

Resolut plugins:

PublicTransportPlugin - 1.4.6.0

  • Fixed releasing progress form to prevent out of memory problems (TFS5526, I2308-0155)

ResolutInvoicePrintingModule - 1.0.9.0

  • Added possibility to have prices shown excluding VAT, in such case also the netto subtotal and VAT total are shown together with total amount (TFS5262, I2301-0092)

SecondScreenLocal - 4.0.1.1

  • Added possibility to have prices shown excluding VAT, in such case also the netto subtotal and VAT total are shown together with total amount (TFS5262, I2301-0092)

SecondScreenOnline - 4.0.1.1

  • Added possibility to have prices shown excluding VAT, in such case also the netto subtotal and VAT total are shown together with total amount (TFS5262, I2301-0092)

ResolutBosClient v.2.1.81 and ResolutDistributor v.2.1.17

ResolutBosClient:

  • Added support for managing generic fields for items (I2210-0148)(TFS4472)
    • List of attributes can be specified in Item attributes definitions module (access code 592)
    • Attribute values for selected item can be specified in Item management module in Item details > Attribute values
  • Added new columns to Item sales report (I2306-0049)(TFS5290)
    • Added new option “per sales line” to “Filter sales” combobox to show sales per sales line (so not grouped in any way)
    • Added new option “Transaction date” to “By” combobox to order the result by transaction date
    • When report is loaded with option “per sales line”, additional columns Transaction date, PosId and Receipt number are shown in the report
  • Added possibility to request autoupdate of selected POS4 tills (requires Resolut distributor update)(TFS5328)
    • Available in Shop configuration module in Shop details tab

ResolutDistributor:

  • Handling POS4 autoupdate requests (TFS5328)

New database patches:

  • 372_AddItemAttributesDefinitionsPatch.sql
  • 373_SalesGroupView_Patch07.sql

POS4 Release Notes Sprint 82

Release Notes POS4 – v. 4.0.8684.0

General Information

A new version of POS4 is now available on the Bovertis downloads page.

Upgrade Steps

New Features

  • Clicking on notification icon in POS header panel will open a balloon with notification explanation (TFS1622)
  • In customer interview screen, nationality can be selected by clicking on text label of nationality shortcut as well (apart from clicking on flag icon) (I2305-0241)( TFS5178)
  • Added parameter YourSaleIsTicketText to customize header text “Your sale is” printed on ticket in flight info section above TAX FREE/VAT PAID information text (note: this information text can be already configured by existing parameters TaxFreeTicketText and VatPaidTicketText) (I2305-0241)( TFS5178)
  • In customer interview screen, icon with id 420 can be used to configure shortcut for unknown nationality (I2305-0241)( TFS5178)
  • Added parameters TopNavigationPanelHeight and KeypadButtonPanelHeight to configure heights of respective POS GUI sections. These parameters including existing parameter NavigatorPanelWidth can be configured in configuration screen. (I2307-0201)( TFS5443)
  • Added possibility to configure POS screen layout with new configuration file PosDesign.txt which when used must be located in C:\POS directory (TFS5473)
  • Added parameter PosRestartAvailableMemoryLimitMb to configure the amount of memory which when allocated by POS will cause the POS to automatically restart (only if no sale is currently opened). Default value is 1024. Restart trigger can be overridden by parameter PosRestartAvailableMemoryLimitMb if it is set which specifies a minimum amount of memory that must be available in the system, otherwise POS will be automatically restarted. (TFS5499)
  • Added support for autoupdating of tax free refund module configured by existing parameter TaxFreeRefundModule (TFS5575)
  • Selfcheckout - added possibility to have prices shown excluding VAT, in such case also the netto subtotal and VAT total are shown together with total amount (TFS5583)
  • Item ids are printed on transfer receipts (I2309-0104)( TFS5594)
  • Added parameters Menu.RowsCount and Menu.ColumnsCount to configure number of rows and columns of the POS menu. Both parameters need to be set to apply.

Fixes

  • Resolving item price based on sales channel of the POS and the item prices (TFS4752)
  • Showing crew sale icon when restoring crew sale from on hold (I2305-0240)( TFS5178)
  • Resolut online - fixed exporting correct price line ID on tickets (TFS5305)
  • Improved POS memory management (I2308-0155)( TFS5526)
  • Resolut online - fixed resolving total turnover from balance sign of cash counts (I2308-0216)( TFS5542)
  • Clearing age selection when opening new customer interview screen (TFS5663)
  • Deserialization of MD5Hash value present in flight info on pos ticket

Other Changes

  • Plugins are now automatically downloaded or updated on application startup only if POS application is updated to the latest released version. Because of that, if running old POS version is intentional, newly configured plugins must be installed manually. (TFS5500)
  • Changed default text of message 4036 from “Select origin” to “Select nationality”. This message is used in customer interview screen (I2305-0241)( TFS5178)

Resolut plugins:

PublicTransportPlugin - 1.4.7.0

  • Fixed handling of request timeout error
  • Fixed processing order before ticket is stored
  • Improved plugin stability

SalesReportPlugin - 1.0.2.0

  • Report is now closed by pressing new close button instead of clicking anywhere in the report (TFS5592, I2309-0137)

POS4 Release Notes Sprint 84

Release Notes POS4 – v. 4.0. 8719.0

General Information

A new version of POS4 is now available on the Bovertis downloads page.

Upgrade Steps

New Features

  • Storing item group and item sub group descriptions on sales lines to have them available in BOS if sale of non-owner product was made on combishop POS (TFS5647)

  • Handling restart requests from BOS planned at specific time. Added also new parameter RestartPosAtTime to configure a time of a day when POS should be regularly restarted. (TFS5672)

  • Fontsize of texts in POS header control can be adjusted in configuration screen or directly using parameter HeaderScale (I2310-0097)(TFS5699)

  • Added parameter PrintVatPaidTicketHeader (default 1) to control printing of VAT PAID/BTW BETAALD text in header of tickets containing flight information on tills with countryId configured to 31. (TFS5749)

Fixes

  • Resolut online - fixed handling case when POS was activated, but assigned POS number was too large for PosId and therefore rejected by POS. Activation can now be retried with smaller POS number without necessity to deactivate POS manually in POS database. (TFS3621)

  • Customer ID mapping for on-account payment (TFS5459)

  • SCO - price incorrectly loaded in some cases (TFS5748)

  • VAT amount calculation in sales with discount applied (I2310-0260)( TFS5773)

  • Handling parameters Menu.RowsCount and Menu.ColumnsCount also for cases when menu is autogenerated from groups/subgroups/items

  • Memory management on data import and when working in Debtors module

Other Changes

  • None

Resolut plugins:

PublicTransportPlugin - 1.4.9.0

  • Fixed retrying transactions (TFS5727, I2310-0174)
  • Improved plugin performance

POS4 Release Notes Sprint 86

Release Notes POS4 – v. 4.0.8739.0

General Information

A new version of POS4 is now available on the Bovertis downloads page.

Upgrade Steps

New Features

  • Added POS layout designer(TFS5739)
  • Added support for importing customer origins in airport interview dialog(TFS5821)
  • Added support for matrix sales menu. Menu can be skinned in POS skin editor.( TFS5826)

Fixes

  • Fixed issue that caused POS to print message about till not being closed correctly the last time on every application-started receipt (I2311-0011)( TFS5758)
  • Handling of Authorize setting for command AppSales configured in table ApplicationCommand (I2311-0029)( TFS5775)
  • Showing crew sale indicator when restoring transaction from hold(TFS5794)
  • GUI issue when Debtors screen was cut at the bottom when running in window mode(TFS5801)
  • Discount not calculated and applied for some promotions (I2311-0083)( TFS5839)
  • Accidentally unattached onclick events on notification icons in header panel

Other Changes

  • None

Resolut plugins:

  • None

POS4 Release Notes Sprint 88

Release Notes POS4 – v. 4.0. 8770.1

General Information

A new version of POS4 is now available on the Bovertis downloads page.

Upgrade Steps

New Features

  • Belgium fiscalization plugin (TFS5597)

  • Item modifiers and printing them on receipts (TFS5760)(TFS5874)

  • Added parameter AirportAskBuyerInfo to request additional customer info in customer origin dialog (default 0) (I2310-0216)( TFS5819)

  • Added parameter EnableOrderNumbering (default 0) to automatically generate order number on sale ticket. This number is then printed on the receipt.( TFS5849)

  • Added new parameters to match Belgium fiscalization requirements: BlockConfigurationChanges to block opening configuration screen (default 0), BlockReprintTicket to block any sale ticket reprint (default 0) and PrintVatNameOnTicket to print VAT description on every sales line and in VAT overview (default 0)( TFS5884)

  • Added command AppRemark in sale screen for entering remark on ticket(TFS5888)

  • Added parameters QrCodeContent and QrCodeText (both default empty) to print configured QR code with text at the end of the ticket. Parameters are automatically set when settings are imported from Resolut online portal. (Requires manual update of printer plugin)(TFS5889)

  • Added parameter FoodConsumeOrTakeAwayPerSale.Enabled to enable mod where “consume here/take away” question dialog is shown once per sale (default 0) (including TFS5993)( TFS5920)

  • Resolut online - importing item attributes from portal(TFS5921)

  • Custom logo can be printed inside ticket footer QR code configured by parameter QrCodeContent. Logo file must be located in POS Media directory under name qrLogo.jpg and can be automatically imported from Resolut online portal. (Requires manual update of printer plugin)(TFS5950)

  • Resolut online - added support for printing orders on kitchen printer (TFS6001 and TFS6015)

Fixes

  • Delayed flights now shown correctly if Resolut online flight info provider is used and parameter FidsFlightInfoUseXamba is set (TFS5746)

  • Fixed printing sales line promotion discount information on tickets for non-percentual discounts(TFS5915)

  • Resolut online - items deleted in portal are now removed from POS database (TFS5918)

  • Fixed importing VAT description value (TFS5930)

  • Resolut online - fixed processing delete import messages received from portal(TFS5939)

  • Fixed adding DrawerOpened attribute on posticket if drawer was not closed after previous transaction(TFS5957)

  • Fixed handling display name placeholder on receipt (TFS5986)

  • Items with no kitchen group ID configured are printed on all kitchen printers (TFS5987)

  • Printing takeaway/consume here flag on the receipt (TFS5988)

  • Fixed accidental printing of barcode-not-printed message on receipt (TFS5998)

  • During loading and autoupdating, plugins configured as “Active” but with no FileName specified are now skipped

Other Changes

  • Improved layout designer (TFS5863)

  • Using new PosModule framework

Resolut plugins:

DefaultCouponPrinter - 1.1.2.0

  • Integration with new PosModule framework

GVBPublicTransportPlugin - 1.0.6.0

  • Integration with new PosModule framework

PublicTransportPlugin - 1.5.2.1

  • Fixed clearing card info from previous sale when starting new transaction (TFS5994)

ResolutInvoicePrintingModule - 1.0.10.0

  • Integration with new PosModule framework

SecondScreenLocal - 4.0.2.0

  • Integration with new PosModule framework

SecondScreenOnline - 4.0.2.0

  • Integration with new PosModule framework

VatfreePlugin - 1.0.3.0

  • Integration with new PosModule framework

WeposPosPrinter - 4.3.3.0 (Only manual update)

  • Added support for printing QR code with text below and logo inside of the QR code (TFS5889, TFS5950)

POS4 Release Notes Sprint 90

Release Notes POS4 – v. 4.0. 8797.0

General Information

A new version of POS4 is now available on the Bovertis downloads page.

Upgrade Steps

New Features

  • Storing total discount information on balance sign off ticket(TFS5834)
  • Handling priceline setting for showing netto prices when entering discount, changing price or entering price for “AskPrice” items (I2311-0176)(TFS5865)
  • Resolut online - reduced timeout when searching for customers (I2307-0270)(TFS5972)
  • Resolut online - migrated to new portal URL (TFS6022)
  • Resolut online - importing currency deletions made in portal (TFS6025)
  • Clearing item modifiers tables on POS full reset (TFS6035)
  • Resolut online - sending transactional fiscal seal data to portal (TFS6050)
  • Handling POS menu button count settings in menu editor (TFS6051)
  • Warning message now shown after ticket for refund is loaded and partial refund is not allowed (TFS6053)
  • Resolut online - sending EFT terminal printout lines to portal

Fixes

  • Setting “discountId” on sales lines when new discount engine promotion is applied (I2401-0027) (TFS5990)
  • Added missing parameter ProductBrandId to stored procedure “POS_AddItem” (TFS6076)
  • Resolut online - fixed import of item’s “ProductBrandId” setting

Other Changes

  • None

Resolut plugins:

  • None

POS4 Release Notes Iteration 6

Release Notes POS4 – v. 4.0. 8878.0

General Information

A new version of POS4 is now available on the Bovertis downloads page: Upgrade Steps

New Features

  • Logging info when plugins autoupdate is skipped due to newer version of POS available on the server (TFS209)
  • Handling item duties including printing the sale duty overview on receipt (I2312-0597)(TFS611)
  • Added support for e-sim API (I2403-0052)(TFS859)
  • Added additional parameters to match Belgium fiscalization requirements: BlockPosAutoupdate to block POS autoupdate (default 0), BlockMenuEditor to block access to menu editor (default 0), BlockCommandsIfNotSignedOn to require cashier to be signed on to use the POS (default 0)
  • Added support to block printing of specific fiscal information on tickets
  • Added support for command AppOpenUrl to open URL in default browser when in the main menu
  • Additional logging in Debtors module
  • When POS is planned to be restarted and the moment of the restart comes, the information message is automatically confirmed after 30 seconds

Improvements

  • If parameter AppCustomerOnAccountPayment is set and customer is not selected when entering payment screen, the customer selection dialog is shown instead of blocking the payment (TFS138)
  • Partial refund of a sales ticket with promotions applied is not blocked anymore, but discounts are recalculated to correspond with the remaining sales lines (TFS267)
  • Changed log message when button index overlap is detected on command registration (I2402-0090)

Bug Fixes

  • Adjusted customer interview dialog enabled by parameter InterviewZipNationalityNL to POS4 design (I2401-0114)(TFS224)
  • Fixed triggering POS autoupdate after scheduled restart (I2403-0098)(TFS983)
  • Fixed handling of not contracted employees
  • Fixed blocking of reprinting ticket configured by parameter BlockReprintTicket
  • Fixed searching an item when partial AltItemId is entered
  • Fixed showing total netto amount and total VAT amount in the sales screen and in the payment screen

Resolut Plugins

AlipayProvider - 1.0.0.0

  • Plugin for new Alipay+ integration (TFS363)

BelgiumFiscalPlugin - 1.0.1.0

  • Added receipt header and footer
  • Fiscal info is printed only on VAT receipts
  • Fiscalizing aborted transactions

PayPlazaPinpadPlugin - 1.2.0.1

  • Updated security ceriticate

PublicTransportPlugin - 1.5.2.2

  • Removed printing of points counter on a sales line (TFS867, I2402-0066)

ResolutAlipayPlugin - 1.2.518.1

  • Connection timeout made configurable by parameter Alipay.ConnectionTimeout, by default 7 seconds (TFS988, I2404-0032)

SalesReportPlugin - 1.0.3.0

  • Fixed sorting per-day report data and fixed showing negative values in total turnover info (I2403-0177)

WeChatPayNLProvider - 1.0.5.0

  • Updated to use TLS1.2

POS4 Release Notes Iteration 8

Release Notes POS4 – v. 4.0.8907.0

General Information

A new version of POS4 is now available on the Bovertis downloads page:

Upgrade Steps

New Features

  • Ticket priceline can be changed to NEU in Norway tax free sales based on flight destination country and country of origin (I2310-0216)(TFS1254)

Improvements

  • None

Bug Fixes

  • Fixed printing sales ticket with no VAT details present

Resolut Plugins

AlipayProvider - 1.0.1.0

  • Added rules for recognizing Alipay+/WeChat barcodes (TFS1439, I2405-0059)

ResolutInvoicePrintingModule - 1.0.11.0

  • Fixed integraton with new POS4 versions (TFS1236)

POS4 Release Notes Iteration 10

Release Notes POS4 – v. 4.0.8937.0

General Information

A new version of POS4 is now available on the Bovertis downloads page.

Upgrade Steps

New Features

  • None

Bug Fixes

  • Using arrow buttons in customer interview screen (I2405-0113)(TFS1469)
  • Adjusting customer interview screen to current screen resolution(I2406-0033)(TFS1700)
  • Handling of customer interview for Norway tax free sales; added parameter ShowSkipInterviewScreenButton to allow skipping of the interview (default 0) (I2406-0033)( TFS1732)

Resolut Plugins

  • None

POS4 Release Notes Iteration 11

Release Notes POS4 – v. 4.0.8937.4

General Information

A new version of POS4 is now available on the Bovertis downloads page:

Upgrade Steps

New Features

  • None

Bug Fixes

  • Return tickets with duties (I2407-0134)(TFS2132)

Resolut Plugins

  • None

POS4 Release Notes Iteration 12

Release Notes POS4 – v. 4.0.8937.5

General Information

A new version of POS4 is now available on the Bovertis downloads page: Upgrade Steps • Download the latest version from the Bovertis Downloads page: https://downloads.bovertis.nl/downloads.html

New Features

• None

Bug Fixes

• Resolut online - fixed exporting transactions if item is not present in local POS database (TFS2006)

Resolut Plugins

• None

Resolut BOS

Subsections of Resolut BOS

Subsections of Release Logs

Release Notes Resolut BOS Iteration 6

General Information

Below are the latest changes for:

  • ResolutBosClient v.2.1.85.
  • PosModuleExporter v.4.13,
  • ResolutDistributor v.2.2.21
  • BITTicketsExporter v.1.1.4.12.

Upgrade Steps

Please contact our support team if you need assistance with updating to the latest version.

Note: When deploying PosModuleExporter or BITTicketsExporter, make sure that ticket storage database is patched, especially (already existing) patches 011_LocationIdPatch.sql and 014_TransactionJournal_Patch02.sql.

ResolutBosClient 2.1.85:

  • Maximum length of airport name limited to 20 characters (I2402-0052)(TFS232)
  • Added module for duties management (I2312-0597)(TFS367)
  • Fixed initializing “Apply to all items” setting on default selection group when creating new promotion (I2209-0115)(TFS1107)

PosModuleExporter 4.13:

  • Loading TransactionJournal.LocationId as Int data type (4.11)
  • Added parameter MailServer_EnableSsl to enable using SSL when sending mail notifications (4.11.0.1)
  • Improved log when imported ticket cannot be deserialized (4.11.0.1)
  • Optimized getting new SalesTransactionId (4.12)
  • Processing duties (I2312-0597)(TFS367)
  • Fixed generating optimized SaleTransactionId

ResolutDistributor 2.2.21

  • Distributing duties (I2312-0597)(TFS367)

TicketsExporter 1.1.4.12

  • Exporting duties (I2312-0597)(TFS610)

New database patches:

  • 380_AddDutiesTable_Patch.sql
  • 381_Verkoopinfo_AddDutyInfo.sql

Resolut BOS Release Notes Sprint 85

General Information

Below are the latest changes for: ResolutBosClient v.2.1.82 ResolutDistributor v.2.2.18 PosModuleExporter v.4.9 TicketSplitter v.1.0.2.0.

Upgrade Steps

Update to the latest version.

Please contact our support team if you need assistance with updating to the latest version.

ResolutBosClient:

  • Fixed discount type and category for discounts created by new discount engine (I2211-0291)( TFS5601)
  • In Item sales report, fixed showing item group, subgroup and item description of items sold in combishop (for new transactions); requires also update of TicketSplitter, PosModuleExporter and POS4 (I2308-0129)( TFS5647)
  • Added possibility to schedule automatic POS restart in Shop configuration module; requires update of ResolutDistributor and POS4 (TFS5671)
  • Added ApplyToAllItems checkbox to promotion details in new promotions module (I2309-0287)( TFS5676)

ResolutDistributor:

  • Handling and distributing restart time in POS restart requests (TFS5671)

PosModuleExporter:

  • Storing item group, subgroup and item description of sold items in VerkoopInfo table (I2308-0129)( TFS5647)

TicketSplitter:

  • Copying item group, subgroup and item description of sold items to split tickets (I2308-0129)( TFS5647)

New database patches:

  • 374_AddSaleTransactionId_Patch.sql (released with PosModuleExporter 4.8)
  • 375_FinKassaInformatieTotaal_SmallMoneyToMoney_Patch.sql (released with PosModuleExporter 4.8)
  • 376_VerkoopInfo_AddItemDetails.sql
  • 377_SalesGroupView_Patch08.sql

Resolut BOS Release Notes Sprint 86

General Information

Below are the latest changes for: ResolutBosClient v.2.1.83, ResolutDistributor v.2.2.19 and BitRetailTicketsExportToXml v.1.1.4.5 .

Upgrade Steps

Update to the latest version.

Please contact our support team if you need assistance with updating to the latest version.

ResolutBosClient:

  • Automatic update of EFT notification transaction description by applying patch 379_TransactionDescription_Patch01.sql (I2204-0240)( TFS5762)
  • Added module for managing airport interview origins, access key 4041(TFS5821)

ResolutDistributor:

  • Distributing airport interview origins (TFS5821)

BitRetailTicketsExportToXml:

  • Fixed exporting tickets by using new db column ImportedUtcDateTime, ResolutServer db patch 014_TransactionJournal_Patch02.sql needs to be applied (I2310-0257, I2311-0216)( TFS5771)

New BOS database patches:

  • 378_AddAirportOriginInterview_Patch.sql
  • 379_TransactionDescription_Patch01.sql

New ResolutServer patches:

  • 014_TransactionJournal_Patch02.sql (Z:_manual\ResolutServer\DbPatches)

Resolut BOS Release Notes Sprint 90

General Information

  • Below are the latest changes for:
  • ResolutBosClient v.2.1.84
  • TicketSplitter v.1.0.3.0
  • BovertisSapInterfaceService v.2.1.4
  • BitRetailTicketsExportToXml v.1.1.4.7
  • ResolutDistributor v.2.2.20
  • ResolutImport v.1.6.0.0.

Upgrade Steps

Update to the latest version.
Please contact our support team if you need assistance with updating to the latest version.

NOTE: Due to updates made on posTicket, if some POS4 tills are updated to version 4.0.8770.2+, it is highly probable that ticket export services (PosModuleExporter, TicketSplitter, BovertisSapInterfaceService and BitRetailTicketsExportToXml) will need to be updated as well.

ResolutBosClient:

  • Maximal length of currency symbol specified in currency module limited to 1 (I2311-0028)(TFS5836)
  • Fixed showing new discount engine promotion names in Total discount report (I2401-0027)(TFS5990)
  • Added ItemId to the description of items selected in promotion details of new promotions module (I2401-0216)(TFS6052)
  • Added validation of origin code uniqueness in airport origin interview module

PosModuleExporter:

  • Updated PosModule and PosDeviceBase dlls

TicketSplitter:

  • Updated PosModule and PosDeviceBase dlls

BovertisSapInterfaceService:

  • Updated PosModule and PosDeviceBase dlls

BitRetailTicketsExportToXml:

  • Added SaleTransactionId to export file (I2311-0084)(TFS5837)
  • Updated PosModule and PosDeviceBase dlls
  • Updated framework to .net 4.8

ResolutDistributor:

  • Distributing delete messages for ItemPrices (I2310-0057)(TFS5759)
  • Added more info logs for promotion distribution (I2311-0155)(TFS5976)

ResolutImport

  • Distributing delete messages for ItemPrices (I2310-0057)(TFS5759)

Resolut Online

Welcome to the Resolut Online Help Center!

Whether you are a Merchant just starting out with Resolut Online, or an experienced Reseller, you can find everything you need to get the most from your system, right here.

Getting Started
How-to
User Guide
FAQ
Support
Release Logs
Here are the latest updates to Resolut.

Subsections of Resolut Online

Getting Started with Resolut Online

Welcome to Resolut Online!

This quick guide will take you through the basic set-up, so that you can familiarize yourself with the essential features of your new system.

We recommend you follow this guide from start to finish. You can then refer to our “How-to” section, or the User Manual, to complete your set-up.

The Getting Started Guide will cover:

  1. Adding Your First Location
  2. Adding Your First Device
  3. Creating an Item Group or Subgroup
  4. Manually Adding an Item
  5. Importing Your Items
  6. Creating Users
  7. Setting-up VAT
  8. Set Your Currency
  9. Add a Payment Method

Click > to begin, or follow the links above to visit any section of the guide.

Subsections of Getting Started with Resolut Online

Adding Your First Location

To add a location, first login to the Resolut Online Back office portal.

Select Infrastructure and then Locations.

A2 fig1

In the right-hand corner, use the + icon to open the ‘New Location’ dialog box.

Fill in the Location address and set the Location Type to either ‘Shop’ or ‘Restaurant’.

You can also choose to add any additional information you wish by creating a ‘Free text’ field.

A2 fig2

Finally, you can add a ‘Customer Display’ image by clicking Select Image (Idle) or Select Image (Sale) and choosing an appropriate image from your computer.

A2 fig3

Once you have finished making changes, click Save to add the Location.

Editing and Deleting a Location

A list of all Locations is visible when you return to Infrastructure > Locations. A2 fig4a You can edit a Location using the Edit pencil icon, or delete it from the Resolut Online Portal using the dustbin Delete icon.

Adding Your First Device

To add a device, first login to the Resolut Online Back office portal.

Select Infrastructure and then Devices.

A3 fig1

In the right-hand corner, use the + icon to open the ‘Device Detail’ dialog box.

Give your device a Name and Number, and select a Device Type and Location from the drop-down menus.
You can also select a Device group, if one is configured. For a kitchen screen device check the Kitchen screen box.

You can then set the receipt properties such as Characters per line and Printer paper width.

A3 fig2

At this point, you can add an EFT Provider if you need to.
You can also choose to add any additional information you wish by creating a ‘Free text’ field.

A3 fig3

At the bottom are specific settings for different applications. A3 fig4

Once you have finished making changes, click OK to create the device. An activation code will be generated.

Start your POS device and enter the activation code when prompted.

You can now start using your device.

Editing and Deleting a Device

A list of all Devices is visible when you return to Infrastructure > Devices. A3 fig5 You can edit a Device using the Edit pencil icon, or delete it from the Resolut Online Portal using the dustbin Delete icon.

Creating an Item Group or Subgroup

First, login to the Resolut Online Back office portal.

Create a New Group

Select Assortment and then Groups.

A4a fig1

In the right-hand corner, use the + icon to open the ‘New Item Group’ window.

A4a fig2

Add a Name and Number for the new group.

You can also choose to add any additional information you wish by creating a ‘Free text’ field.
Click OK to save the group.

Create a New Subgroup

Select Assortment and then Subgroups.

A4a fig3

In the right-hand corner, use the + icon to open the ‘New Subgroup’ window.

A4a fig4

Add a Name and Number for the new subgroup, and choose a parent group from the Group drop-down menu.

You can also choose to add any additional information you wish by creating a ‘Free text’ field.
Click OK to save the group.

Editing and Deleting a Group or Subgroup

A list of all Groups is visible when you return to Assortment > Groups. Subgroups are visible in Assortment > Subgroups. A4a fig5 You can edit a Group or Subgroup using the Edit pencil icon, or delete them from the Resolut Online Portal using the dustbin Delete icon.

Manually Adding an Item

First, login to the Resolut Online back office portal.

Select Assortment and then Items.

A4b fig1

In the right-hand corner, use the + icon to open the form.

General

Add a Name and Number for the new item, and choose a group from the Group drop-down menu.
Select the Status from the drop-down menu and add a Description.

A4b fig2

Pricing

Click Add Price to expand the price form, and enter the value of the item under Price.
At this point you can also add additional information such as a Start/End Date for the price, Barcode, Location, Variant and Priceline.

A4b fig3

Click Save to add the price.

Select the VAT amount from the drop-down menu.

Inventory

Select the Stock Unit of Measure from the drop-down menu.

A4b fig4

When you have added all the information you need to, click Save in the top-right hand corner to create your item.

Editing and Deleting an Item

A list of all Items is visible when you return to Assortment > Items. A4b fig5 You can edit an Item using the Edit pencil icon, or delete it from the Resolut Online Portal using the dustbin Delete icon.

Importing Items

First, login to the Resolut Online back office portal.

Select Assortment and then Items.

A4b fig1

Select Upload > Items to open the import window.

A4c fig2

Click Select File and choose a .csv file from your device. Once the file is ready, click Upload.

A4c fig3

Creating a User

First, login to the Resolut Online back office portal.

Select Infrastructure, then Users.

A5 fig1

In the right-hand corner, use the + icon to open the ‘New User’ dialog box.

A Number and PIN code should be automatically generated. Fill in a Name and valid Email address.

A5 fig2

Create a password, and enter it a second time to confirm. You can also add the user’s Role at this point if you wish.

Once you have finished, click OK to save the new user.

Setting-up VAT

Set VAT rates for your products that will be applied in Resolut POS.

Setup

First, login to the Resolut Online back office portal.

Select Configuration, then VAT.

A7 fig1

Select a VAT rate from the list to open the ‘VAT Detail’ screen.

A7 fig2

From this view, you can modify the Name and Number of the VAT rate.
Under ‘VAT Percentages’ you can add a new VAT rate by clicking Add, or delete the existing rate by clicking the dustbin icon.

A7 fig3

Once you have finished, click Save to save your changes, or Cancel to discard them.

Applying VAT

Go to Assortment > Items and select the item you need. Under “Pricing”, choose a VAT rate from the VAT drop-down menu. A7 fig4

Click Save to set the VAT rate.

Set Your Currency

First, login to the Resolut Online back office portal.

Select Configuration, then Currencies.

A8 fig1

In the right-hand corner, use the + icon to open the ‘New Currency’ dialog box.

Fill-in a Number, Description, ISO Code and Exchange Rate for the currency you need.

A8 fig2

If you have not set-up a currency yet, make sure to check the Default checkbox, to make this currency the default currency. The Exchange Rate should be set to “1.0”. Later if you add a second currency, set the exchange rate accordingly, where the default currency = 1.0.

For example:

The default currency is EUR, set to “1.0”.

The secondary currency is USD, set to “1.2” reflecting the exchange rate.

Once you have finished, click OK to add the currency.

Add a Payment Method

Add a payment method to POS through the Resolut Online Portal.

Create a Payment Method

First, login to the Resolut Online back office portal.

Select Configuration, then Payment Types.

A9 fig1

In the right-hand corner, use the + icon to open the ‘Pay’ dialog box.

Select a Category and Eft Provider Type, if applicable. The Menu Order and Number are automatically generated.

A9 fig2

At this stage, you can also uncheck the Active box if you wish to not use this payment method for the time being.

Use the Can Refund and Can Reverse checkboxes to set whether the payment type will be refundable or reversable. If refundable, set the Refund Mode using the drop-down menu.

Combining of a payment types can be enabled by checking the Can combine checkbox. The Burn points checkbox is used to enable a payment with loyalty points. Check the Open drawer box to open the cashdrawer after payment and Open drawer refund box to open a cashdrawer after a refund payment.

A9 fig3

Select a Customer Mode, Ask Remark mode, and Options mode from the drop-down menus.
If using the ‘Ask Remark’ mode, add a remark in the Ask Remark Comment field.

You can also choose to add any additional information you wish by creating a ‘Free text’ field.

A9 fig4

Once you have finished, click Save to add the payment method.

Add the Payment Method to a Role

All payment types must be enabled by Role in Infrastructure > Roles. Select a role to open the “Role detail” window and scroll down to “Payment Types”. Check both checkboxes. A9 fig5 Next, find the required Payment Types on the right-hand side of the permissions section and check those to be activated for this role. A9 fig6

Click Save. The payment type is now ready to use.

Subsections of Resolut POS

Android Launcher

Installing the Launcher

  1. Login to the Resolut Online Portal and Create a New Device.

  2. Go to https://downloads.bovertis.nl/launcher/acceptance/launcher.apk using the Android device that the Launcher will be installed on. The download will start automatically.

  3. Once the Launcher is installed, enter the Activation code generated in Step 1 and tap Enter.
    B11 fig1

    The Launcher is now ready to use.

Installing Resolut POS via the Launcher

  1. Open the Launcher and tap App Market > Market.
    B11 fig2
  2. Next to “Resolut Online POS” tap Install.
    B11 fig4
  3. When prompted tap Install.
    B11 fig3
  4. Once the install is complete, the Resolut POS app will be visible on the Launcher main screen.
    B11 fig5

Journal in Resolut POS

The Journal in Resolut POS shows you a record of all transaction made through Resolut.
To access the Journal:

  1. Open the Resolut POS and tap Journal
    B12 fig1
  2. A list of all transaction for the current date will be displayed. You can choose a different date by tapping the Date field in the top-left corner.
    B12 fig2
  3. Tapping a transaction will show you the receipt.
    B12 fig3
  4. Use the Print button to print a copy, or the Refund button to issue a refund.
    B12 fig4

How to Cancel a Sale

Resolut Online Documentation, How-to

B1- How to Cancel a Sale

  1. In the Resolut Online POS app, tap Sale

    B1 fig1

  2. Select the product to be returned, and tap the “Back” arrow

    B1 fig4

  3. A confirmation window will pop-up. Tap Yes to return the item

    B1 fig3

How to Park & Retrieve Bills

  1. In the Resolut Online POS app, tap Sale

    B1 fig1

  2. Select the products you would like to park

    B2 fig2

  3. Tap P to park the products

    B2 fig9

  4. At this point, you can either create a new bill for these products by tapping Create new bill, or merge the items with an existing bill by selecting it from the list

    B2 fig4

  5. Leave a remark if required, and then tap OK

    B2 fig5

  6. Tap P to retrieve the parked bill

    B2 fig10

  7. Select the bill from the list

    B2 fig7

  8. You can add additional products to the bill and then finish the sale, or park it again to finish later

    B2 fig8

How to Perform an EFT Sale

  1. Login to the Resolut Online POS app, and tap Sale

    B1 fig1

  2. Select a product and tap the payment button to complete the sale

    B3 fig5

  3. Select your EFT Payment Method to process the payment via EFT.

    B3 fig6

How to Remove a Line Item

  1. Login to the Resolut Online POS app, and tap Sale

    B1 fig1

  2. Select a product to add it to the bill

    B4 fig2

  3. To remove the line item from the bill, tap the Dustbin icon next to the item

    B4 fig5

  4. A confirmation window will pop-up. Tap Yes to remove the line item

    B4 fig6

How to Refund a Sale

  1. To fully refund a completed sale, tap Functions > Refund sale

    B5 fig2a

  2. You will be asked to enter the Location ID, Device Number, and Ticket Number from the receipt

    B5 fig4

    Here is an example to show you where you can find this information on the receipt:

    B5 fig5

  3. Select the products to be returned using the +/- buttons. You can choose to return only individual line items or select them all to return the entire sale. Then tap OK

    B5 fig6a

  4. Tap the Payment button

    B5 fig7a

  5. Choose the EFT option to complete the refund and return the funds to the customer

    B5 fig8a

How to Split a Sale

  1. When making a sale, add items to the bill and tap P to park the sale

    B6 fig1a

  2. Then select the table that bill will be assigned to

    B6 fig2a

  3. Later, when it’s time to split the bill, tap P to retrieve the sale and select the table you want to split

    B6 fig4a

  4. Once the bill is retrieved, tap Functions > Split sale

    B6 fig5a

  5. Select the items to be put onto a new bill

    B6 fig6a

  6. The new bill appears in the cart, ready for you to close the sale. The rest of the items are still on the original order, which you can retrieve when needed

    B6 fig7a

    B6 fig8a

Selfcheckout

  1. To activate the self checkout functionality, a device with the Selfcheckout type has to be created in Infrastructure > Devices
    B7 fig1

  2. Once a Selfcheckout device is created, download the Selfcheckout application and enter the activation code on the activation screen.
    B7 fig2

  3. The customer can then scan products with an external scanner.
    B7 fig3 B7 fig4

  4. After clicking the payment button and completing the payment, a “You have Paid” message appears on screen.
    B7 fig5

  5. When the company is set to airport settings. Selfcheckout switches to flight mode. A boarding pass must be scanned to use the selfcheckout
    B7 fig6

  6. When the boarding pass is scanned the flight number is listed in the top-right.
    B7 fig7

  7. The customer adds products to the cart, clicks the pay button and follows the instructions.
    B7 fig8

  8. Sales are shown in the Sales report and Journal browser in the Resolut Online back office portal
    B7 fig9 B7 fig10a

Automatic Startup

The Resolut Online POS app can be set to open automatically on startup.

  1. Press the Windows logo key + R, type “shell:startup”, then select OK.
    B9 fig1

  2. This opens the Startup folder. Drag and drop the BovertisPOS shortcut from the Start menu into the Startup folder.
    B9 fig2

  3. Restart Windows. The POS will open automatically.

Employee Sales

Employee sales are sales with an employee discount.
The Employee sales option appears on the Scan boarding card screen of the Resolut POS.

Set-up

Login to the Resolut Online portal and go to Configuration > Company settings. Under Airport settings, set up the Airport code, Price line EU and Price line non-EU.
B10 fig1

Scroll back up to “Company Settings” and check the Allow own employee sale checkbox to allow the users to apply the employee discount themselves.
B10 fig2

Employee sales must be enabled in the Role that will use it.
Go to Infrastructure > Roles and click the role you wish to edit. Scroll down and make sure the Employee sale checkbox is checked.
B10 fig3

You must also create a new user group for those users who will use Employee Sales.
Go to Infrastructure > Users and click the pencil icon to edit the user. In the Group field enter a name for the user group.
B10 fig4

Next, set-up a new promotion. Go to Discounts > Promotions and click + to create a new promotion.
Use the Trigger type “EmployeeSale” and the user group that you just set-up.

B10 fig5

Using Employee Sales in POS

On the Scan boarding card screen, tap Sale > Employee sale.
B10 fig6

Enter the current user’s PIN (if Allow own employee sale is enabled) or the manager’s PIN (if Allow own employee sale is disabled).
A discount panel with the current trigger will appear on the sales screen and the employee discount will be applied to related items.
B10 fig7

User Guide

Subsections of User Guide

Subsections of Assortment

Creating an Item Group or Subgroup

First, login to the Resolut Online Back office portal.

Create a New Group

Select Assortment and then Groups.

A4a fig1

In the right-hand corner, use the + icon to open the ‘New Item Group’ window.

A4a fig2

Add a Name and Number for the new group.

You can also choose to add any additional information you wish by creating a ‘Free text’ field.
Click OK to save the group.

Create a New Subgroup

Select Assortment and then Subgroups.

A4a fig3

In the right-hand corner, use the + icon to open the ‘New Subgroup’ window.

A4a fig4

Add a Name and Number for the new subgroup, and choose a parent group from the Group drop-down menu.

You can also choose to add any additional information you wish by creating a ‘Free text’ field.
Click OK to save the group.

Editing and Deleting a Group or Subgroup

A list of all Groups is visible when you return to Assortment > Groups. Subgroups are visible in Assortment > Subgroups. A4a fig5 You can edit a Group or Subgroup using the Edit pencil icon, or delete them from the Resolut Online Portal using the dustbin Delete icon.

Importing Items

First, login to the Resolut Online back office portal.

Select Assortment and then Items.

A4b fig1

Select Upload > Items to open the import window.

A4c fig2

If you do not already have an import file, click Get import sample to download a .csv template. Once you have an import file, click Select File and choose a .csv file from your device. Once the file is ready, click Upload.

A4c fig3

Manually Adding an Item

First, login to the Resolut Online back office portal.

Select Assortment and then Items.

A4b fig1

In the right-hand corner, use the + icon to open the form.

General

Add a Name and Number for the new item, and choose a group from the Group drop-down menu.
Select the Status from the drop-down menu and add a Description.

A4b fig2

Pricing

Click Add Price to expand the price form, and enter the value of the item under Price.
At this point you can also add additional information such as a Start/End Date for the price, Barcode, Location, Variant and Priceline.

A4b fig3

Click Save to add the price.

Select the VAT amount from the drop-down menu.

Inventory

Select the Stock Unit of Measure from the drop-down menu.

A4b fig4

When you have added all the information you need to, click Save in the top-right hand corner to create your item.

Editing and Deleting an Item

A list of all Items is visible when you return to Assortment > Items. A4b fig5 You can edit an Item using the Edit pencil icon, or delete it from the Resolut Online Portal using the dustbin Delete icon.

Add Modifiers to an Item

Modifiers give your team options to adjust an item based on customer requests.

  1. Go to Configuration > Modifiers and click + to create a new modifier.

  2. In the Modifier window, make sure the new modifier has a Name, and Type;

  • Per Unit- Applies the modifier to the item
  • Per Sale- Applies the modifier to the entire sale

Set the modifier to Active using the checkbox. C5 fig2

  1. To add a modifier field, click New field. Under Key add the name of the field, and then choose a Type from the drop-down menu. Use the Optional checkbox to set whether the field is a mandatory selection or optional. C5 fig7

  2. If you choose Selection from the “Type” list, the “Selection options” menu will expand. Set a “Display Type”, such as Tiles, then click New option and enter a Value. If you chose the selection “Image Tiles”, you can also add an image to the tile by clicking Select image. You can set the tile as Default using the checkbox or Delete it using the dustbin icon. Check the Multiselect checkbox if more than one option can be selected. Once you have added all your options, click OK to save the modifier fields. C5 fig8

  3. Click Assign items to assign this modifier to specific items, or Assign Subgroup to assign it to an entire Subgroup. C5 fig9

  4. Once you are happy with your modifier, click OK to save it.

  5. When an item with modifiers is sold, the modifier menu appears. The fields shown depend on the type and configuration of the modifier.

    Modifiers screen when using Resolut POS: C5 fig10 C5 fig4

    Modifiers screen when using POS4: C5 fig11

  6. Modifiers are also shown on the kitchen ticket and receipt.
    C5 fig5

Editing and Deleting Modifiers

A list of all Modifiers is visible when you return to Configuration > Modifiers. C5 fig6 You can edit a Modifier using the Edit pencil icon, or delete it from the Resolut Online Portal using the dustbin Delete icon.

Package Deposits

It is possible to add a Packaging deposit to items that have returnable packaging through the Resolut Online back-office portal.

Creating a Package Item

  1. First, go to Assortment > Items and create a new item for your packaging. C6 fig0

  2. Go to Configuration > Package deposits and click + to create a new package deposit. Enter a Description and Amount and then use the Item drop-down menu to find the packaging item you just created. Click OK to create the new package deposit.
    C6 fig1a C6 fig2a

  3. Go to Assortment > Items and double-click an item to open the Item details window. Under “Organization” you can select a package deposit to apply to the item.
    C6 fig3a

  4. When an item with a Package deposit is added to the cart, the Package deposit is shown underneath the item.
    C6 figa4

Returning a Package Item

  1. When a customer returns the packaging use the Package deposit returns button.
    C6 fig5a

Note: If you cannot see the Package deposit returns button, make sure that package deposit returns are enabled for your role in Infrastructure > Roles.

  1. Scan the item barcode and click OK.
    C6 fig6a

  2. If an item without a package deposit is scanned a message is shown.
    C6 fig8a

  3. The balance for the packaging is added to the cart.
    C6 fig7a

Complete the sale to return the packaging deposit to the customer.

Setup a Kitchen Screen

Install the Kitchen Screen App

Go to https://downloads.bovertis.nl/kitchenscreen.uwp/prod/index.html and download the Kitchen Screen application to the device that will be used as the Kitchen screen. C7 fig10

Setup the Kitchen Screen

  1. In the Resolut Online back-office portal, go to Configuration > Company settings.

    Then choose an option from the drop-down menu “Kitchen distribution policy” (POS/BOS)
    as well as an option from the drop-down menu for “Kitchen policy” (No/All/Balance) C7 fig1a

  2. Go to Assortment > Kitchen groups and click + to create a new Kitchen group.

  3. Go to Infrastructure > Devices, and create a new Device. In the “Device Detail” window, check the “Kitchen Screen” checkbox.
    C7 fig4a

  4. Scroll down to “Applications” and expand Kitchen screen APP. Then select the previously created Kitchen Group from the drop-down menu.
    C7 fig5a

  5. Open the Kitchen screen app and activate it with the generated Activation code. Then login to the kitchen screen app using your PIN.
    C7 fig7

Setup Items for the kitchen

  1. In the Resolut Online back-office portal, go to Assortment > Items and click the edit icon of an Item you want to set as a kitchen item.

  2. In the Item edit window, scroll down to “Organization” and check the “Send to kitchen” checkbox and select the Kitchen group you previously created. Click Save to finish.
    C7 fig9a

Using the Kitchen Screen

When Kitchen items are purchased through the Resolut POS app, the order will appear on the Kitchen Screen once the sale is completed. C7 fig11

Tap the order to begin preparing it. The order will be highlighted blue, and a countdown timer will start. Tap the order or tap Detail to open up the order. C7 fig12

When the order is finished, tap it again to close the order. The order will be highlighted in red, and will disappear from the screen in a few seconds. C7 fig13

Printing Order Numbers with POS4

If you are using the Kitchen screen with a POS4 setup, use the parameter EnableOrderNumbering. When enabled, the order numbers will be displayed both on the kitchen screen receipt and on the POS receipt. In this case order numbers are 4 digits long, where the first digit is the PosId followed by three more digits. For example, for POS number “1” the numbering sequence would be “1001”, “1002” and so on.

Creating a Kitchen Group

Creating Kitchen groups allows you to send items from orders on the Kitchen Screen to printers in different locations.

  1. In the Resolut Online Portal, Go to Assortment > Kitchen Groups and click + to create a new Kitchen Group. C10 fig1

  2. In the “New Kitchen Group” Window, give the group a Name and click OK to Save the new Kitchen group. C10 fig2

  3. To print orders from a Kitchen group on a Kitchen printer, you will need to set the distribution policy. Go to Configuration > Company Settings and under “Kitchen distribution policy” select POS, then click Save. C10 fig3

Kitchen Printer

Setup a kitchen printer to print orders from the Kitchen Screen using Kitchen Groups.

  1. In the Resolut Online portal, go to Infrastructure > Devices and click + to create a new device.

  2. Give your device a Name, Number and Location, then select the “Device Type” Kitchen printer.
    C13 fig1

  3. Choose a Kitchen group from the drop-down menu.
    C13 fig2

  4. Click Save to create the device.

Creating a Brand

You can assign your items to a Brand, which allows you to better categorize your products in Resolut POS. the first step is to create a Brand in the Resolut Online Portal.

  1. In the Resolut Online Portal, Go to Assortment > Brands and click + to create a new brand. C8 fig1

  2. In the “New Item Brand” Window, give the brand a Number and Name. C8 fig2

You will now be able to assign your items to the brand. Go to Assortment > Items, select an item to edit, and under “Organization” choose the brand from the Brand drop-down menu. C8 fig3

Editing and Deleting a Brand

A list of all Brands is visible when you return to Assortment > Brands. C8 fig4 You can edit a Brand using the Edit pencil icon, or delete it from the Resolut Online Portal using the dustbin Delete icon.

Creating a Price Line

You can create a Price line to group items together by price.

Creating a Price Line

  1. In the Resolut Online Portal, Go to Assortment > Price Lines and click + to create a new Price line. C9 fig1

  2. In the “Price Line” Window, enter a Number and Description. You should also check or uncheck the Active, Allow Discount, Use VAT and Show Price Info checkboxes, according to your preference. C9 fig2

Click Save to create the new Price Line.

Assigning Items to a Price Line

  1. You can apply a price Line to an item by going to Assortment > Items and opening the item you need.
  2. Under “Pricing” click Add price and select a price line from the Price line drop-down menu. C9 fig3

Label Printing

Print price labels for your items from with the Resolut Online Portal.

  1. Login to the Resolut Online Portal, and go to Items. Click Generate labels to create a new label.
    C11 fig1

  2. In the “Item price label configuration” window, choose the Label and price settings tab. Enter the Paper width and Paper height then select a Location. You can also choose a Sale channel or add a date at this point.
    C11 fig2

  3. Open the Items tab, and search for the item you need using the Items, Groups, and Subgroups, filters. Select the items you need and transfer them to the “Selected Items” field using the right-pointing arrow. Once you have selected all the items you need, click OK.
    C11 fig3

  4. The export of the label PDF file will begin automatically. Open the Notifications menu to download the exported PDF.
    C11 fig4

Alphanumeric barcodes

By default, Barcodes used by Resolut are numeric-only. However, it is possible to setup alphanumeric barcodes.

  1. In the Resolut Online Portal, go to Configuration > Company Settings. Under “Company Settings” scroll down and check the Allow alphanumeric barcodes checkbox. Click Save.
    C12 fig1

  2. Now, the next time you Create an Item, under “Pricing”, click Add Price and add an alphanumeric barcode.
    C12 fig2

  3. Click Save. The Item will be validated and created. You will now be able to enter the alphanumeric barcode into the Resolut POS to bring up the item.

Subsections of Infrastructure

Creating a New Role

Assigning Roles to your team members gives them access to different modules.

  1. In the Resolut Online Portal, Go to Infrastructure > Roles and click + to create a new Role. D3 fig1

  2. In the “New Role” Window, give the role a Name and the use the checkboxes to assign “Back office permissions” and “POS permissions” to the Role. D3 fig2

You can Filter the list of permissions if you need, or just check the Select All checkbox. For each permission, check read, write or enable.

Back Office Permissions POS permissions
Location module Settings
Device module Settings Edit
Item module Time Registration
Item Brand module Discount
Item Group module Ticket Discount
Item Subgroup module On Hold
Role module Restore
User module Refund
Distribution module Return
Discount module Offline Transaction
Device group module Search Item
Menu COnfiguration Reprint
Receipt Configuration Balance Deposit
Loyalty module Balance Check
Reports module Time Clock break
Restaurant Designer module Balance Withdrawal
Item Stock module Sale remark
VAT module Kitchen print
Application Wizard module Open Drawer
Customer Management module Customer
Invoice module New Customer
Public API Split Sale
Logistics module Scan
Price Lines module Orders
Currency module Package Deposit Returns
Exactonline module Enter Barcode
TimeClock module Continue of Cashcount difference
Sale channel module EFT Refund
Kitchen Group module Change Price
Age check module Change Price (Discount)
Orders module
Configuration module
Payment Types module
Emailing module

The left side of the POS permissions section contains checkboxes for enabling payment types (Cash, EFT payments, Invoice, Food tickets, Burn loyalty points, On account, Custom). The payment types will only be visible in this permission list if they have been configured in the Resolut Online Portal under Configuration > Payment types. D3 fig4

For all EFT payments you must also configure the EFT provider in the Device detail. Go to Infrastructure > Devices and click the Edit icon for the current device, then scroll down to the EFT providers section. D3 fig5

  1. Once you have assigned all the required permissions, click Save to create the new role. You can now assign this role to a user. D3 fig3

Creating a User

First, login to the Resolut Online back office portal.

Select Infrastructure, then Users.

A5 fig1

In the right-hand corner, use the + icon to open the ‘New User’ dialog box.

A Number and PIN code should be automatically generated. Fill in a Name and valid Email address.

A5 fig2

Create a password, and enter it a second time to confirm. You can also add the user’s Role at this point if you wish.

Once you have finished, click OK to save the new user.

Adding a Device

To add a device, first login to the Resolut Online Back office portal.

Select Infrastructure and then Devices.

A3 fig1

In the right-hand corner, use the + icon to open the ‘Device Detail’ dialog box.

Give your device a Name and Number, and select a Device Type and Location from the drop-down menus.

A3 fig2

At this point, you can add an EFT Provider if you need to.
You can also choose to add any additional information you wish by creating a ‘Free text’ field.

A3 fig3

Once you have finished making changes, click OK to create the device. An activation code will be generated.

Start your POS device and enter the activation code when prompted.

You can now start using your device.

Editing and Deleting a Device

A list of all Devices is visible when you return to Infrastructure > Devices. A3 fig5 You can edit a Device using the Edit pencil icon, or delete it from the Resolut Online Portal using the dustbin Delete icon.

Adding a Location

To add a location, first login to the Resolut Online Back office portal.

Select Infrastructure and then Locations.

A2 fig1

In the right-hand corner, use the + icon to open the ‘New Location’ dialog box.

Fill in the Location address and set the Location Type to either ‘Shop’ or ‘Restaurant’.

You can also choose to add any additional information you wish by creating a ‘Free text’ field.

A2 fig2

Finally, you can add a ‘Customer Display’ image by clicking Select Image (Idle) or Select Image (Sale) and choosing an appropriate image from your computer.

A2 fig3

Once you have finished making changes, click Save to add the Location.

Editing and Deleting a Location

A list of all Locations is visible when you return to Infrastructure > Locations. A2 fig4a You can edit a Location using the Edit pencil icon, or delete it from the Resolut Online Portal using the dustbin Delete icon.

Device Groups

Device groups are configuration groups for Devices. You can setup different Menu configurations and Receipt configurations for each Device group. Each Device assigned to a Device group will use the Menu configuration and Receipt configuration assigned to the Device group.

Create a Device Group

  1. In the Resolut Online back-office portal, go to Infrastructure > Device groups and click + to add a new Device group.

  2. Name the new device group and select a Menu configuration and a Receipt configuration, then click Save.
    D2 fig2

Assign a Device to Device Group

  1. Go to Infrastructure > Devices and click on the edit icon of the device which you want to assign to the Device group.

  2. In the Device detail window, select the Device group from the drop-down menu and click OK.
    D2 fig4a

Check which Devices are assigned to a Device group

  1. Go to Infrastructure > Device Groups and click on the device group to check the assigned devices

  2. You can find assigned Devices for this Device group at the bottom of the Device group detail. D2 fig6a

How to upload and view a database

Upload a local Resolut POS database to the Resolut Back Office portal.

Uploading a Database

  1. Login to the Resolut Online POS and tap Settings.
    C3 fig1

  2. Open the Diagnostics panel and select Send database to Server.
    C3 fig2

  3. If the message “Wifi not available, send file anyway?” appears, click Yes.
    C3 fig3

  4. Login to the Resolut Online Back office portal and go to Infrastructure > Devices. Find your device and click the edit icon.
    C3 fig4

  5. In the device detail window, scroll down to “Databases” and find the database sent from the POS. Click the download icon.
    C3 fig5

Viewing a Database

You can use DB Browser for SQLite for viewing databases.

  1. Download and install the latest version of DB Browser for SQLite from https://sqlitebrowser.org/dl.

  2. Open DB Browser (SQLite).

  3. In the menu go to File > Open Database… C3 fig6

  4. Choose the downloaded .db file.
    C3 fig7

  5. In the Browse Data tab you can choose and view database tables.
    C3 fig8

Reports Role

  1. To create a user with access only to the “Reports” and “Journal” modules, go to Infrastructure > Roles, and click the + icon to create a new role.

  2. Give the role a name, and tick the Sale reports and Journal tickboxes. Then click Save.

D5 fig3

  1. Go to Infrastructure > Users.
    Select an existing user from the list, or create a new one by clicking the + icon. Under Roles, select Reports role to apply only the Report role to the user.

D5 fig5

  1. Logout from the current user. Enter the credentials of the new created Reports role user and sign in.
    D5 fig6a

The user can see only the Sale reports and Journal modules.
D5 fig7a

Menu Configurations

Resolut POS supports multiple configured menus (menu profiles) that can be changed in the configuration.

Under Menu Configuration it is possible to quickly change the navigation menu in the interface, or by editing a text file. Text can also be pasted into the text area.

  1. In the Resolut Online Portal, Go to Infrastructure > Menu Configurations and click + to create a new Menu configuration. D7 fig1

  2. Give the configuration a Name and enter a Text Definition in the Text Editor. D7 fig2

  3. The menu text has the following structure:

\$Profile=Default

@Main\|Main

1\|App\|AppSignOn\|Text\|Sign-on

2\|App\|AppSignOff\|Text\|Sign-off

3\|App\|AppOpenDrawer\|Text\|Open drawer

@MainOptions\|MainOptions

1\|App\|AppBrowseJournal\|Text\|Journal viewer

@Handies\|Handies

1\|App\|AppPrintLastSalesTicket\|Text\|Last receipt copy

2\|App\|AppCalculator\|Text\|Calculator\|IconId\|1002

The first line should always start with \$Profile=\<name\>, this is the name of the menu which can be configured in the parameter .

There are a few pre-defined menu names:

@Main the main menu.

@MainOptions the menu behind the options (^) button.

@Handies the menu that opens on top-left (V) button.

@Sales the sales menu.

@SalesOptions the menu behind the options (^) button in the sales screen.

@Payments the menu in the payment screen

@Boardingcard the menu in the boarding cards screen (airports only)

@BoardingcardOptions the menu behind the options (^) button

Each menu can have one or more buttons in the following format where the parameter and icon id are optional:

<button>|<button action>|<Command or menu>|(Parameter | VALUE)|Text|<menu text>|( IconId |<number>)


This example sets the 4th button with command AppSales and Text “Sales” with icon 12:

4|App|AppSales|Text|Sales|IconId|12


This example sets the 4th button with command AppSales and Text “Sales” with icon 12:

8|Menu|OptionsMenu|Text|Other options|IconId|20
  1. In the Tree Editor, make sure the Configuration has a Function assigned. You can also edit the Number, Text, Definition and Icon ID. Click OK to create the configuration. D7 fig3

Receipt Configurations

Customize the look and layout of your printed receipts.

  1. In the Resolut Online Portal, Go to Infrastructure > Receipt Configurations and click + to create a new Receipt configuration. D8 fig1

  2. Give the configuration a Name. You can choose to upload a new header image by clicking Select New logo and add header and footer text. You can choose the alignment of the text, or make it bold if you wish. D8 fig2

  3. Insert placeholders to automatically bring information such as location onto the reciept. The supported placeholders are:

#LOCATION_ID
#LOCATION_NAME
#LOCATION_NUMBER
#TRANSACTION_DATE
#TICKET_NUMBER - (Not supported in POS4)
#CURRENT_DATE - (Not supported in POS4)
#USER_ID
#USER_NAME
#DISPLAY_NAME
#TYPE - (Not supported in POS4)

QR Code Configuration

It is possible to add a QR code to your receipts to send your customers to a review site, or your company website. D8 fig4a

  1. Add the URL of your website in the QR code content field.
  2. In the QR code text field, add a short message to be displayed underneath the QR code.
  3. Click Add QR logo to upload an image to the centre of the QR code

D8 fig3

Once you are happy with your configuration, click Save to create the configuration.

Sale Channels

Create a Sales Channel

  1. In the Resolut Online Portal, Go to Infrastructure > Sale Channels and click + to create a new Sales Channel. D9 fig1

  2. Give the configuration a Name and a Number. D9 fig2

  3. Click Save to create the Sale Channel.

Adding Items to a Sales Channel

  1. Go to Assortment > Items and open the item you wish to add to the Sales Channel.

  2. Scroll down to “Sales Channels” and click Add Sales Channel. D9 fig3

  3. Click Save to assign the Sales Channel.

Logistics

The Logistics module contains information on managing suppliers, stock, and purchasing in the Resolut Back Office client. This section will cover:

  1. Adding Suppliers
  2. Automatic Orders
  3. Purchasing
  4. Stock
  5. Waste

Click > to begin, or follow the links above to visit any section of the guide.

Subsections of Logistics

Adding a New Supplier

To add a new supplier, log in to the Resolut Online portal and go to Logistics > Suppliers. Click + to open the “New Supplier” window.
E1 fig1

Make sure the supplier has a Name and Number. You can also enter an Address, Contact Person, and Contact details at this point, as well as a Business ID, Tax ID and VAT number if applicable.
Choose an Order send method:

  • Manual – Only Send Orders manually to this supplier.
  • Email – Orders will be sent by Email.
  • Integration – Use an Integration to send orders.

E1 fig2

Check the Automatic order creation checkbox to activate Automatic ordering.

Once you have entered everything, click Save to create the new supplier.

Automatic Orders

1. Activate Automatic Orders

To set-up automatic ordering, log in to the Resolut Online Portal and go to Logistics > Suppliers.

Find the supplier you need and click to open the “Supplier Detail” window.

Scroll down and check the Automatic order creation checkbox.
Set up the Frequency and Time of order using the buttons and drop-down menus.

At the bottom of the window, the “Last run” and “Next run” dates can be seen if applicable.

Once you are happy with the settings, click Save.
E2 fig1

2. Stock Information

Next you need to set up Stock Information for each item which will be ordered automatically.
Go to Assortment > Items and select the item you need. This opens the editing window.

Scroll down to “Stock Information”.
Click Add stock level. Enter the Location to be re-stocked and the Replenishment method:

  • None
  • MinMax - when the quantity of the current item in stock reaches the Min. stock, the item is ordered in a quantity that will supplement the quantity of resources for the item, up to the value of Max. stock (Order count = Max. stock – Min. stock).
  • SaleHistory - the order is created with the quantity that was sold.

Min. stock and Max. stock values only need to be set for the MinMax replenishment method.

E2 fig2

Once you are happy with the setup, click Save.

Purchasing

1. PURCHASE LIST

You can manually create a purchase list in the Resolut Online portal in Logistics > Purchase list.

Search for items by Name or Item number, enter a quantity to Qty and press Enter. The item will be added to the “Purchase List” below.

Important: Make sure your items have been assigned a supplier. Go to Assortment > Items and open the item. Scroll down to “Purchasing” and click Add purchase information. Choose a Supplier using the drop-down menu and check the Is Active checkbox. You can also set a Default supplier using the drop-down menu. When you are finished click Save.

E3 fig1

Change the quantity if required. You can also filter the purchase list by Location and Supplier. Clicking the three dots in the Actions column will give you the option to save or delete the order.
E3 fig2

Use the checkboxes on the left to select items. Once at least one item is selected, the Create order button appears above the Purchase List. Click it to create an order from the selected items.
If you are happy with the order, click Create order, or click Cancel to go back and edit.
E3 fig3

2. PURCHASE ORDERS

All purchase orders are displayed in Logistics > Purchase orders. You can filter the list of Purchase Orders by Location, Supplier, Status, Item and Order reference. Refresh the list using the refresh button.
E3 fig4

Clicking the three dots in the Action column gives you a few options for the order:

  • Deliver all – Immediately marks the order as delivered.
  • Deliver – Opens the “Purchase Order delivery” window, where you can mark parts of the order as delivered.
  • Export to PDF.
  • Send as email.
  • Edit.

Stock

To track an item as stock, you must first ensure that the item is marked as a Stock Item. Go to Assortment > Items and open an item. Scroll down to “Inventory” and make sure the Stock Item checkbox is checked.
E4 fig1

You can also enable the item weight requirement by checking the Weight item checkbox. If you do this, remember to set the Stock unit of measure and Purchasing unit of measure to KG, Gram or Litre, rather than PCS.
You can also set the percentage of alcohol content for Alcoholic products in the Alcohol percentage field and a purchase quantity in the Purchase quantity field.

ITEM STOCK

Items in stock can be seen under Logistics > Item stock. You can filter the list by Location and Item. Refresh the list using the Refresh button, or download the list using the downward arrow Download button.
E4 fig2

STOCK LIST

A Stock list can be created by going to Logistics > Stock lists and clicking +.

Note: Item stock types (Inventory, Waste, Purchase order created) can by configured in Logistics > Item stock types.

E4 fig3

You can find items in the list by Name and Number in the Item search section. The item is added to the list by entering the quantity to Qty column and pressing Enter.
E4 fig4

Items are then displayed in Item stock list below.
E4 fig5

It is possible to delete items from the stock list in the Action column.

Once you have finished, click Save.

ITEM STOCK TYPES

Items stock types can be configured in Logistics > Item stock types.
E4 fig6

STOCK LOG

The Stock changes list can be found in Logistics > Stock log. It can be filtered by Locations, From date, To date, Item and Change type.
E4 fig7

Waste

  1. To generate waste reports, the Merchant must have the Logistics module activated. Login as a reseller, and go to Merchants > Merchants and click the edit button. Under Modules click the toggle switch LogisticsModule.
    C4 fig1

  2. Once the Logistics module is switched on, login as the merchant and go to Infrastructure > Roles. Click on a role to view the “Role Detail” window. Scroll down to “LogisticsModule” and ensure that the checkbox EnableLogistics is checked.
    C4 fig2

  3. To track waste, go to Logistics > Item stock types then click Waste to edit. Here you can choose to record waste for all items, or only for items that are in stock by checking the Only stock keeping checkbox.
    C4 fig3 C4 fig4

  4. If Only stock keeping is checked, only items with the “Stock item“ active field will be tracked.
    C4 fig5

  5. Go to Logistics > Stock lists and click + to create a new Stock list for waste items.
    C4 fig6 C4 fig7

  6. Enter the quantity of items put to waste. Click Save.
    C4 fig8

The waste values are shown in “Items on stock list“.
C4 fig9

  1. To see a Waste report go to Logistics > Sale reports > Waste report.
    C4 fig10

  2. Waste report and items in stock can be used also with Resolut Online Terminal application, which can be downloaded from: https://downloads.bovertis.nl/xambaterminal/prod/apk/xambaterminal.html

  3. Device with the Resolut Online Terminal application installed can be activated by creating a new device in Devices, with the Device type “Terminal“.
    C4 fig11

  4. Activate the device using the code generated in device detail.
    C4 fig12

  5. In the Resolut Online Terminal, choose Waste, scan the item and add the quantity.
    C4 fig13

  6. After scanning all items, select Options in left menu and choose Upload list.
    C4 fig14

  7. All scanned products from the Resolut Online terminal are shown in Stock list – Item on stock list.
    C4 fig15

  8. Scanned products are also listed in the waste report.
    C4 fig16

Sales Reports

Viewing Sales Reports

Resolut Online generates a variety of sales reports, which can be found under Sales Reports in the left hand side menu. F1 fig1

Sales reports can be filtered using the Period, Location, Device, User and Sale Type drop-down menus. Filters can be cleared using the X button. Results can be refreshed using the Refresh button. F1 fig2

Downloading Sales Reports

Use the downward-arrow Download button to download the current Sales Report. A .csv file will be saved to your device. F1 fig3

Other Sales Reports

More specific reports with graphs are accessible in the left-hand side menu:

  • Sales Report by Item
  • Sales Report by Item Group
  • Sales Report by User
  • Sales Report by Device
  • Sales Report by Location
  • Sales Report by Period

Use the Scales button to Compare two periods. F1 fig4 You can also use the menu button on the right-hand side to choose how to Export or Print the report and graph. F1 fig5

Subsections of Sales Reports

Other Reports

Viewing Reports

Resolut Online generates a variety of other reports, which can also be found under Sales Reports in the left-hand side menu. F2 fig1

These include:

  • Tax Report
  • Payment Report
  • Alcohol Report
  • Waste Report
  • Promotion Report
  • Promotion Campaign Report
  • Modifiers Report
  • Pivot Sales Report
  • Shifts Report
  • Cashier Activities
  • Assortment Configuration
  • Discounts Report
  • Expenditures Report
  • Combination Sale Report

Reports can be filtered using the Period, Location, Device, User and Sale Type drop-down menus. Filters can be cleared using the X button. Results can be refreshed using the Refresh button. F1 fig2

Downloading Reports

Tax reports, Payment reports and Alcohol reports can be downloaded using the downward-arrow Download button. A .csv file will be saved to your device. F1 fig3

Pivot Sales Report

Create and export a pivot table from sales data directly from the Resolut Online Portal.

  1. Open the Resolut Online Portal and go to Sales Reports > Pivot Sales Report

  2. At the top, set the Period, Location, Device or User.
    F4 fig1

  3. Click the Field Chooser icon on the left to open the “Field Chooser” window.
    F4 fig2

  4. Here you can set what information is included using the checkboxes under “All Fields”.
    F4 fig3

  5. By default each category in put in the “Column Fields”, but you can move it to “Row Fields” or “Filter Fields” by dragging it with the mouse.

F4 fig4 F4 fig5

Click OK to view your changes
F4 fig6

  1. Right-click on a column to manage sorting. F4 fig7

  2. Once you have the table set-up, click the Export icon to export the report. A .csv file will be downloaded to your device.
    F4 fig2

Combination Sale Report

Combination Sale Reports can be used to show how often an item is sold alongside other items.

To create a Combination Sale Report:

  1. Open the Resolut online portal and go to Sales Reports > Combination Sale Report.
  2. Use the Period field to select the period to create the report from.
    F3 fig1
  3. Use the Group by field to set how the results are grouped:
    • Location: displays results grouped by location
      F3 fig2a
    • Item: displays results numerically according to the Item number
      F3 fig3a
  4. Set the Min. Item Quantity to exclude items below a certain number of sales
    F3 fig4a

Results can be refreshed using the Refresh button, or cleared using the X. Use the Download button to download the report to your device.

Time Registration

Viewing Time Registration Logs

Resolut Online can record Time Registration Logs. They can be found under Time Registration in the left-hand side menu. G0 fig1

The logs can be filtered using the Period, Location, Device, and User drop-down menus. Filters can be cleared using the X button. Results can be refreshed using the Refresh button. G0 fig2

Downloading Time Registration Logs

Use the downward-arrow Download button to download the current Time Registration Log. A .csv file will be saved to your device. F1 fig3

Subsections of Time Registration

Create a New Time Registration Log

Under Time Registration > Time Registration Log click + to open the “Manually Add Time Action” window.

G1 fig1

Select an Employee and Device from the drop-down menus.

Choose a Type from the following:

  • Clock In – Start a shift
  • Clock Out – End a shift
  • Break Start – to begin a break period
  • Break End – to finish a break period

G1 fig2

Finally Enter a Date and Time. When the entry is complete, click Save.

G1 fig3

The new entry will be visible in the Time Registration Log.
G1 fig4

Subsections of Create a New Time Registration Log

Create a New Log in POS

  1. To create a Time Registration log in Resolut POS, tap Time registration on the Home screen.
    G3 fig1

  2. Tap Clock in.
    G3 fig2

  3. A confirmation will pop-up.
    G3 fig3

  4. When finishing the shift, tap Clock out to complete the Time registration for the day.
    A Break can be registered too, by tapping Break Start, and then closed by tapping Break end.
    G3 fig4

Time Clock Report

Viewing the Time Clock Report

The Time Clock Report can be found under Time Registration in the left-hand side menu.

G2 fig1

The report can be filtered using the Period, Device, and User drop-down menus. Filters can be cleared using the X button. Results can be refreshed using the Refresh button.
G2 fig2

Downloading the Report

Once the entries you need are displayed, use the downward-arrow Download button to download the Time Registration Log. A .csv file will be saved to your device.
F1 fig3

Create a Loyalty Scheme

  1. To create a Loyalty scheme, login to the Resolut Online portal and go to Loyalty program > Loyalty Schemes and click + to create a new Loyalty Scheme.

  2. In the “Scheme detail” window, make sure the Scheme has a Number, Name and a Points Name.
    Next, set the Earn ratio, and Burn ratio. For example:

    “Earn ratio = 10”
    for each euro spent, the customer gains 10 loyalty points

    “Burn ratio = 10”
    10 loyalty points = 1 euro when paying with loyalty points

    Enter a Start date, as well as an End date if needed. Don’t forget to check the Active checkbox to start using the Loyalty Scheme straight away.

    Once you have finished, click OK to create the new Loyalty Scheme.
    I1 fig1

  3. Loyalty points can only be earned from items that have Earn loyalty points checked in the item configuration. Go to Items and select the item you need. Scroll down to “Pricing” and make sure that the Earn loyalty points checkbox is checked.
    I1 fig3a

Subsections of Create a Loyalty Scheme

Loyalty Cards

Create Loyalty Cards

  1. To create a new Loyalty Card, go to Loyalty Program > Loyalty Cards, and click + to open the “Generate Loyalty Cards” window.
  2. Enter a Card Count and select a Card Scheme from the drop-down menu. Once you are happy with your selection, click Generate to create the Loyalty cards.

I1 fig9

Using Loyalty Cards

  1. Loyalty cards can be either scanned or the bar code entered manually. Once recognized, loyalty points are added to the customers loyalty card for the current sale, and their balance is visible.
    I1 fig6a I1 fig7a

  2. Customers with enough points can choose to pay for the sale using loyalty points.
    If they don’t have enough points a message is displayed.
    I1 fig8

  3. In Loyalty Cards you can see a list of individual cards with their loyalty points and loyalty points history.
    Click the Edit to view the card history or Deactivate the card.
    I1 fig4

I1 fig5

Subsections of Configuration

Setting-up VAT

Set VAT rates for your products that will be applied in Resolut POS.

Setup

First, login to the Resolut Online back office portal.

Select Configuration, then VAT.

A7 fig1

Select a VAT rate from the list to open the ‘VAT Detail’ screen.

A7 fig2

From this view, you can modify the Name and Number of the VAT rate.
Under ‘VAT Percentages’ you can add a new VAT rate by clicking Add, or delete the existing rate by clicking the dustbin icon.

A7 fig3

Once you have finished, click Save to save your changes, or Cancel to discard them.

Applying VAT

Go to Assortment > Items and select the item you need. Under “Pricing”, choose a VAT rate from the VAT drop-down menu. A7 fig4

Click Save to set the VAT rate.

Company Settings

You can adjust your back office settings under Configuration > Company Settings.

Company Settings

This section contains a number of settings that can be adjusted:

  • POS menu
  • Receipt printing mode – Use the drop-down menu to select when a receipt should be printed.
  • Sale mode – Use the drop-down menu to select the sale mode
  • Multi sign-on - Use the drop-down menu to select whether multiple users can be signed-on at once.
  • Ask remark on Parking – Check the checkbox to prompt with a Remark field before parking a ticket.
  • Ask merge on Parking – Check the checkbox to prompt with the option to merge tickets when parking a ticket.
  • Ask print invoice – Check the checkbox to ask before printing an invoice.
  • Print Merchant copy mode – Use the drop-down menu to select when a Merchant copy is printed.
  • Print customer area – Check the checkbox to enable printing the customer area.
  • Group sale lines – Check the checkbox to group sale lines together by item.
  • Use VAT – Check the checkbox to enable VAT.
  • Restrict tag menu to location group – Check the checkbox to restrict the tag menu.
  • Kitchen distribution policy - Use the drop-down menu to select whether distribution of kitchen orders is done via the POS or BOS.
  • Kitchen Policy - Use the drop-down menu to select kitchen orders are distributed between multiple kitchen screens/printers
  • Print remark area for kitchen – Check the checkbox to enable a remark field for kitchen tickets.
  • Kitchen receipt count – Enter the number of kitchen receipts.
  • Receipt barcode mode - Use the drop-down menu to select how barcodes are displayed on receipts.
  • Transaction booking time – Enter the required time for the end of the fiscal day.
  • Order printing policy - Use the drop-down menu to select the format for printing order numbers.
  • Use local parking – Check the checkbox to enable local parking of tickets.
  • Ask deposit remark - Use the drop-down menu to select whether a remark should be added when making a deposit, and whether it should be optional or mandatory.
  • Ask discount remark - Use the drop-down menu to select whether a remark should be added when applying a discount, and whether it should be optional or mandatory.
  • Numeric input format - Use the drop-down menu to select a numeric format. Choose from either decimals (1.50 euro) or integers (150 cents).

Cashcount Settings

Use the drop-down menu to select if a cashcount should be made, and also whether it should be performed for every user separately, or only for each shift.

J2 fig1

Airport Settings

Set your Airport Code and choose a Price line EU for EU countries and Price line non EU for countries outside the EU.

J2 fig2

Customer Display

Upload images for the customer-facing screens. Click Select image (Sale) for the sales screen, Select image (Idle) for the idle screen and Select image (Sale background) for the sales screen background.

Images should be no larger than 2Mb and should be .bmp or .png files.

Enter a value in “Image change interval” to adjust how quickly customer images will change. The value must be between 10-300 seconds.

These settings can be changed for individual location or devices. J2 fig3

BOCA Printing

Click Add a template to upload a template for your BOCA thermal printer.
J2 fig4

Company ID

Use this field to enter a Company ID, if needed.

Set Your Currency

First, login to the Resolut Online back office portal.

Select Configuration, then Currencies.

A8 fig1

In the right-hand corner, use the + icon to open the ‘New Currency’ dialog box.

Fill-in a Number, Description, ISO Code and Exchange Rate for the currency you need.

A8 fig2

If you have not set-up a currency yet, make sure to check the Default checkbox, to make this currency the default currency. The Exchange Rate should be set to “1.0”. Later if you add a second currency, set the exchange rate accordingly, where the default currency = 1.0.

For example:

The default currency is EUR, set to “1.0”.

The secondary currency is USD, set to “1.2” reflecting the exchange rate.

Once you have finished, click OK to add the currency.

Integrations

Resolut Online currently has a number of integrations to help streamline your Point-of-Sale operation. In the Resolut online back office portal, you can find them under Configuration > Integrations. These include:

More information about each specific integration can be found by following the link, or by contacting our support team.

Note: for all our integrations, data import runs every 4 hours and transaction export runs every 30 minutes.

Subsections of Integrations

Microsoft Dynamics/ Axapta

Configure the Microsoft Dynamics/ Axapta integration.

Set-up

Go to Configuration > Integration and on “Axapta” click Configure .

J19 fig1

In the “Configuration – Axapta” window, enter:

  • AX web service URL for data import
  • AX web service URL for ordering
  • Company ID
  • Start item ID

Enter a date in the From field, and choose whether to Import prices, Import items for purchasing or Import barcodes by checking or un-checking the checkboxes.

Make sure to choose a Supplier from the drop-down menu, and select a Customer.

J20 fig1

Click Save to finish the configuration.

RetailNXT

Configure the integration with RetailNXT

Set-up

Go to Configuration > Integration and on “RetailNXT” click Configure .

J7 fig1

In the “Configuration – retailnxt” window, enter the URL, and API Location. You can also add a Store EAN and Cash Register id at this point.
J17 fig1

Click Save to finish the configuration.

FTP Upload

Go to Configuration > Integration and on “FTP Upload” click Configure .

J7 fig1

In the “Configuration – FTP Upload” window, enter the Server, Port and Directory. Then add a Username and Password. You can also test the connection at this point by clicking Test Connection.
J18 fig1

Scroll down, and choose an Export Template from the drop-down menu. You should also make sure to pick a Frequency using the radio buttons. Set the number of days between uploads by entering a number in the Repeat Every field, and set a Time.
J18 fig2

Click Save to finish the configuration.

Previously uploaded files can be seen under “File History”.

VAT Free

Configure the VAT Free integration for the Resolut Online POS.

Setup

  1. In the Resolut Online Portal, go to Configuration > Integrations. Find the VatFree integration and click Configure.
    In the Configuration window, set the Retailer ID and API Secret.
    J28 fig1

    NOTE: These screenshots show test environment values! Please contact our Support Team if you need assistance with your environment.

  2. Go to Infrastructure > Roles, find the role that will be making VatFree sales and check the Vatfree checkbox.
    J28 fig2

Use in Resolut Online POS

Tap Functions, then the Vatfree button, to register the current sale as Vatfree. Partial refunds on Vatfree registered sales are not possible.
J28 fig3

Subsections of VAT Free

Vatfree integration POS4

Setup

  1. Be sure that the device number of the device you are using contains the number 1. For example: “17”, “41”, or “1”. VatFree needs this in order to identify a POS device.

  2. Open POS4 and in the Plugins table add the line VatfreePlugin.dll. POS4 autoupdate will download the plugin.
    J14 fig1

  3. In the Resolut Online Portal, go to Configuration > Integrations, and under “VatFree” click Configure. Set the Retailer ID, and the API Secret.
    J14 fig2

  4. In POS4, open the menu editor, and add a VatFree button to the Sales menu.
    J14 fig3

  5. When making a sale, if the user wants to register the sale on vatfree.com, press the VatFree button. This will mark the sale, and a notification will be shown.
    J14 fig4

  6. A VatFree receipt will be printed together with sale receipt. The user can scan the QR code from the VatFree receipt with the VatFree application to register the sale.

Intersolve

Configure the Intersolve integration.

Setup

NOTE: These screenshots show test environment values! Please contact our Support Team if you need assistance with your environment.

  1. In the Resolut Online portal, got to Infrastructure > Devices and open the device that will use Intersolve.
    Add a free text field to the device. Enter a Name. This will be the Intersolve POS ID. Make sure the Values are either “001” or “005”.
    J15 fig1a

  2. Go to Configuration > Integrations, find the Intersolve integration and click Configure.
    J19 fig1

  3. Enter the URL, Retailer ID, and Password. Then enter the Intersolve POS ID you created earlier and set a value for the Barcode Prefixes.

    NOTE: These screenshots show test environment values! Please contact our Support Team if you need assistance with your environment.

    J15 fig3

    URL: https://service-acc.intersolve.nl/webservices/webapigeneric.asp

    Retailer ID: 609701 or 609710

    Password:

    Intersolve POS ID: Free text field that was created on device

    Barcode prefixes: 700

Using the Intersolve Loyalty Cards

In the Resolut POS, customers can use the loyalty cards on the payment screen by scanning the barcode.
J15 fig4a

Resolut BOS Connector

The Resolut BOS Connector can be used to import and export transactions, and import data such as Employees, Items, Prices, VATs, etc. from Resolut BOS to Resolut Online BOS.

Set-up

  1. Go to Configuration > Integration and on “Resolut” click Configure
    J7 fig1

  2. Enter the BOS connection string and the Resolut connection string, as well as the Resolut BOS Company id and Resolut BOS Country id.
    J7 fig2

Connection strings template:

BOS connection string:

Data Source= 192.168.X.1;Initial Catalog=BosClientDatabase;User ID=username;Password=password;TrustServerCertificate=true

Resolut connection string:

Data Source=192.168.X.1;Initial Catalog=ResolutDatabase;User ID=username;Password=password;TrustServerCertificate=true

Data source – server IP

Initial Catalog – database of either Resolut or BosClient

User ID/password – login used to connect to server

TrustServerCertificate - optional

  1. Then choose which Transaction Types to import or export.
    J7 fig3

  2. Click Save to finish.

Piggy Plugin

Configuration in Resolut Online Portal:

  1. Go to Configuration > Integrations, find the Piggy integration and click Configure. J8 fig1a

  2. Enter the URL, Token field and Item J8 fig2a

PiggyBaseUrl - url of piggy backend (https://api.piggy.nl/api/v3)

  1. Go to Infrastructure > Devices and select a device Create a free text field and enter the Piggy api token

J8 fig4b

Usage in Resolut Online POS:

  1. In Resolut Online POS you can search for a contact with the Piggy button or scan a contact’s email address directly from the salescreen. Then select a reward with the Piggy Reward button. Contact, points and selected reward is shown above the sales screen. J8 fig5a

  2. The user can also use piggy gift cards for payment by scanning the card number from piggy portal.

J8 fig6a J8 fig7a

Subsections of Piggy Plugin

Create a Piggy Contact

It is possible to create a Piggy contact, and link an identifier to it, directly in Resolut POS.

Create a Contact

Tap Functions > Piggy. The contact search window will appear. Tap Create contact.
J24 fig1

In the “Create Contact” form, only the Email field is mandatory. Only one Piggy account can be created per email address.
Fill in the additional fields if needed, and tap OK to save the contact.
J24 fig2

If the email address has already been used, the message “Contact already exists” is shown:
J24 fig3

After a contact is selected, tap Link identifier to link an identifier to it.
J24 fig4

Scan the identifier with the scanner or enter the barcode manually.
J24 fig5

If the link identifier has already been used, the message “Contact identifier already exists” is shown:
J24 fig6

If the linking was successful, the Piggy contact can now be selected from the Sales Screen by scanning the linked identifier.

Add Piggy Credit

It is possible to check the balance of a Piggy gift card and print a balance overview, as well as add credits to the Piggy gift card.

Make sure you already have the Piggy integration configured.

Configuration

Before you can add credits to Piggy gift cards via Resolut POS, you must first configure an item for them in the Resolut Online Portal.
Open the portal, go to Items, and create a new item. Check the checkbox Ask price and select a Min. and Max. price.
J25 fig1

Go to Configuration > Integrations > Piggy and select the item in the Item for change amount operation field.
J25 fig2

Check the Balance and Add Credits in POS

On the Sales screen, scan the Piggy gift card. The card number, and balance are displayed. At the bottom of the screen there are options to Top Up, Print overview or Close the window.
J25 fig3

To top-up the Piggy gift card, select Top Up and input the amount of credit to be added. You can also input the price using the Calculator option. Select OK to add the item to the sale.
J25 fig4

Resolut eCards

Setup

  1. In the Resolut Online Portal, go to Configuration > Integrations. Find “Resolut eCards” and click Configure.
    J16 fig1a

  2. Enter the URL, Username, and Password.

    NOTE: These screenshots show test environment values! Please contact our Support Team if you need assistance with your environment.

    J16 fig2

Using the eCards

  1. eCard barcodes can be found in the Resolut eCards portal
    J16 fig3a

  2. In the Resolut POS, customers can use the eCards on the payment screen by scanning the barcode.
    J16 fig4a !

  3. After scanning the barcode, a confirmation message appears.
    J16 fig5

  4. In case of insufficient credit, the payment will fail and an error is shown.
    J16 fig6

  5. Transaction history can be found on the Resolut eCards Portal.
    J16 fig7a

Butlaroo

Configure the Butlaroo integration.

Set-up

Go to Configuration > Integration and on “Butlaroo” click Configure .

J19 fig1

In the “Configuration – Butlaroo” window, enter the URL, and make sure the Username and Password are correct. Click Save to finish the configuration.
J19 fig2

Ximedes

Configure the Ximedes integration.

Set-up

Go to Configuration > Integration and on “Ximedes” click Configure .
J21 fig1

In the “Configuration – Ximedes” window, enter your URL. J21 fig2a

Click Save to keep the configuration.

When you are ready to activate the integration, click Enable.

Exact

Configure the Exact Online integration.

Set-up

Go to Configuration > Integration and on “Exact” click Configure .

J7 fig1

In the “Exact Online Configuration” window, check that the Company ID and Endpoint are correct. Then enter the Callback URL, Client ID and Client Secret.

At this point, you can choose whether or not to check the Auto-renew access token checkbox.
J22 fig1

Click Save to finish the configuration.

SAP Integration

Configure the SAP integration.

Set-up

Go to Configuration > Integration and on “SAP” click Configure .
J30 fig1

In the “Configuration – SAP” window, enter an SAP Connection string and an SAP company id. You can test the connection by clicking Test connection.
J30 fig2

Through the SAP integration it is possible to import Items, Employees and Currencies from SAP into Resolut Online.

Items

Note: VAT rates and Kitchen groups must be set-up manually in Resolut Online before importing items from SAP. Please contact our support team if you need assistance with this.

Under “Items” add the Items table name from SAP.

To exclude certain item groups from having discounts applied, enter the “item group id” from SAP to the Discount exclude item groups field. The item ids should be comma separated. Users will not be able to apply discounts to items in these groups.
To set a starting date for the import, check the Change import since checkbox and set a date using the Import since field.
J30 fig3

Employees

Under “Employees” add the Users table name from SAP. To set a starting date for the import, check the Change import since checkbox and set a date using the Import since field.
J30 fig4

Currencies

Under “Currencies” add the Currencies table name from SAP
J30 fig5

Once you are happy with your settings, click Save to finish the configuration.

Tikkie Integration

Configure the Tikkie integration in the Resolut Online Portal.

Set-up

NOTE: Currently Tikkie can only be configured globally via the application configuration file. If you need assistance with this, please contact our Support team.

Bovertis Service Bus Configuration

In Bovertis service bus, there is a component (Azure function), which receives requests from the bank when a payment is made. This message from the bank is pared (based on Token) with the item, which is in the table TikkiePaymentTokens. The TikkiePaymentTokens contains:

  • Token the last section from the payment link
  • TikkieAccountId Id from TikkieAccounts table
  • ShopId Location number from resolut online
  • ItemId internal (autoincrement) item id from Items table
  • ItemDescription item name/short description
  • Amount item price

A message with the data above is sent to the message queue and messages from there are then processed via the Resolut online Tikkie integration.

Resolut Online Configuration

Configuration for this integration is in the application settings, and looks like this:

"Tikkie": {
   "ConnectionString": "",
    "TopicName": "",
    "SubscriptionName": "",
   "DeviceMapping":""
//LocationNumber,DeviceNumber;LocationNumber,DeviceNumber;...
 }

ConnectionString connection string to Azure service bus

TopicName topic name in the configured service bus

DeviceMapping to support multiple locations this mapping should be set between devices and locations. When a payment is made in a given location, then the transaction is booked in the portal according to this configuration. We recommend you create a new device rather than use an existing POS device, otherwise duplicate ticket numbers could cause issues. The configuration must look like this: “LocationNumber1,DeviceNumber1;LocationNumber2,DeviceNumber2;…”

Enable Tikkie

Once you have configured your Tikkie integration, login to the Resolut Online Portal and go to Configuration > Integrations and on “Tikkie” click Enable .
J31 fig1

POS4 configuration (payment notifications)

For receiving and showing notifications from finished Tikkie payments in POS4, the following parameters need to be set:

  • TopButtons.UseNewsItems – 1
  • BSBMessaging.Enabled – 1
  • Tikkie.NotificationsEnabled – 1
  • Tikkie.Topic – name of the topic in the message queue
  • Tikkie.BaseUrl – base URL of the Bovertis Service Bus
  • Tikkie.MessageQueue – connection string to the message queue
  • TopButtons.NewsItemsButtonIndex – value = position between 1-4

When the Tikkie notification is received, a message is shown in the top-left corner for 5 seconds with name and price of the sold product. J31 fig2

The button in the top-right corner shows number of recent received messages. J31 fig3

Clicking on this button, a list with all notifications received withing last 5 minutes is shown. J31 fig4

Tite Live Integration

To import products from Tite Live into Resolut Online, and export transaction from Resolut Online into Tite Live, configure the Tite Live integration in the Resolut Online Portal.

Set-up

Go to Configuration > Integration and on “Tite live” click Configure .
J32 fig1

  1. Enter the Protocol, Server and Port of your Tite Live server, then add the Directory.
    J32 fig2

  2. Choose the method of Authentication from the drop-down menu. Enter your User name, and either the SSHKey or Password.

    NOTE: If using an SSH Key, only keys in PEM format may be used.

    To view the SSH Key click Show SSH Key. You can test the connection using the Test connection button.
    J32 fig3

  3. Enter your Item import path and Transaction export path. If you need to use a different Item import sequence number, or Transaction export sequence number, check the relevant checkbox and enter the new sequence number in the field provided.
    If needed, check the Change last export key to change the export key and enter the new export key in the Export key field.
    J32 fig4

Once you are happy with the configuration, click Save.

Add a Payment Method

Add a payment method to POS through the Resolut Online Portal.

Create a Payment Method

First, login to the Resolut Online back office portal.

Select Configuration, then Payment Types.

A9 fig1

In the right-hand corner, use the + icon to open the ‘Pay’ dialog box.

Select a Category and Eft Provider Type, if applicable. The Menu Order and Number are automatically generated.

A9 fig2

At this stage, you can also uncheck the Active box if you wish to not use this payment method for the time being.

Use the Can Refund and Can Reverse checkboxes to set whether the payment type will be refundable or reversable. If refundable, set the Refund Mode using the drop-down menu.

Combining of a payment types can be enabled by checking the Can combine checkbox. The Burn points checkbox is used to enable a payment with loyalty points. Check the Open drawer box to open the cashdrawer after payment and Open drawer refund box to open a cashdrawer after a refund payment.

A9 fig3

Select a Customer Mode, Ask Remark mode, and Options mode from the drop-down menus.
If using the ‘Ask Remark’ mode, add a remark in the Ask Remark Comment field.

You can also choose to add any additional information you wish by creating a ‘Free text’ field.

A9 fig4

Once you have finished, click Save to add the payment method.

Add the Payment Method to a Role

All payment types must be enabled by Role in Infrastructure > Roles. Select a role to open the “Role detail” window and scroll down to “Payment Types”. Check both checkboxes. A9 fig5 Next, find the required Payment Types on the right-hand side of the permissions section and check those to be activated for this role. A9 fig6

Click Save. The payment type is now ready to use.

Subsections of Add a Payment Method

Quick Access Payments

Setup

  1. Login to the Resolut Online Portal and go to Configuration > Payment types. Open the payment type that you wish to set as quick access and check the “Quick access” checkbox.
    J29 fig1

Using Quick Access Payments

In the Resolut Online POS add items to the sale and select Functions > Payments.
All payments that have had the “Quick Access” checkbox checked can be found here. Click on a payment type and the current sale will be finished and paid directly from the sales screen.
J29 fig2

Assign an EFT provider

Here are the steps required to assign an EFT provider. For specific configuration parameters, see our list of EFT parameter configurations.

  1. In the Resolut Online back-office portal, go to Infrastructure > Devices and open the device you wish to edit.

  2. Scroll down to “EFT Providers” and click + to add a new provider.
    J26 fig1

  3. In the “Assign EFT provider” window Enter a Name, and select the Type from the drop-down menu.
    You will then need to enter a Configuration.

    We will use the EFT provider “Six” as an example:
    J26 fig2

    The configuration field should contain:

    IP|TID|port

It should look like this: 172.20.16.161|31395930|7784

NOTE: These are test values, if you are unsure what values you should use, please reach out to our Support team.

  1. Once you have entered all the details click OK, and then Save to finish assigning the EFT provider.

EFT Configuration Parameters

When setting up an EFT provider you will need to configure the correct parameters in the Device details (Infrastructure > Devices).

Below you can find configuration parameters for the most common EFT providers:

Adyen

To set-up an Adyen device, the EFT provider must be set in the device details as follows:

Name: Adyen

EFT provider: Adyen

Configuration: consists of 10 parameters, separated with semicolons:

1 – Terminal Id (from Adyen portal)

2 – Terminal IP

3 - Port (if not set, default is 8080)

4 - Logical POS ID

5 - Merchant account (account at Adyen portal)

6 - Encryption key (from Adyen portal: Point of sale > Terminal settings > Integrations)

7 - Encryption pass phrase (from Adyen portal: Point of sale > Terminal settings > Integrations)

8 – Environment

9 - Currency

10 - Print merchant receipt (if not filled in, the merchant receipt will not be printed)

J27 fig1a

Six (Wordline)

To set-up a Six device, the EFT provider must be set in the device details as follows:

Name: Six

EFT provider: Six

Configuration: consists of 3 parameters, separated with a pipe (|):

Individual parameters:

1 - Terminal IP

2 - TID of terminal

3 – Terminal port

J27 fig2a

CCV

To set-up a CCV device, the EFT provider must be set in the device details as follows:

Name: CCV

EFT provider: CCV

Configuration: consists of 5 parameters, separated with a pipe (|):

Individual parameters:

1 - Terminal IP

2 – POS IP

3 – Workstation ID

4 - Terminal port

5 – POS port

J27 fig3a

Vibbek (Wallee)

To set-up a Vibbek device, the EFT provider must be set in the device details as follows:

Name: Standalone

EFT provider: Standalone

Configuration: Leave empty

J27 fig4a

MyPOS

To set-up a MyPOS device, the EFT provider must be set in the device details as follows:

Name: MyPOS

EFT provider: MyPOS

Configuration: Leave empty

J27 fig5a

Standalone

To set-up a standalone device, the EFT provider must be set in the device details as follows:

Name: Standalone

EFT provider: Standalone

Configuration: Leave empty

J27 fig6a

Bovertis

To set-up a Bovertis device, the EFT provider must be set in the device details as follows:

Name: Bovertis

Name: Bovertis

Configuration: Serial number

Payplaza

To set-up a Payplaza device, the EFT provider must be set in the device details as follows:

Name: Payplaza

Name: Payplaza

Configuration: ECR ID J27 fig8

Sepay

To set-up a Sepay device, the EFT provider must be set in the device details as follows:

Name: Sepay

Name: Sepay

Configuration: Sepay requires 2 parameters- the SID and login. These are separated by a vertical bar “|” .

EFT Card Mapping

EFT mapping is used to assign a name to a type of EFT cards. For example, mapping the same name for different types of “Visa” cards.

Two tables are used for this. One at the system level (the default) and the second at the Company level.
The name from the system-level table is used if it is not overridden in the company-level table. If a mapping is not available for the current card type, the system creates a new entry in the default mapping table with the same name. The mapped card name will be used in the payment overview and csv export.

Set-up

The EFT mapping table at company level can be edited in the Resolut Online Portal, under Configuration > EFT card mapping.
J23 fig1

Click + to create a new entry.

In the “Card Mapping” window, enter the EFT card name and EFT card code. You can also choose to check or leave un-checked the Exact search checkbox.
J23 fig2

Click Save to create the new Card mapping entry.

Creating Vouchers

  1. In the Resolut Online back-office portal, go to Configuration > Payment types and click + to add a new payment type.

  2. Under Category select Voucher, give the voucher a Name and add the value of the voucher into Fixed amount. Be sure to uncheck the Can refund checkbox. Then click Save.
    J4 fig2a

  3. Go to Infrastructure > Roles and select the role in which the voucher payment will be enabled.

  4. In Role detail check the voucher option. Then click Save.
    J4 fig4a

Once you have completed the setup, the voucher you have created will be visible on the POS payment screen
J4 fig5a

Age Check on Restricted Items

In a case of an age restriction for sale of an item, confirmation window is shown after payment.
J5 fig1

In case of more items with different age restrictions, the highest age restriction is shown. Maximum born date is displayed, as well.

Settings

Turn on Age Check Module

  1. Login to the Resolut Online back office portal as a Reseller and go to Configuration > Companies then edit the company.

  2. Click the Modules tab, and under “Advanced Modules” use the toggle switch to turn on the AgeCheckModule. Click OK.
    J10 fig1a J10 fig1b

Create Age Groups

  1. Go to Configuration > Age groups and click + to add a new age restriction. Give the restriction a Name and set the Age. Click Save. J5 fig4a

Setup Age group for Item

  1. Go to Assortment > Items and click the edit icon next to the product you wish to apply an age restriction to.

  2. Scroll down to “Organization” and select an Age group from the drop-down menu. Click Save to save your changes. J5 fig6a

Companies

Create a New Company

To create a new company Login to the Resolut Online back office portal as a Reseller, then go to Configuration > Companies and Click +.

J13 fig1

  1. In the Info tab, under “Details”, enter a Name, Type and Parent Company. You can also add a Company ID, Business ID, Tax ID and a VAT Registration Number if needed.
    J13 fig2
  2. Scroll down to “Address” and use the drop-down menus to select a Country and Time Zone. You can also fill in the rest of the address, as well as adding contact details such as a Phone number, Email address and company Website.
    J13 fig3
  3. Scroll down to “User” and enter the Name and Email of the initial user. Enter a Password, then Repeat Password to confirm.
    J13 fig4
  4. Scroll down to “Settings” and add the Count of allowed devices. You can also assign a Brand if needed, and check the Use VAT checkbox to enable VAT.
    J13 fig5
  5. If required, scroll down to “Price List” and assign the company a price list using the drop-down menu. You can also create a new price list by clicking +.
    J13 fig6
  6. Click the Modules tab and use the toggle switches to activate or turn off the individual modules need by the new company. The Default modules are automatically activated, and “Other Modules” turned off by default. Activate or deactivate each module, as required.
    J13 fig7
    Once you have selected all the required modules, click OK to create the new company.

Edit a Company

You can edit an existing company by logging into the Resolut Online back office portal as a Reseller, then going to Configuration > Companies.
Select the company from the list and click the pencil icon to edit.
J13 fig8

In the Info tab you can edit the “Details”, “Address”, “Settings” and “Price List” fields. You can also deactivate the company using the red Disable Company button.
J13 fig9

Activate/Deactivate Modules

In the Modules tab, you can turn each module on or off using the toggle switches.

Once you have made your changes, click OK to save them.

Numeric Input

“Numeric input format” determines the format in which amounts are displayed.

There are 2 options: “Decimal” and “Cents”.

Decimal – amount is entered in a decimal format (e.g. 2.50).

Cents – amount is entered in cents (e.g. 250).

Set-up

In the Resolut Online Back office (BOS), go to Configuration > Company settings, and scroll down to “Numeric Input Format”. Select an option from the drop-down menu, then click Save.

J6 fig1

Second Screen Images

It is possible to choose which images will be displayed on the second (customer-facing) screen. There are two modes:

-Sale: shown when the user is on the sale screen

-Idle: shown when the user is not on the sale screen

-Sale background: the background of the customer sales screen

Images can be set on 3 levels: in Configuration > Company, Infrastructure > Location or Infrastructure > Devices. Images must be in .bmp or .png format under 2Mb..

Company

Under Customer Display, click Select Image (Sale) or Select image (Idle) to upload an image. Here, the user can also choose the interval in which will the images change:
J9 fig1

Location

Under Customer Display, click Select Image (Sale), Select image (Idle), or Select Image (Sale background) to upload an image. J9 fig2

Device

From the Devices page, double-click a device to open the “Device Detail” window.

Scroll down to Applications and use the downwards-arrow to expand the device you wish to add an image to.
Scroll down to “Customer Display” and click Select Image (Sale) or Select image (Idle) to upload an image.

J9 fig3

Emailing Module

  1. E-Mailing as a separate module can be turned on/off on a company level. Login as a Reseller and go to Configuration > Companies > Edit Company. Open the Modules tab, and under “Advanced Modules” use the toggle switch to turn the Emailing Module on or off.
    J10 fig1a J10 fig1b

  2. It is possible to edit the SMTP configuration (contact our support team for help with this) and email templates. If an email template is edited, the default checkbox is automatically unchecked.
    J10 fig2a

  3. When the emailing module is turned off in the Resolut Online Backoffice portal, it becomes hidden in the POS. Changes are applied on the next activation of the device.
    J10 fig3a

Export Templates

  1. Export templates can be created in the Export templates module. In the Resolut Online Back office portal, go to Configuration > Export templates. Click + to create a new template.

  2. In the Export Template configuration window, fill in the following:

Name: Name of the Export template

Data type: Choose “Turnover” (item report) or “Payments” from the drop-down menu

Export type: CSV file

Date grouping: no/hourly/daily/weekly/monthly

Grouping:

  • For turnover:
    • Item
      • (Item external reference)
      • Item group
      • (Item group external reference)
      • Location
      • (Location external reference)
      • Device
      • Vat group
      • (Vat group external reference)
    • For payments:
      • Location
      • (Location external reference)
      • (Device)
      • Payment type
      • Payment type ext reference
      • Payment type option

J11 fig2a

Fields: The user can choose which fields will be displayed in the report. They can also change the order of shown fields.

  • For turnover
    • RowId – incremented row ID number
    • FixedValue – set some fixed string
    • LocationNumber
    • LocationName
    • LocationExternalReference – new field
    • Date – day when sale was created, define format in string (for example “yyyymmdd”)
    • Year, Month, Day as separate fields
    • Time – wit format (for example “hh:mm”)
    • ItemNumber
    • ItemName
    • ItemExternalReference
    • ItemGroupNumber
    • ItemGroupName
    • ItemGroupExternalReference
    • Amount – Negative value optional
    • (AmountExclVat)
    • Qty – Negative value optional
    • VatAmount – Negative value optional
    • VatNumber
    • VatExternalReference
  • Fields (for payments):
    • RowId – incremented row ID number
    • FixedValue – set some fixed string
    • LocationNumber
    • LocationName
    • LocationExternalReference – new field
    • Date – day when sale was created, define format in string (for example “yyyymmdd”)
    • Year, Month, Day as separate fields
    • Time – wit format (for example “hh:mm”)
    • Amount – Negative value optional
    • PaymentTypeName
    • PaymentTypeNumber
    • PaymentTypeExternalReference

J11 fig3

  1. For every template, you can choose to generate the file manually for a selected period by clicking Execution. You can select multiple locations.
    J11 fig4

  2. Reports can then be downloaded through the notifications button.
    J11 fig5

Creating a Merchant

  1. Login as reseller and go to Configuration > Companies and click the + icon.
    J12 fig1

  2. Fill in the company Name and any other details. Under Type, select “Merchant” from the drop-down menu. Click OK
    J12 fig2

  3. Logout as a reseller and login again as the new merchant.

    Follow our Getting Started guide to set up the first Location, Device, and Item for the Merchant.

How to Create a Cashcount

  1. Tap Login > Start shift
    K1 fig1

  2. Enter the “sign-on” cashcount. The “Balance sign-on” receipt is printed.
    K1 fig2 K1 fig3

  3. It is possible to make a withdrawal during the shift by tapping Cash Operation > Withdrawal.

K1 fig4a K1 fig5a K1 fig6 K1 fig7

  1. After making some sales, before creating a cashcount it is possible to print out a balance overview. Tap Balance Overview > Yes.
    K1 fig8a K1 fig9

  2. Create a cashcount to end the shift. Tap Cashcount > Yes.
    K1 fig10a K1 fig11

If the sum of sales and entered cashcount amount does not match, it is possible to recount or continue.
K1 fig12 K1 fig13

  1. If more currencies are configured to finish the sale, the cashcount provides the possibility to enter these currencies through ”Currency“ button
    K1 fig15a

Subsections of How to Create a Cashcount

Cashcount Configuration

To configure the Cashcount settings go to Configuration > Company settings and scroll down to “Cashcount Settings”.
K2 fig1a

Configuration

  1. Under “Cashcount mode” choose from the following:
  • No – it is not available to create cashcount on device, cashcount button is not visible
  • Per User – one user can login to multiple devices, cashcount is counted from all devices and is created and printed only for one user.
  • Per Shift – cashcount starts when first user log in device and cashcount is created and printed when last users log out and closes the shift. K2 fig2a
  1. If you check Allow cashcount overview, once you select Balance overview, X report no cashcount is created, only the info data from cashcount is printed

  2. Under “Amount input required” choose from the following:

  • No – cashcount is created without entering an amount,
  • Yes - cashcount is created with an exact amount
  • Check difference - cashcount is created with an amount. If the difference is more than the “Allowed difference“, a warning message is shown on the device and the entered cashcount can be recounted
  • Check difference percentage - cashcount is created with an amount. If the difference is more than the “Allowed difference“ percentage, a warning message is shown on the device and the entered cashcount can be recounted K2 fig4a
  1. Under “Cashcount entry” choose from the following:
  • Simple – only one number (whole sum) must be entered
  • Detailed – each banknote has it own entry K2 fig5a
  1. Initial Cash - Enter an initial cash amount for the shift
  2. Print cashcount report – cashcount report is printed, but cashcount is not created
  3. Cashcount on sign on – cashcount has to be entered when after user’s login

When you are happy with your changes, click Save.

Functions

In Infrastructure > Roles under “POS Permissions” it is possible to choose which balance function is allowed on the device.

  • Balance deposit – insert amount to device drawer
  • Balance withdrawal – take out amount from the drawer
  • Balance check – cashcount info data are printed, cashcount itself is not created K2 fig6

Check the checkboxes you need, and click Save.

Cashcount Manager (POS4)

Instead of performing the cash count through POS4 when closing the shift, it is possible to close the shift and perform the cash count later using the Cashcount Manager in the Resolut Online Portal.

Setup

  1. In the Resolut Online Portal, go to Infrastructure > Roles and select the role that will perform the cash count. Scroll down to the “Cash count Module” and check the Enable cashcount manager checkbox. Then click Save.
    K3 fig1

  2. The cash count performed via the Cashcount Manager will be based on your Cash count Configuration in Configuration > Company settings. Make sure that the “Cash count mode” is set to Per Shift and fill in an Initial Cash amount.
    K3 fig2

  3. Make sure that cash count is deactivated in POS4.
    In POS4, press ctrl + right click on the key icon and go to System Configuration > Cash counts then uncheck both checkboxes and click Save.
    K3 fig3

Use

  1. Open the shift in POS4, no cash count will be taken. Make at least one sale, and when you are ready to close the shift, sign-out without performing a cash count in POS4.

  2. The same user that closed the shift should then login to the Resolut Online Portal and go to Cash count > Cashcount Manager.

    NOTE: Only the same user that closed the shift will be able to view the cash count in the Resolut Online Portal.

  3. Any shifts where the cash count has not been completed are listed here. Double-click the one you need. This will open the cash count screen.
    K3 fig4

  4. Enter the quantity of each bank note and coin for each currency used, and add the sealbag number to the “Sealbag” field.
    K3 fig5

  5. Once the cashcount is entered, click Verify to verify the count. If the cash count is configured to check the difference, and error message will be displayed if the difference exceeds the set limit. Re-enter the cash count and try again.
    K3 fig6

  6. Once verified, click Save to store the cash count.

Orders

When customer orders are placed through the Resolut POS, those orders are recorded in the Resolut Online Portal. An overview of your orders can be found in the Resolut Online portal under Orders.

You can filter the results using the Period, Status, Location, and Device fields. The list can be refreshed using the Refresh button.

L1 fig1

Subsections of Orders

Journal

The Journal shows a record of all actions and transactions made through Resolut.

You can find the Journal by logging in to the Resolut Online portal and going to Journal.

The Journal can be filtered using the Period, Location, Device and User fields. Filters can be cleared using the X button. Results can be refreshed using the Refresh button.
N1 fig1

Use the downward-arrow Download button to download the current Journal view. A .csv file will be saved to your device.

F1 fig3

Subsections of Journal

Add a Customer

  1. To add a new customer, login to the Resolut Online portal and go to Customers, then click + to open the “Customer detail” window.
  2. Make sure to enter a Name and Number. You can also choose to select an Account Type, and to enter a Business ID, Tax ID and VAT registration number at this point if needed.
  3. You can also add contact details, such as a Contact Person, Email, Phone and Website.
    O1 fig1
  4. Next, fill in the “Address” fields.
    O1 fig2
  5. Under “Other” check the Pay by invoice checkbox if you would like this customer to pay by invoice. You can also select a Price line from the drop-down menu or leave a comment in the “Remark” field if needed.
    O1 fig3
  6. Once you have finished, click Save to create the new customer.

Your new customers will be visible in the customer list. You can refresh the list using the Refresh button.

O1 fig4

Subsections of Add a Customer

Customers (POS)

Making a Customer Sale in POS

  1. Login to the Resolut POS. Tap Sale > Function > Customer. O2 fig1
  2. Tap a customer on the list to make a sale under that customer. You will be returned to the sale screen, the customer name is displayed at the top.
    O2 fig2
  3. Complete the sale as you normally would.

Adding a new Customer via POS

  1. Login to the Resolut POS. Tap Sale > Function > Customer.
  2. Tap + to open the new customer screen.
    O2 fig1
  3. Make sure the new customer has a Name and set an Account Type from the drop-down menu. You can also add contact details and a VAT registration number at this point.
    O2 fig3
  4. Tap OK to save the new customer.
  5. You will be returned to the sale screen, the customer name is displayed at the top. Complete the sale to save the new customer.

NOTE: If the sale is abandoned or otherwise not completed, the new customer will not be saved.

O2 fig2

Generating and Printing Invoices

It is possible to generate and print invoices using Resolut Online.

Setup:

First you need to set-up the feature in the Resolut Online Portal:

  1. Go to Configuration > Payment Types and click + to create a new payment type.
  2. From the Category drop-down menu, choose Invoice.
    Next, choose an option from the Customer mode drop-down menu:
    -No: Invoices are available on the Sales screen as a payment option, when selected the cashier must choose a customer.
    -Customer Needed: Invoices are only available when making a Customer Sale P1 fig1
  3. Go to Customers and select a customer who needs to pay by invoice. Make sure the “Pay by Invoice” checkbox is checked.
    P1 fig2

Use:

Generate and print an invoice from Resolut POS:

  1. If using Customer Mode, choose a customer.
  2. Create a sale and choose the Invoice payment option. If not using Customer Mode, you will need to select a customer at this point.
    P1 fig3
  3. The invoice is generated, and will open in your default web browser. From here you can print it out.
    P1 fig4
  4. A confirmation message “Was invoice printed successfully?” will be displayed. Select Yes to close the message, or No to try again.
    P1 fig5

Subsections of Generating and Printing Invoices

Show Prices Excluding VAT

To print invoices and receipts where prices are shown exclusive of VAT you will need to make some changes in the Resolut Online Portal.

By Device

If you need all your invoices and receipts from a device to exclude VAT, you can change the default price line for that device.

  1. Go to Assortment > Price lines and create a new price line.
  2. Make sure to check the Show prices excluding VAT checkbox then click Save.
    P2 fig1
  3. Next, go to Infrastructure > Devices and open the device you need.
  4. Scroll down to “Applications” and expand Resolut Online POS. Select the new price line from the drop-down menu, then click Save.
    P2 fig2
  5. Restart your POS device. Prices should now be displayed and printed excluding VAT.
    P2 fig3 P2 fig4

By Customer

If only some of your customers need prices to exclude VAT, you can change the price line used for that customer.

  1. Go to Assortment > Price lines and create a new price line.
  2. Make sure to check the Show prices excluding VAT checkbox then click Save.
    P2 fig1
  3. Go to Customers and open the customer you need.
  4. Scroll down to “Other” and under Price line select the new price line from the drop-down menu. Click Save.
    P2 fig5
  5. Now, when you make a Customer Sale for this customer,
    the Excl. VAT price line will be used, and prices will be displayed excluding VAT without changing the default price line for the device.
    P2 fig3 P2 fig4

NOTE: If a discount is applied to the sale, it will be applied to the Total including VAT, not only to the subtotal that excludes VAT.

Invoice Printing with a POS4 Device

It is possible to print invoices generated by the Resolut Online Portal via a configured Resolut POS4 application connected to a printer.

Set-up

You will need a correctly configured Resolut POS4 installation with the “Print to laserprinter” option enabled. To do this:

  1. In System configuration, Select Printing and tick the “Print to Laserprinter” checkbox.
    D6 fig1a

  2. Then go to Settings and turn on the “Use invoice printer” option with the toggle switch and select the printer from the drop-down menu.
    D6 fig2a

  3. In Configuration > Parameters enter the parameter WebApiPort. Set the value to “9800”.
    D6 fig3a

To print via Resolut Online, you will then need to configure the Resolut Online POS app:

  1. In the Resolut Online Portal, go to Infrastructure > Devices and under “Applications” select the application Resolut Online POS to expand it. Under “Invoice printing POS” select the required POS device.

Note Turn off the firewall on Windows with POS4

D6 fig4a

Invoice Templates

It is possible to use multiple invoice templates when printing invoices through POS4.

Invoice templates are files with the .repx extension and should be placed in the folder C:\Pos\Invoices.

To set the invoice template, in POS4 use the Invoice.Layout parameter- the value will be the name of the template file located in C:\Pos\Invoices. If there are several templates, they will be separated by a semicolon. D6 fig5

When multiple invoice templates are set in POS4, the Invoice layout template selector will be displayed before printing the invoice from Resolut Online POS. The Names in the selector are names of files of the templates. D6 fig6 Select the required layout and click OK. The invoice will be printed with the selected template on the set printer for POS4.

Discounts

The Discounts module contains information on creating promotions and discounts in the Resolut Back Office client. This section will cover:

  1. Promotions
  2. Basic Discounts

Click > to begin, or follow the links above to visit any section of the guide.

Subsections of Discounts

Promotions

  1. Login to the Resolut Online back-office portal and go to Discounts > Promotions. Click + to create a new promotion.
    H1 fig1

  2. In the promotion creation wizard, go to Basic Info. Make sure your promotion has a Name, Number, and Promotion Type. You can also add a description and add it to an existing campaign if you wish.
    H1 fig2

    There are three checkboxes to check or leave blank as you wish:

    Scaling – discount can scale to more than the hit items

    Ask barcode – asks for barcode when promotion is applied, used only in ticketing POS

    Active - discount is active or inactive

  3. Under Filters you can set the start and end date of the promotion in addition to the following options:
    H1 fig3

    From/To = Start date/End date

    Start time/End time – promotion is applied only in certain hours (e.g. happy hour from 15:00-16:00)

    Select day – promotion is applied only these days

    Min/Max amount – promotion is applied if the total amount of the hit items is within amount range

  4. Under Benefit configuration, select the Benefit Type from the drop-down menu and set a Benefit Amount.
    H1 fig4 Benefit type + Benefit amount:

    Perc – percentage discount

    Amount – amount discount

    ForAmount – fixed price

    Apply to – number of items the benefit is applied to

  5. It is also possible to set Triggers to activate the promotion:
    H1 fig5 H1 fig6

    Trigger type:

    BarcodeScan – employee can scan a barcode to trigger discount

    BarcodePattern – barcode with certain pattern triggers the discount:

  • 123* pattern triggers all barcodes starting with 123 (123 can be set to any number)

  • *123 pattern triggers all barcodes ending with 123 (123 can be set to any number)

    ManualAction – manual action is needed to trigger the discount

    Multiuse - discount can be used multiple times in one sale

  1. Under Assortment filters you can choose which items will be eligible for the promotion.
    H1 fig7

Mix level:

No – items to hit must be mixed only from one list

Half – items to hit can be mixed from any lists

Full – items to hit must be mixed from all lists

Item count – how many items need to be hit in sale to apply promotion

H1 fig8

Min. hit/Max. hit – hit range for the current list

Min. amount/Max. amount – amount range for the current list

Advantage – item to hit is allowed to apply benefit

Details:

Detail type – Item. Subgroup, Group or Brand can be chosen, search with search icon

Exclude – this detail will be used as an exception, so you can hit items from this list EXCEPT this detail

Basic Discounts

Here is some basic information you need to enter to the Promotion Wizard to create 5 different types of discount.

Discount X% on all items from productgroup/subgroup Y triggered by a button

Basic info – fill in Name, Promotion type, Active field is checked

Filters - fill in From, other fields are optional
H2 fig1

Benefit configuration: Benefit type – Perc (percentage), Benefit amount – enter percentage X,

Apply to – 0 (all items in assortment filters)

Triggers: Trigger type – ManualAction, Value (enter number or word to define button name which will show in Functions/Discounts), Multiuse field is checked
H2 fig2

Assortment filters: Mix level – No, Item count – 1

Assortment filter - fill in Name, Advantage field is checked

Details, Detail type – Group/Subgroup, Search group/subgroup – (enter name of the group/subgroup Y)
H2 fig3

Buy 3 pay 2 of the same product, automatically triggered.

Basic info – fill in Name, Promotion type, Active field is checked

Filters - fill in From, other fields are optional
H2 fig4

Benefit configuration: Benefit type – Perc (percentage), Benefit amount – enter percentage 100,

Apply to – 1
H2 fig5

Triggers: no need to add trigger, promotion is applied automatically
H2 fig6

Assortment filters: Mix level – No, Item count – 3

Assortment filter - fill in Name, Advantage field is checked

Details, Detail type – Item, Search item – (enter name of the item)
H2 fig7

Buy 3 products from a selection of the assortment, get the cheapest product for free

Basic info – fill in Name, Promotion type, Active field is checked

Filters - fill in From, other fields are optional
H2 fig8

Benefit configuration: Benefit type – Perc (percentage), Benefit amount – enter percentage 100,

Apply to – 1
H2 fig9

Triggers: no need to add trigger, promotion is applied automatically
H2 fig10

Assortment filters: Mix level – No, Item count – 3

Assortment filter - fill in Name, Advantage field is checked

Details, Detail type – Subgroup, Search subgroup – (enter name of the subgroup)
H2 fig11

Buy product A, get product B for free

Basic info – fill in Name, Promotion type, Active field is checked

Filters - fill in From, other fields are optional
H2 fig12

Benefit configuration: Benefit type – Perc (percentage), Benefit amount – enter percentage 100,

Apply to – 1
H2 fig13

Triggers: no need to add trigger, promotion is applied automatically
H2 fig14

Assortment filters: Mix level – Full, Item count – 2

Assortment filter 1 - fill in Name

Details 1, Detail type – Item, Search item – (enter name of the item)

Assortment filter 2 - fill in Name, Advantage field is checked

Details 2, Detail type – Item, Search item – (enter name of the item)
H2 fig15

Buy product A (€2,50) + B (€3,-), pay €4,00

Basic info – fill in Name, Promotion type, Active field is checked

Filters - fill in From, other fields are optional
H2 fig16

Benefit configuration: Benefit type – ForAmount**,** Benefit amount – enter amount 4,

Apply to – 1
H2 fig17

Triggers: no need to add trigger, promotion is applied automatically
H2 fig18

Assortment filters: Mix level – Full, Item count – 2

Assortment filter 1 - fill in Name, Advantage field is checked

Details 1, Detail type – Item, Search item – (enter name of the item)

Assortment filter 2 - fill in Name, Advantage field is checked

Details 2, Detail type – Item, Search item – (enter name of the item)
H2 fig19

Subsections of Hardware

Windows POS terminal Setup

For the UWP application BovertisPOS to work properly, you need to have Windows 10 IoT Enterprise LTSC 2021 x64 operating system installed on the POS terminal.

Installation of UWP application BovertisPOS on Windows 10 IoT Enterprise LTSC

  1. Before an installation go to Start > Settings and click on Update & Security.
    Q3 fig1

  2. Click For developers and turn on the Developer Mode option.
    Q3 fig2

  3. To install Microsoft Store on Windows 10 IoT Enterprise LTSC 2021 x64 editions, download this Microsoft Store installer and then extract it on your desktop (Ctrl + click): Download LTSC Microsoft Store Installer.

  4. Extract the archive, then open up the folder until you see the Add-Store.cmd. Right click the add-store.cmd and run it as administrator:
    Q3 fig3

  5. Wait for it to finish automatically installing Microsoft Store on your LTSC system and restart your computer.

  6. After the restart, open Microsoft Store and click on the menu dots > Downloads a updates.
    Q3 fig4

  7. Click Get updates and wait for the download and installation.
    Q3 fig5

  8. After Microsoft Store restarts, click Install.
    Q3 fig6

  9. In the pop-up window click Open App Installer.
    Q3 fig7

  10. Check the Launch when ready checkbox and then Install.
    Q3 fig8

  11. Once installed, the application will start automatically. On the Activation screen enter your activation code.
    Q3 fig9

  • If you have trouble reinstalling the application, try using the link under “Additional Links”.
    Q3 fig10

    It will start downloading the file. After downloading the file, open it and continue from step 9.

Touchscreen

Enable Touch Keyboard

Barcode scanner

Link

Cash drawer connection

Cash drawer should be connected to an Epson USB printer. Solenoid Flip Top cash drawer is supported.

Installation of USB printer Epson TM-T88V

Download and install USB driver for Epson TM-T88V, unzip and install it (run Setup.exe). Download and install Advanced Printer Driver, unzip and install it (run APD_513_T88V.exe). Plug printer in POS terminal and turn it on.

Setup of Boca ticket printer

You must first have a configured Boca ticket printer for Ethernet. You can use the Configure program for configuration of Boca ticket printer and set Ethernet Dynamic IP address up.

Then you need to create a device Boca printer in the Resolut Online back office portal and set the current IP and port 9100 for it. Finally set up the device Boca printer as an External printer in Resolut Online configuration for device POS.

Enable Touch Keyboard

Enable touch keyboard on Win 10 IoT Enterprise LTSC

  1. Go to Start > Settings and click System.
    Q4 fig1a

  2. In the menu click Tablet mode and under “When I sign in” choose Always use tablet mode.
    Q4 fig2a

  3. In the top-left of the menu click Home.
    Q4 fig3a

NOTE: The following steps are for terminals with more than 1 display – in that case Tablet mode is not allowed:

  1. Click Devices.
    Q4 fig1a

  2. In the menu click Typing and under “Touch keyboard” set the option Show the touch keyboard when not in tablet mode and there’s no keyboard attached.
    Q4 fig5a

The touch keyboard now appears when you tap a text field on the display.

Barcode scanner

Setup of POS HID Barcode scanner

A USB connected barcode scanner must be configured in HID-POS Scanner mode to work with the barcode scanner driver that is included in Windows. This procedure should work for Newland and Sunmi scanners:

  1. Plug the scanner into a USB port on the POS terminal

  2. Scan the Enter Setup barcode:
    Q5 fig1

  3. Scan the USB HID-POS barcode:
    Q5 fig2

  4. Scan the Exit Setup barcode:
    Q5 fig3

    The scanner should now be in HID-POS Scanner mode.

Install Adyen PEM certificates

Install Adyen PEM certificates on an Android device

  1. Download Adyen public root certificates:

Test certificate:

Click on (CTRL+click): adyen-terminalfleet-test.pem . This is the test root certificate for validating the certificate on TEST terminals.

Go to the menu in the top-right and select More tools > Save page as… Q6 fig1

In “File name” delete the .txt extension. Change the file name to “adyen-terminalfleet-test.pem“ and click Save.
Q6 fig2

Live certificate:

Click on (CTRL+click): adyen-terminalfleet-live.pem . This is the live root certificate for validating the certificate on LIVE terminals.

Go to the menu in the top-right and select More tools > Save page as…
Q6 fig3

In “File name” delete the .txt extension. Change the file name to “adyen-terminalfleet-live.pem“ and click Save.
Q6 fig4

  1. Verify that the SHA-256 fingerprint (also called thumbprint) of the root certificate matches the following:
  • TEST root certificate: 3A 33 C3 34 C3 0F 69 46 E9 75 4B 6B B1 67 2B 54 6F BA A9 66 FB 6A 4B 58 AA 4E 3A BE 80 A7 EC BE

NOTE: These are test values! Please contact our Support Team if you need assistance with setting up your live environment.

There are various ways to get the SHA-256 fingerprint:

  • You can use the following OpenSSL command (in opened Command Prompt):

    cd %USERPROFILE%\\Downloads - Set to the directory with downloaded files

    openssl x509 -**in** adyen-terminalfleet-test.pem -noout -sha256 -fingerprint –Fingerprint for TEST root certificate

    openssl x509 -**in** adyen-terminalfleet-live.pem -noout -sha256 -fingerprint –Fingerprint for LIVE root certificate

  1. Convert PEM certificates to CRT:

    Enter in the Command Prompt:

    openssl x509 -outform der -in adyen-terminalfleet-live.pem -out adyen-terminalfleet-live.crt -for LIVE certificate

    openssl x509 -outform der -in adyen-terminalfleet-test.pem -out adyen-terminalfleet-test.crt -for TEST certificate

  2. Copy CRT certificates to a USB key and insert the USB key to the android device.

  3. Install certificates from Settings > Security > Install from SC card

Sunmi Scanner setup Android

  1. Plug the scanner into a desktop device via USB.

    Note: Make sure there are no other USB cables (with or without a device) connected to the desktop device.

  2. Go to Settings > Scan code and keyboard.
    Q7 fig1a

  3. Choose the scanner from the list.
    Q7 fig2

  4. Turn on the ‘Broadcast output’ option.
    Q7 fig3a

  5. Tap on Select device type and set the Scanning device type. Tap Save.
    Q7 fig4

Applications

Subsections of Applications

Android Launcher

Installing the Launcher

  1. Login to the Resolut Online Portal and Create a New Device.

  2. Go to https://downloads.bovertis.nl/launcher/acceptance/launcher.apk using the Android device that the Launcher will be installed on. The download will start automatically.

  3. Once the Launcher is installed, enter the Activation code generated in Step 1 and tap Enter.
    B11 fig1

    The Launcher is now ready to use.

Installing Resolut POS via the Launcher

  1. Open the Launcher and tap App Market > Market.
    B11 fig2
  2. Next to “Resolut Online POS” tap Install.
    B11 fig4
  3. When prompted tap Install.
    B11 fig3
  4. Once the install is complete, the Resolut POS app will be visible on the Launcher main screen.
    B11 fig5

Setup a Kitchen Screen

Install the Kitchen Screen App

  1. Go to https://downloads.bovertis.nl/kitchenscreen.uwp/prod/index.html and download the Kitchen Screen application to the device that will be used as the Kitchen screen. C7 fig10

Setup the Kitchen Screen

  1. In the Resolut Online back-office portal, go to Configuration > Company settings.

    Then choose an option from the drop-down menu “Kitchen distribution policy” (POS/BOS)
    C7 fig1

  2. Choose an option from the drop-down menu for Kitchen policy (No/All/Balance):
    C7 fig2

  3. Go to Assortment > Kitchen groups and click + to create a new Kitchen group.
    C7 fig3

  4. Go to Infrastructure > Devices, and create a new Device. In the “Device Detail” window, check the “Kitchen Screen” checkbox.
    C7 fig4

  5. In the Applications tab click on the “Kitchen screen App” settings button:
    C7 fig5

  6. In the “Application configuration” window, select the created Kitchen group.
    C7 fig6

  7. Open the Kitchen screen app and activate it with the generated Activation code. Then login to the kitchen screen app using your PIN.
    C7 fig7

Setup Items for the kitchen

  1. In the Resolut Online back-office portal, go to Assortment > Items and click the edit icon of an Item you want to set for kitchen.
    C7 fig8

  2. In the Item edit window, scroll down to “Organization” and check the “Send to kitchen” checkbox and select the Kitchen group you previously created. Click Save to finish.
    C7 fig9

Using the Kitchen Screen

When Kitchen items are purchased through the Resolut POS app, the order will appear on the Kitchen Screen once the sale is completed. C7 fig11

Tap the order to begin preparing it. The order will be highlighted blue, and a countdown timer will start. Tap the order or tap Detail to open up the order. C7 fig12

When the order is finished, tap it again to close the order. The order will be highlighted in red, and will disappear from the screen in a few seconds. C7 fig13

Selfcheckout

  1. To activate the self checkout functionality, a device with the Selfcheckout type has to be created in Infrastructure > Devices
    B7 fig1

  2. Once a Selfcheckout device is created, download the Selfcheckout application and enter the activation code on the activation screen.
    B7 fig2

  3. The customer can then scan products with an external scanner.
    B7 fig3 B7 fig4

  4. After clicking the payment button and completing the payment, a “You have Paid” message appears on screen.
    B7 fig5

  5. When the company is set to airport settings. Selfcheckout switches to flight mode. A boarding pass must be scanned to use the selfcheckout
    B7 fig6

  6. When the boarding pass is scanned the flight number is listed in the top-right.
    B7 fig7

  7. The customer adds products to the cart, clicks the pay button and follows the instructions.
    B7 fig8

  8. Sales are shown in the Sales report and Journal browser in the Resolut Online back office portal
    B7 fig9 B7 fig10

Subsections of Release Logs

Sprint 61

Resolut Online updates from Sprint 61:
POS
Portal

Subsections of Sprint 61

Portal Release Notes

Release Notes Resolut Online 01/12/2022 Portal

General Information

Below are the latest changes made to Resolut Online:

Upgrade Steps

  • No action Needed

New Features

  • Configuration of sale background image (4237)
    -Part of a redesign of how customer images are displayed on the Sales screen.

  • Piggy giftcard provider (4211)

    -It is now possible to integrate Piggy Giftcards with your system.

  • AX order integration (4044)
    -It is now possible to integrate Microsoft Dynamics AX (Axapta) with your system.

Improvements

  • Implement mail sending via Mailgun (4187, 4189)
  • Emailing as separate module (4166)
    • improvements to receipt sending
  • Rework devices module to the new style (4128)
    • Redesign of the Devices module

Bug Fixes

  • Bug fixes (4325, 4087, 4231, 4301, 4145, 4226, 4104, 4150, 4174, 4126, 4234, 4246, 4249, 4251, 4133)

Other Changes

  • None

POS Release Notes

Release Notes Resolut Online 01/12/2022 POS

General Information

Below are the latest changes made to Resolut Online:

  • Android version: 1.4.229

  • Windows version: 1.4.130

Upgrade Steps

  • Update to the latest version using the regular distribution channel

New Features

  • Handle sale background on customer screen (4238)
    -Part of a redesign of how customer images are displayed on the Sales screen.

Improvements

  • Mypos payment cancellation (4219)

    • It is now possible to cancel a payment through the MyPOS payment app.
  • Handle PackagePrintPriceType - Package (4094)

    • A new option for PrintPriceType; “Package”, which allows you to print the full package price on all tickets

Bug Fixes

  • Customer screen fixes (4236) – Related to how customer images are displayed on the Sales screen.
  • Fixed various issues in the restaurant mode (3687, 4202, 4157)
  • POS code refactoring and clean-up (4088, 71)
    -Removed Xamarin.Forms dependency
  • Handle non printable receipts in Journal (4155)
    -hiding the receipt in Journal based on the flag “PrintableReceipt “.
  • Fixed kitchen printing on integrated printer (4388)
  • Bug fixes (4149, 4247, 4248, 4303)

Other Changes

  • None

Sprint 62

Resolut Online updates from Sprint 62:
POS
Portal

Subsections of Sprint 62

Portal Release Notes Sprint 62

General Information

Below are the latest changes made to the Resolut Online Portal;
apk: 1.4.233 uwp: 1.4.134

Upgrade Steps

  • No action needed.

New Features

  • Add card name to Payment export templates (4349)
    • in the Payments module, the card name can now be included in the exported file.
  • Extend sale channel import in Items module (4265)
    • for every sale channel in the input file it is now possible to define the price.
  • Assign menu (4127)
    • assign a configured menu to a device, device group or in Company settings.
  • Track source on customer level (4305)
    • track the kind of environment from which a customer is loaded.

Improvements

  • Store POS4 parameters (4347, 4348)
    • POS4 will now send all the parameters to the backend after every start. This is visible in device detail screen.
  • Add open drawer indicator to payment type (4277)
    • make configurable on the payment type whether drawer should be opened after payment.

Bug Fixes

  • Bug fixes (4377, 4365, 4401, 4374, 4373, 4299, 4302, 4358, 4361, 4367, 4403)

Other Changes

  • None

POS Release Notes Sprint 62

General Information

Below are the latest changes made to the Resolut Online POS;
apk: 1.4.233 uwp: 1.4.134

Upgrade Steps

  • Update to the latest version.

New Features

  • Open drawer indicators (4278)
    • opening drawer after payment if the open drawer flag is set on the payment type level

Improvements

  • GUI Cleanup and preparation for MAUI upgrade (4343)

Bug Fixes

  • Bug fixes (3752, 4262, 4313, 4306, 4359, 4310, 4163, 4364, 4369, 4372, 4379, 4389, 4388, 4396, 4397)

Ticketing

  • Bug fixes (4309, 4263)

Other Changes

  • None

Sprint 64

Resolut Online updates from Sprint 64:
POS
Portal

Subsections of Sprint 64

Portal Release Notes Sprint 64

General Information

Below are the latest changes made to the Resolut Online Portal;
apk: 1.4.237 uwp: 1.4.140

Upgrade Steps

  • No action needed.

New Features

  • Integration of Piggy gift cards (4211)
    • Piggy gift cards can now be used to complete a sale.
  • Printing price labels (4223)
    • Print price labels for your items directly from Resolut Online.

Improvements

  • Upgrade to .NET 7 and latest Angular (4327)

  • Indicator of Promotion level when “AskAssistance” is used in Selfcheckout (4520)

  • Handling of combishop companies in discount engine (4425)

  • Track source of entities in the system (4406)

  • Added ItemTicketInfo.ProductHandlingType (4381)

  • APIs for sales reports in point of sale (4492)

  • Redesigned timeclock and alcohol reports (933)

Bug Fixes

  • Bug fixes (4607, 4581, 4532, 4547, 4556, 4560, 4577)

Other Changes

  • None

POS Release Notes Sprint 64

General Information

Below are the latest changes made to the Resolut Online POS;
apk: 1.4.237 uwp: 1.4.140

Upgrade Steps

  • Update to the latest version.

New Features

  • Integration of Piggy gift cards (4211)
    • Piggy gift cards can now be used to complete a sale.

Improvements

  • Support for Piggy email scanning (4509)

    • Scan a contact’s email address directly from the Sales Screen.
  • Display and print customer VAT Numbers (4487)

    • Customer VAT numbers can now be displayed, as well as printed on receipts and invoices.

Bug Fixes

  • Bug fixes (4588, 4551, 4526, 4516, 4531, 4533, 4542, 4544, 4558, 4575, 4608)

  • Kitchen screen fixes (4360, 4524, 4565, 4584, 4568)

Other Changes

  • None

Sprint 65

Resolut Online updates from Sprint 65:
POS
Portal

Subsections of Sprint 65

Portal Release Notes Sprint 65

General Information

Below are the latest changes made to the Resolut Online Portal;
version 1.4.18.8

Upgrade Steps

  • No action needed.

New Features

  • Printing item description on receipt can now be configured (4683)

  • Loyalty and giftcard payments can now be cancelled (4593)

  • Employee sales support and mapping to promotions (4456)

Improvements

  • Free text support for entitits in Public API (4601)

  • Add remark to customers Public API (4570)

  • Processing of employee sales (4638)

Bug Fixes

  • None

Other Changes

  • None

POS Release Notes Sprint 65

General Information

Below are the latest changes made to the Resolut Online POS;
apk: 1.4.240 uwp: 1.4.142

Upgrade Steps

  • Update to the latest version.

New Features

  • Printing item description on receipt can now be configured (4683)

  • Loyalty and giftcard payments can now be cancelled (4593)

  • Employee sales support and mapping to promotions (4456)

Improvements

  • Wallee EFT cancel (4682)
  • Encrypt boarding card data (4643)

Bug Fixes

  • Bug fixes (4592,4534, 4630, 4707, 4710, 4712, 4800)

Ticketing

  • Meal selection for orders (4681)

  • Bug fixes (4591,4727)

Other Changes

  • None

Sprint 68

Resolut Online updates from Sprint 68:
POS
Portal

Subsections of Sprint 68

Portal Release Notes Sprint 68

General Information

Below are the latest changes made to the Resolut Online Portal;
version 1.4.19.2

Upgrade Steps

  • No action needed.

New Features

  • Loyalty gift card activation - implemented card activation for Intersolve and Resolut eCards (4632)
  • New sales report per item subgroup (4697)
  • Enabled multiselect in sale reports (4700)
  • New column “Percentage to sales” in Sales Reports (4726)
  • Added new permission for Ticketing POS (4694)
  • Hide System Admins and inactive users from the User list(4810)
  • Implemented history of generated files in ftp uploader connector (4719)
  • Support for alphanumeric barcodes (4825)
  • EFT mappings (4351)
  • Ximedes URL is configurable (4962)

Improvements

  • Fixed saving promotion with triggers (4879)

Bug Fixes

  • Fixed missing remark in sale with discount (4862)

Other Changes

  • None

POS Release Notes Sprint 68

General Information

Below are the latest changes made to the Resolut Online POS;
apk: 1.4.243 uwp: 1.4.144

Upgrade Steps

  • Update to the latest version.

New Features

  • Loyalty gift card activation - implemented card activation for Intersolve and Resolut eCards (4632)

  • Added “Refresh order count” field to Company Settings (4867)

Improvements

  • Removed Ticketing POS specific features related to Branding, Menu options, Products, Capacity, Barcodes, Online Orders and Vouchers. These features and setting are no longer enabled by default, but remain configurable. (4384)

Bug Fixes

  • Fixed amount after refund (4842)

  • Fixed input field after opening piggy module (4766)

  • Fixed entering double zeros in price input (4725)

  • Fixed printing user number and name in employee sale receipt (4816)

  • Fixed piggy scan from payment screen with hardware scanner (4817)

  • Fixed uwp printing receipts on external printer (4838)

Ticketing

  • Fixed rebooking online order (4846)

  • Fixed busy mode when UROVO device is run out of paper (4709)

  • Refund of Swedish fiscalization is fixed (4845)

  • Fixed fiscalization of a sale with 0 amount (4763)

Other Changes

  • None

Sprint 70

Resolut Online updates from Sprint 70:
POS
Portal

Subsections of Sprint 70

Portal Release Notes Sprint 70

General Information

Below are the latest changes made to the Resolut Online Portal;
version 1.4.20.2

Upgrade Steps

  • No action needed.

New Features

  • Order count refresh of “on hold” tickets is now configurable (4865)
  • Added “User display name” field in user detail (4613)
  • It is now possible to test the connection in Resolut BOS integration (4885)

Improvements

  • Renamed fields in the Items module (4908)

  • Mapped card name in payment report (4956)

  • Priceline added to csv import/export (4887)

  • Resolut BOS connection strings are now encrypted (4965)

  • Handle all item statuses in item csv import/export (4985)

  • Import additional fields into the “Flights” table (4996)

  • Piggy add credits to a card (4918)

Bug Fixes

  • Changed error message in case of duplicate user email (4883)

  • Added combo boxes for entering pricelines in “Airport settings” (4884)

  • An empty screen is no longer displayed when exporting templates (4936) (I2303-0112)

  • Configuration dialog titles in the Integrations module are now displayed correctly (4952)

  • Fixed “failed to load data" error when opening a newly created Exact online configuration (4953)

  • Renamed field “Percentage to sales” to “Percentage of total” (4954)

  • Cents are now displayed when showing the Piggy gift card balance (4981)

  • Fixed the spacing between toggle switched and text in Resolut BOS integration (4964)

  • Fixed error message when saving a newly created role (5051) (I2303-0355)

Other

  • None

POS Release Notes Sprint 70

General Information

Below are the latest changes made to the Resolut Online POS;
apk: 1.4.244 uwp: 1.4.147

Upgrade Steps

  • Update to the latest version.

New Features

  • Order count refresh of “on hold” tickets is now configurable (4865)

  • Added “User display name” field in user detail (4613)

  • Piggy – now possible to add credits to a giftcard and to check the gift card balance (4844)

Bug Fixes

  • Fixed showing VAT when sale has no VAT (4940)

  • No longer necessary to clear the input field when entering a price manually (4827)

  • Fixed “default user” error message when activating a new Selfcheckout device (4942)

  • Device name not updating after renaming in portal is now fixed (4967)

  • The on-screen keyboard will no longer appear when tapping +/- buttons in the cashcount sceen (4960)

Ticketing

  • None

Other Changes

  • None

Sprint 72

Resolut Online updates from Sprint 72:
POS
Portal

Subsections of Sprint 72

Portal Release Notes Sprint 72

General Information

Below are the latest changes made to the Resolut Online Portal;
version 1.4.21.3

Upgrade Steps

  • No action needed.

New Features

  • Support unit of measurement “Tons” in Resolut online portal (5022)

  • It is now possible to delete unused devices (622)

Improvements

  • Improved order processing performance (5072)

  • Reworked the Exact online configuration screen (2221)

  • It is now allowed to add a barcode to an item if a variable price is set (5002)

Bug Fixes

  • Fixed the wrong item type setting when importing from a .csv file (5098)

  • Fixed the missing user display name in the receipt configuration (5130)

  • Changed the default order count refresh interval to 120 (5131)

  • Withdrawals column is now visible in downloaded cashcount exports (5083) (I2305-0011)

  • When downloading sales reports, the item name is now shown instead of item number (5095)(I2304-0374)

  • Fixed UI glitch when showing item margin (5150)

  • Fixed showing zero interval in variable price when Min. and Max. is not set (5151)

Other

  • None

POS Release Notes Sprint 72

General Information

Below are the latest changes made to the Resolut Online POS;
apk: 1.4.245
uwp: 1.4.148

Upgrade Steps

  • Update to the latest version.

New Features

  • Extend the logging to seq from “reprint last sale screen” buttons (5076)
  • Piggy - create + link contact in ROPOS (4920)
  • Piggy - add credits to giftcard + print gift card balance overview (4844)

Bug Fixes

  • Fixed printing on external printer from Adyen device (5009)
  • Fixed old journal logo (4968)
  • When searching for piggy contact, search no longer appears after every character input (5152)
  • Fixed Boca printer issue when using bovertis pos apk (5100)
  • Fixed showing the “enter barcode” screen when scanning a loyalty card (5057)

Ticketing

  • Ticketing POS Sale screen no longer freezes after restarting during printing tickets (5110)

Other Changes

  • None

Sprint 74

Resolut Online updates from Sprint 74:
POS
Portal

Subsections of Sprint 74

Portal Release Notes Sprint 74

General Information

Below are the latest changes made to the Resolut Online Portal;
version 1.4.22.1

Upgrade Steps

  • No action needed.

Improvements

  • Added a “ Deposits Export” template (5089)
  • “Phone number” field now included in “Location” (5133)
  • Company modules UI improvements (5163)
  • Sales pivot report (5192)
  • EF Core 7 encryption between app and database (5122)

Bug Fixes

  • Fixed wrong “last import/export” time in Resolut Portal integration (5243)

Other

  • None

POS Release Notes Sprint 74

General Information

Below are the latest changes made to the Resolut Online POS;
apk: 1.4.246

uwp: 1.4.149

Upgrade Steps

  • Update to the latest version.

New Features

  • Multiple invoice templates (5071)

Improvements

  • The “Park” button is now hidden if the user doesn’t have park/unpark permission (5175)

  • Changed the text on the discount button in payment screen (5177)

  • Added a button to close the app on the “Something went wrong” screen (5209)

  • Changed the message when leaving the sales screen with an uncompleted sale (5231) (I2306-0080)

  • Item info screen improvements (103)

Bug Fixes

  • Refreshing parking button counter when entering sale screen (5132)

  • Completing EFT payment on SCO application (5128)

  • Adding weight items to the sale (5171)

Ticketing

  • Fixed issues with printing merchant receipt copy on UROVO devices (5077)
  • Extending logging on reprint actions (5076)
  • POS no longer freezes when the device crashes during ticket printing (5110)

Other Changes

  • None

Sprint 76

Resolut Online updates from Sprint 76:
POS
Portal

Subsections of Sprint 76

Portal Release Notes Sprint 76

General Information

Below are the latest changes made to the Resolut Online Portal;
version 1.4.23.6

Upgrade Steps

  • No action needed.

Improvements

  • Colored buttons can now be configured for POS (5238)

  • Titelive integration (5296)

  • Shift report (5197)

Bug Fixes

  • Ximedes connector no longer overrides free text fields on items (5251)

  • Improved data distribution (5354)

Other

  • None

POS Release Notes Sprint 76

General Information

Below are the latest changes made to the Resolut Online POS;
apk: 1.4.251

uwp: 1.4.151

Upgrade Steps

  • Update to the latest version.

New Features

  • Vatfree integration (5240)

Improvements

  • Preset value can now be selected for Piggy top-up amounts (5199)

Bug Fixes

  • “Destination” is now printed on receipts when in Airport mode (5267)
  • Fixed VAT calculation on refund sales under “NO VAT2 priceline (5246)
  • Bovpay payment on Urovo devices (5270)
  • Fixed device synchronization issue when a new company is created (5311)

Ticketing

  • None

Other Changes

  • None

Sprint 78

Resolut Online updates from Sprint 78:
POS
Portal

Subsections of Sprint 78

Portal Release Notes Sprint 78

General Information

Below are the latest changes made to the Resolut Online Portal;
version 1.4.24.3

Upgrade Steps

  • No action needed.

Improvements

  • Added favorite items per saleschannel (5312)
  • New tile menu in the portal (5363)
  • Added transaction counter to payment report (5230)
  • Implemented Cashier activity report (5196)
  • Triggering of update for POS4 from Portal (5327)

Bug Fixes

  • Missing field in Deposit export template (5468) (I2308-0015)

  • Wrong priceline id in transactions (5469)

Other

  • None

POS Release Notes Sprint 78

General Information

Below are the latest changes made to the Resolut Online POS;
apk: 1.4.233 apk pax: 1.4.255 uwp: 1.4.152

Upgrade Steps

  • Update to the latest version.

New Features

  • Tickets and Tourism Selfcheckout (5342)

Improvements

  • Skip printing of group tickets (5419)

Bug Fixes

  • Colored buttons on configurable menu now load correctly (5431)
  • Location group menu loading (5455)

Ticketing

  • None

Other Changes

  • None

Sprint 80

Resolut Online updates from Sprint 80:
POS
Portal

Subsections of Sprint 80

Portal Release Notes Sprint 80

General Information

Below are the latest changes made to the Resolut Online Portal;
version 1.4.25.9

Upgrade Steps

  • No action needed.

New Features

  • Cash Out transactions added to export templates (5467)(I2308-0016)

  • Configuration report (5198)

  • Created Tikkie payment in RO backend (5364)

Improvements

  • UI improvements to Resolut BOS integration (5490)

  • Currencies module redesign (5515)

  • Implemented EFT mapping in reports (5474)

Bug Fixes

  • UI fix of toolbar for smaller screens (5519)

Other

  • None

POS Release Notes Sprint 80

General Information

Below are the latest changes made to the Resolut Online POS;
apk: 1.4.235
apk pax: 1.4.260
uwp: 1.4.154

Upgrade Steps

  • Update to the latest version.

Improvements

  • Change price line numbers in Exact online interface (5437)(I2304-0137)

Bug Fixes

  • Payment amount rounding (5531)

  • Adding item without valid price (5511)

  • Settings import

  • Park counter bug in airport mode (5496)

Ticketing

  • None

Other Changes

  • None

Sprint 82

Resolut Online updates from Sprint 82:
POS
Portal

Subsections of Sprint 82

Portal Release Notes Sprint 82

General Information

Below are the latest changes made to the Resolut Online Portal;
version 1.4.26.5

Upgrade Steps

  • No action needed.

New Features

  • Discount report (5195)
  • Expenditures report (5613)

Improvements

  • Cashcount report improvements (5542)(I2308-0216)
  • Unified date format in reports (5541)(I2308-0041)
  • Change of tiles design in main menu (5553)
  • “Trigger update” tooltip extended (5558)
  • Added sftp upload configuration in integrations module (5596)(I2307-0304)
  • Implemented assortment configuration improvements (5610)

Bug Fixes

  • None

Other

  • None

POS Release Notes Sprint 82

General Information

Below are the latest changes made to the Resolut Online POS;
apk: 1.4.236
apk pax: 1.4.261
uwp: 1.4.155

Upgrade Steps

  • Update to the latest version.

Improvements

  • Urovo Improvements

Bug Fixes

  • Issues with external printer (5631)

Ticketing

  • None

Other Changes

  • None

Sprint 85

Resolut Online updates from Sprint 85:
Portal

Subsections of Sprint 85

Portal Release Notes Sprint 85

General Information

Below are the latest changes made to the Resolut Online Portal;
version 1.4.27.4

Upgrade Steps

  • No action needed.

New Features

  • Customer Deletion (5691)
  • Combination Sale Report (5614)

Improvements

  • Improved promotion detail selection (5675)
  • Trigger restart for POS4 update (5324)

Bug Fixes

  • audit failed logins (5708)

Other

  • None

Sprint 86

Resolut Online updates from Sprint 86:
Portal

Subsections of Sprint 86

Portal Release Notes Sprint 86

General Information

Below are the latest changes made to the Resolut Online Portal;
version 1.4.28.2

Upgrade Steps

  • No action needed.

New Features

  • Devices and Locations can now be deleted (5692)

  • Groups, Subgroups and Brands can now be deleted (5694)

  • Items and Modifiers can now be deleted (5705)

  • Download button added for all reports (5817)

Improvements

  • “Restrict tag menu to location group” option added to device level (5697)

Bug Fixes

  • UI fix in user module (5754)

Other

  • None

Sprint 88

Resolut Online updates from Sprint 88:
Portal

Subsections of Sprint 88

Portal Release Notes Sprint 88

General Information

Below are the latest changes made to the Resolut Online Portal;
version 1.4.29.8

Upgrade Steps

  • No action needed.

New Features

  • Support for multiple tikkie locations (TFS5933)

  • SAP integration (TFS5876)

  • Item attributes (TFS5921)

Improvements

  • Item groups can be imported via csv import (TFS5866)
  • Currencies, Payment types, Card mappings and VAT groups can now be deleted (TFS5706)
  • Reworked VAT module (TFS5892)

Bug Fixes

  • None

Other

  • None

Sprint 90

Resolut Online updates from Sprint 90:
Portal

Subsections of Sprint 90

Portal Release Notes Sprint 90

General Information

Below are the latest changes made to the Resolut Online Portal;
version 1.4.30.2

Upgrade Steps

  • No action needed.

New Features

  • Cashcount Manager in Resolut online portal (TFS5891)

Improvements

  • Extended RIS connector with ART, PRH files (TFS6040)

Bug Fixes

  • Kitchen printer location selection (TFS6005)

  • Trim email when creating user in portal (TFS6008)

  • Handle deleted VATs correctly in item details (TFS6024)

  • SAP connector export issues (TFS6050)

  • Do not delete free text fields I2312-0631(TFS5954)

  • Rename security field to “Social security number” (TFS6059)

Other

  • None

Iteration 8

Resolut Online updates from Iteration 8:
Portal

Industry

Subsections of Industry

Airport

Subsections of Airport

RIS (Retail Information System)

RIS is retail information system at Schiphol airport used for tracking of retailers` sales & payments statistics.

We have implemented an interface to generate specific RIS files and send sales & payments data (stored in RIS files per retailer) to Schiphol by FTP upload.

Basic flow:

POS -> POS ticket (sale/refund) -> RIS Web Service (store POS tickets) -> RIS database -> RIS Export Service (load & process POS tickets, generate) -> RIS files for each retailer daily -> FTP upload -> Schiphol RIS FTP

Retailers:
AP1 fig1

​Code base

TFS: $DefaultCollectoin/Projects​ /RIS (TSFC)

RIS server (BOV-RIS)

RDP: spl-2.bovertis.nl

Ask Peter Bakker or Jeroen Vijverberg for access to RIS server.

RIS Web Service

Web service which is used for receiving of POS tickets from retailers (Point-of-Sales).

POS tickets are stored in the RIS database from where they are picked up by the RIS Export Service for processing.

Note: There must be RIS plugin installed / configured on retailer`s POS system to send tickets into our RIS Web Service.

Web Service URL: http://spl-2.bovertis.nl/RIS/RISWebService.svc

Logs: C:\Bovertis\RISExportSvc\Logs\RISWebService_YYYYMMDD.log

Failed tickets folder.: *C:\Bovertis\RISExportSvc\FailedTickets* .TCK

Note:

  • in case of issues with RIS database, POS tickets are stored into failed tickets folder as .TCK files.
  • then there is an automatic process (job) which runs at night to store failed POS tickets into RIS database (for later processing)

RIS Export Service

Windows NT service is responsible for generating of RIS files for each configured company on daily basis.

Generated RIS files: *C:\Bovertis\RISExportSvc\Export* .dat

Uploaded RIS files: *C:\Bovertis\RISExportSvc\Export* .dat.uploaded

Logs: C:\Bovertis\RISExportSvc\Logs\RISExportSvc_YYYYMMDD.log

Scheduled “recurring jobs” which run every day at night:

  • Process failed tickets

    • if there are any failed POS tickets in “FailedTickets” folder they are loaded (.TCK files) and stored into RIS db
    • executed daily at 00:01
  • Process tickets

    • processing tickets loaded from RIS db which has not been processed yet and creating new export batch for company/date
    • executed daily at 00:05
  • Generate RIS files

    • loading not exported batches and trigger “RISFileJob” per company to generate RIS file for each company/date
    • executed daily at 00:10
  • Send RIS files to FTP

    • load RIS files (.dat) and send them to Schiphol PROD FTP server if company has this option “SendRISFilesToFtpProd” set to “1”
    • executed daily at 01:00
  • Recurring Jobs: http://localhost:8080/recurring

    AP1 fig2

RIS Dashboard (Hangfire)

AP1 fig3

RIS dashboard (for managment of queued jobs) is accessible locally on the RIS server.

Dashboard URL: http://localhost:8080/

Failed jobs: http://localhost:8080/jobs/failed
AP1 fig4

Sample failed job (FTP upload job):

  • in this case upload of RIS file to FTP server failed (for some network reason or so, more details can be checked in RIS Export Service logs)

  • it is possible to execute the job again - enqueue job with Requeue button
    AP1 fig5

  • after you click “Requeue” job should be enqueued by RIS Export Service for execution (run job again)

  • then you should see this job in “Enqueued” list -> “Processing” list -> “Succeeded” list or “Failed” list in case it fails again
    AP1 fig6

Notes

  • Gerzon retailer has POS tickets from more companies: 25 (default) and 66+67 which are POS tickets from shop-in-shop.
  • See FB 13065 for more details
  • We export one Gerzon RIS file for all 3 companies -> we treat child companies tickets (66+67) as if they had parent company ID (25)
  • ParentCompanyId must be configured in RIS.CompanyMappings table for child (shop-in-shop) companies, in this case Gerzon (Accessorize)
    AP1 fig7

How to run failed export / FTP upload jobs manually again?

In case there is some issue with Schiphol FTP or another issue Export or FTP Upload jobs can fail.

Then Support should connect to Hangfire Dashboard and navigate to Failed jobs and Requeue jobs which have failed:

http://spl-2.bovertis.nl:8080/jobs/failed
AP1 fig8

Crewshop Schiphol

The crewshop at Schiphol is a shop were crew (pilots, steward) can buy all kind of product like tobacco, perfume, alcohol and cosmetics. The shop is located in the flight center at Schiphol. B&S took ownership in 2014 from AviaPartner.

For the crewshop Bovertis developed a few components:

  • Crewshop handling in Resolut POS 2

  • Server component with website

  • Integration in Resolut BOS (check)

The crewshop at Schiphol provides two type of sales:

  • products that can be bought in the shop and taken immediately

  • product that can be bought but are delivered from the warehouse

When the purchase is started, the cashier must select to start a warehouse sale or shop sale. Warehouse sales are booked on a flight number, shop sales not. It is not allowed to mix sales, responsibility for the cashier.

The warehouse services should process all tickets (sales), if there is not PosTicketAviaPartnerSale object on it, do nothing.

If the object is there, we should create or update the order for this specific flight.

The warehouse service should also track opened orders (flights) and close them one hour (configurable) before departure. The picking order is printed.​

Technical info​

​The POS is using the AirportCrewShopPlugin which can be found in $/ResolutPOS/AddOns/ResolutV2Plugins.

The plugin is calling the CrewShopWebService, in fact GetAllFlightOrders, CloseFlightOrder and OpenFlightOrders WS methods.​

Codebase​

​History

The crewshop at Schiphol changed owner from Avia partner to B&S.

These are the changes for Resolut POS:

the plugin is using a webservice to post crew sales to the server

use parameter CrewShopPlugin_url to set the endpoint on the server (test or prod)

the parameters AviaBackoffice are changed to CrewshopBackoffice

Set parameter AllowNoFlightSales to 1, this allows sales without a boarding card.

​Stocks

The POS can check and show the stock levels of all products on the receipt. The idea is to do this in real time (background), but it is informal only. Theoretically it is possible stock is 0 (or <0) while there is enough stock in the warehouse.

POS

(Shops sales are not in scope for the crewshop)

When a warehouse sale is started, the POS will check the flight data on the server (not in the local database) and check if the flight is not closed (=does not exists or is open). If not closed the user can proceed.

When the transaction is paid the sale is finalized. We have two options:

a- a plugin will update the stocks in the table, the server will poll for new tickets

b- we pass the ticket to a webservice method and the webservice will update the stocks and open/create the flight

Network

The server is located in the datacenter in Dordrecht, Eindhoven and Schiphol Crewshop are in a VPN LAN.

The users are working on a RDP in Amsterdam on the server in Dordrecht, they can print from RDP to the local printers. So we can print from the server in Dordrecht to a printer on Schiphol.

Remark

  • When the print fails we should panic otherwise the order will not be delivered.

  • Remind that the crewshop is just a shop within BOS (67)

Parameters

ParameterName Description
​CrewshopSchiphol = 1 ​This enables the crewshop start screen (flight number input)
​CrewShopBackofficeServer
CrewShopBackofficeUser
CrewShopBackofficePassword
CrewShopBackofficeDatabase ​These parameters are used to contact the stock information
CrewShopStockQuery Overrides the default stock query
AllowNoFlightSales = 1 Allows sales without entering a flight number (shop sale)
CrewShopPlugin_URL
TEST SK:
http://172.20.16.92:9098/CrewShopWebService
TEST B&S:
http://drdbovertistest.bs-international.nl:8080/CrewShopWebService AirportCrewShopPlugin.dll is needed in C:\POS\Plugins folder.Parameter for CrewShop web service must be set (web service is used for loading of flight orders, sending crew sale tickets, and closing/reopening of flight orders).Sample parameter value:<parameter name=“CrewShopPlugin_URL”>http://172.20.16.92:9098/CrewShopWebService</parameter>

Commands

AppCrewshopStockView - Salesscreen, shows stock information

Crew Shop Service - installation & configuration

To install the windows service for Crew Shop you must run this command as Administrator: CrewShopService.exe install. It will install the service.

Then you must allow configured ports (on which web service / web portal will be self-hosted). See below: sample configuration…

Configure all the required parameters (configuration file: CrewShopService.exe.config).

Run the service (from: services.msc)

Sample configuration file (B&S test)

​CrewShopService_BS_configuration.xml

Configuration file explained:
AP2 fig1

Allow ports on which WS/web will be self-hosted, i.e. 8080, 9090 or different ports if these are not available.

B&S network - TEST environment

To access B&S TEST environment you must login to their VPN (use Internet Explorer).

  1. navigate to https://webportal.bs-gg.com and login as User: bovertis_admin Passwd: B0v3rt1s
    AP2 fig2

  2. Select Bovertis Test server and login as User: blijdorp\bovertis_admin AP2 fig3

On the server go to D:\APPLICATIONS\ResolutBosSuite\CrewShopService where CrewShopSvc TEST is installed.

Logs - folder for storing logs

Stock - folder which is now configured in config. file to load Stock.CSV from this folder, later stock will be loaded from some file share so this folder will not be needed

Tickets - when ticket is sent from POS plugin to CrewShopWebService it is stored in this folder, after processing (creating flight orders from PosTicket) it is deleted

Web\Root\Reports - reports are generated & printed automatically (for closed orders), they are stored in this folder so that they are accessible from web portal (see sample report below).

Web\Root - web portal files & folders (css/scripts/html) are here

AP2 fig4

To copy some files to B&S server you need to copy it to Bovertis FTP first (ftp://support.bovertis.nl, \BOV-SUPPORT), User: PosNet AP2 fig5

Web portal (first prototype)

There is also web portal deployed together with web service (self-hosted by CrewShopService) for displaying dashboard with upcoming flights, opened/closed orders & reporting…

Web portal SK:

http://172.20.16.92:9099/

Web portal B&S:

http://drdbovertistest.bs-international.nl:9090/

Dashboard

It will display order details (new page), print order will display generated report, close order will close the order from web portal.
AP2 fig6

Flights - displaying next 10 upcoming flights on the current day
AP2 fig7

Orders

  • opened flight orders (not closed yet - you can do crew sales on these flights)

  • closed flight orders (crew sale should not be possible - only when order is re-opened). Reports are generated automatically for closed orders.
    AP2 fig8

Reports - you can display generated PDF report & print it from the browser.
AP2 fig9

Generated report - after clicking “Show PDF” report will be displayed in the browser from where it can be printed.

Later there will be automatic printing implemented to configured printer & automatic e-mailing of generated reports to specified e-mail addresses.

AP2 fig10

Shop and Collect

This article is for the internal API. For external applications see Schiphol Shop & Collect

Shop and Collect is currently used at Schiphol, and will be build for IDF airport Brussels and Charleroi. At Schiphol the old name was Pickup On Return (PUOR).

On Schiphol Airport the warehouse system is provided by a 3rd party, the lockers are provided by ByBox.

On Brussel and Charleroi the warehouse system will be ours, the lockers are provided by locktec (Germany).

Codebase

Resolut POS 2 project

POS Plugin TFS /$Resolut/Plugins/PluginsGeneric

Server parts:

Functional

When customers are flying with hand luggage only, you cannot buy liquids like perfume or alcohol and take it back on your return flight.

The solution is that you buy the product on the airport, leave it at the airport, and pickup your purchase when you return.

The purchase (parcel) is sent to the warehouse, and the day before you return the warehouse places the purchase in a locker using a specific barcode printed on the parcel.

On the customer receipt another barcode can be used to open the door and collect your purchase.

Technical​​

The POS calls a webservice at our shop & collect service and sends two barcodes, and optional a mobile phone number. If a mobile number is provided, the customer receives an SMS with the order number. The locker receives two barcodes, one to deliver the parcel, one to pick up the parcel.

History

  • Release 2: Implemented cloud server (services1.bovertis.nl) to send SMS reminders
  • Release 3: Implemented logibag lockers though the cloud service

In release 3 (logibag) method ConfirmOrderValuebleLocker is used to register the barcodes to open the lockers door.

Functionality

At the POS the return date and optional the mobile phone number is entered. When this is finished, the POS request a ClaimOrder to get the order id. The order id is further used for the confirm or cancel method.

If the claim fails the POS will retry (queued), in fact as long the POS is not restarted the following claim or cancel will succeed.

Detected issue

The parameter ShopCollectLockers controls if barcodes should be set on the Shop & Collect receipts, this will tell ’the purchase is registered at logibag’. So even if the claim fails (and probably the confirm), this is printed, and in that case the locker will not open (since it is never announced at lockers).

Confirm valuable locker barcodes

In the ConfirmOrderValuableLocker method there are 3 parameters added for lockers:

  • Reference - this is the bag barcode
  • Barcode1 - same as reference (bag barcode)
  • Barcode2 - customer receipt barcode

The bag barcode is used to put the purchase in the locker, barcode2 is used to open the door again and take it out.

Webservice methods

​/// <summary>

/// Register the order and claims the order id and send SMS immediately to the mobile number with order id and return date of the customer, If sendNotificationSms is set to true, so if a mobile number is provided customer receives SMS day before, if valuable is set to true, package is marked as valuable and warehouse will be notified by email or sms in the morning of the pickup date
</summary>

/// <param name="securityToken">Client token used for authorization</param>

/// <param name="companyId">The company id.</param>

/// <param name="shopId">The shop id.</param>

/// <param name="posId">The pos id.</param>

/// <param name="mobileNumber">The customer's mobile number. If set, after the order is created, customer receives an register order information sms</param>

/// <param name="customerPickupDate">The date when customer picks upa the package</param>

/// <param name="sendNotificationSms">If set to true, customer receives a notification sms one day before pick up at 12:00</param>

/// <param name="valuable">if set to true, package is marked as valuable and notification email or sms is sent to warehouse on the pickup day approx at 7:00 in the morning</param>

/// <param name="reference">Barcode of the package/order (can be set later in confirm method)</param>

/// <param name="barcode1">Barcode of the package/order (can be set later in confirm method)</param>

/// <param name="barcode2">Customer barcode (can be set later in confirm method)</param>

/// <returns></returns>​

ClaimOrderServiceResult RegisterOrderId(string securityToken, int companyId, int shopId, int posId, string mobileNumber, DateTime customerPickupDate, bool sendNotificationSms, bool valuable, string reference, string barcode1, string barcode2);

/// <summary>

/// Confirms the order valuable, locker information.

/// </summary>

/// <param name="securityToken">Client token used for authorization</param>

/// <param name="orderId">The order id</param>

/// <param name="ticketTransactionId">Ticket transacation id (unique id)</param>

/// <param name="ticketDate">Transaction datetime</param>

/// <param name="ticketNumber">Ticket number</param>

/// <param name="ticketData">The ticket data (serialized ticket data or receipt text converted to byte array).</param>

/// <param name="valuable">if set to true, package is marked as valuable and notification email or sms is sent to warehouse on the pickup day approx at 7:00 in the morning​</param>

/// <param name="reference">Barcode of the package/order</param>

/// <param name="barcode1">Barcode of the package/order</param>

/// <param name="barcode2">Customer barcode</param>

/// <returns></returns>

ServiceResult ConfirmOrder(string securityToken, int orderId, int ticketTransactionId, DateTime ticketDate, int ticketNumber, byte[] ticketData, bool valuable, string reference, string barcode1, string barcode2);

/// <summary>

/// Cancels the order.

/// </summary>

/// <param name="securityToken">Client token used for authorization</param>

/// <param name="orderId">The order id.</param>

/// <returns></returns>

​ServiceResult CancelOrder(string securityToken, int orderId);

Contract objects returned by the webservice

ClaimOrderServiceResult

​Field name ​Type ​Description
​​Success ​Boolean ​Indicates if operation was successful​
​ErrorCode ​Integer ​Error code number (see error codes table)
​ErrorMessage ​String ​Error message in English
ClaimedOrderId ​Integer ​Id of the order created in the system, later used in confirm or cancel methods
SmsSent​ ​Boolean ​Indicates if customer sms was sent

ServiceResult

​Field name ​Type ​Description
​Success ​Boolean Indicates if operation was successful​
​ErrorCode ​Integer ​Error code number (see error codes table)
​ErrorMessage String ​Error message in English

Error Codes

​0 ​No error
​1 ​Error, more details in the Error Message
​91 ​Not all messages could be delivered
​92 ​Password does not match
​93 ​Given date is incorrect
​94 ​Message is larger than 160 characters
​95 ​Senderid is incorrect
​96 ​There are empty parameters or fields
​97 ​Onvoldoende sms-tegoed
​98 ​Domain from which the message is sent does not match with ‘beveiliging domein’
​99 ​​Text message could not be delivered​
​100 ​Order is received correctly and will be processed
​101 ​Order is not accepted​

Resolut POS Quota Info

Quota registration is used at 4 specific locations:

  • Belgium airports Staff Sale Quota (IDF/Skypeshops)
  • Kenyia (ILagardere BE)
  • Brunssum (Lagardere BE)
  • Afghanistan, Iraq and Mali (B&S)

The 4 locations have 3 different type of quotas:

  • IDF Belgium is related to discount of staff sales and discounts
  • Kenya and Afghanistan use identical plugins for calculation and synchronisations
  • Brunssum and Eibergen are now owned by Lagardere BE and are using the ‘Brunssum Plugin’

Lagardere Belgium​​​

The staffsale quota is handled through the staff sale quota webservice that is running between the POS and the SQL database.

Sourcebase: Vault $/StaffSalesQuotaServer

Tables: StaffSalesQuota, StaffSalesQuotaDetails, StaffSaleQuotaRegistration

Lagardere BE Kenyia​​

The quota’s are maintained in database tables. Registrations (UN card holders so persons) use a RF-ID card to identify themselves.

A registration is bound to a specific category (A, B, C, etc.), and each category is bound to a list of quota’s, is a maximum amount and/or units to buy monthly.

Units can be sigratettes, gram, liters beer of centiliters alcohol.

The registrations are read/syncrhronized throug a file or through file import, with a registration tool it is possible to assign a card to a registration and is written for IDF Kenyia.

Version 1.1.8 update

When the database field Registration.Grade contains RESETQUOTA the quota’s are not updated in the database, but are visible on the receipt.

Lagardere Belgium - Brunssum Eibergen​​

B&S is slightly different as IDF KEnyia as quota’s are synced betweewn locations.

Codebase IDF Kenyia

Quota Registration tool: $/Projects/Applications/RFIDQuotaRegistration/RFIDQuotaRegistration

Plugin: $/Resolut/Plugins/PluginsGeneric (see project QuotaPlugin)

Resolut POS 2 codebase

Technical Quota IDF Kenyia

The plugin listens to the QuotaPluginHello, QuotaCheckQuota and QuotaBook command, and the PosTicketQuota object is used for holding the quota data.

A new sale may not exceed the amount or any unit value. The unit value is stored in PosTicketItemSale.ContentType and is a decimal value for gram, liter of pieces.

Resolut POS can call the check balance command, the plugin will retry with attribute QuotaValid (true of false) and a QuotaText with text to display to the cashier.

In some periode a multiplier applies (i.e. Christmas) and quota’s can be increates temporary in a specific period.

Technical​​ Quota Registration Tool

For this project a specific .NET 4.0 build of PosModule is used to support the RFID OBID cardreader drivers.

Codebase IDF B&S

Plugin: $/Resolut/Plugins/PluginsGeneric (see project QuotaPluginBS)

History​​

​Version ​​Date​ ​Changes
​- ​Sep/Dec 2015 First release
​May 2016 Added interface with ZKACCESS (see FB13032)
​Kenyia 1.1.7 ​31 jan 2018 TFS223 Fixed substracting discount from totalamount
​Kenyia 1.1.8 ​5 sep 2018 TFS339 Added reset quota feature

AENA Configuration

Introduction

On Spanish airports Resolut POS is connected to the software of Savia to export each sale instantly when the receipt is created.

In general, the software should be compliant with the following rules:

  • Create a text file for each sale, refund or aborted transaction
  • Use different sequences for sales, refunds, and aborted sales
  • Create a total file each day
  • Be able to handle Aena specific discounts triggered by a QR code
  • Be able to handle Aena specific vouchers triggered by a QR code
  • Be able to handle airline vouchers and export the correct carrier info
  • Automatic close a shift when it is still open in de evening
  • Be able to recreate any file (sales, refund, aborted sales and total) from the POS
  • Print specific information on the receipts
  • Create XML exports with monthly and yearly totals
  • The software may not be changed after certification

To apply for the certification and rules there are limitations:

  • It is not possible to open multiple shifts simultaneously, i.e., it is not possible to have 2 cashiers working on two different drawers. But it is possible to have multiple cashiers working on the same shift.
  • It is not allowed to have more than 3 different discounts on a single receipt, this is enforced by the software.
  • It is not possible to use the discount engine together with the Aena discount engine, only manual and single discount can be configured.
  • When a product group is not configured in the product group mapping it cannot be sold, this is enforced by the software.
  • It is not allowed to have sales and refunds on a single receipt, this is enforced by the software. By the limitation of the current user interface is will not be possible to refund multiple items on a single receipt.
  • The software cannot be updated without visiting Madrid for a new certification.

To configure the software correctly for existing or new locations is further explained in this document.

Architecture

Most of the Aena logic is built into a single plugin AenaInterfacePosPlugin.dll which can be added to the database Plugins table and plugins folder.

The Aena/Savia software must be installed and the folder C:\savia\ventas must be created.

For each sale instantly a text file is created in the ventas folder and uploaded by the software of Savia to their server.

A separate application AenaTicketResender.exe can be used to re-create the text files, this should always be processed on the original point of sale and only be used upon request of Aena.

Both the POS and ticket storage database requires additional tables:

AenaConfiguration Contractual information per location (shop/airport) needed for the export.
AenaProductgroupMapping Mapping of product groups vs Aena groups.
AenaPaymentLine AenaSalesLine AenaSalesTransaction AenaTransaction AenaVatLine Transactional information.
AenaConceptCanons Table needed on ticket storage only

When a sale, refund of aborted sales is created the information is written in the Aena transactional tables, and the information is queued to be updated in the ticket storage. The POS and ticket storage have the same data, but the storage contains data from all point of sales/locations.

Those extra tables are needed to guarantee an identical re-creation of any text file, even when product groups or mappings change in the configuration.

On the application server monthly and yearly the export is created with the data from the ticket storage.

Resolut setup

Resolut POS version 4.0.7970.0 – Release Spain Aena Branch
AenaInterfacePosPlugin.dll 1.0.1 – PosModule4 Branch
AP5 fig1

Aena locations require the specific release of Resolut POS 4 mentioned above and is maintained in a specific release (GIT) branch. This version must be installed after a fresh Resolut 4 install.

For a fresh installation, additional tables should be added to the Resolut POS database by the AenaTableCreation.sql script. Further the file Aena Group Mapping.sql must be executed to insert the correct mappings in the AenaProductGroupMapping table.

In the table AenaConfigurations an entry should be added for that store with the Aena contract information, see an example below. The configurations are both needed in the POS database and ticket storage where the ticket storage must have record for all locations.

The data for each configuration (record) must be identical in all databases.
AP5 fig2

The AenaConfigurationId (first column) must be configurated in parameter Aena.AenaConfigurationId, i.e., value 3.

Auto update

Do not connect Aena installations to any auto update channel, as this would violate the certification.

Sending Aena data to server (update malaga)

We noticed that the current Malaga installation did not synchronize the Aena data to the server, and this should be done during the update. Sending existing Aena data does not apply for new installations.

Update Ticket Storage

Before executing this update both point of sales at Malaga must be stopped (not running), this procedure can only be started when the shop is closed.

Requirements:

  • AenaUpdate.zip extracted to an installation (temp) folder, for example C:\aenaupdate
  • VNC to the Malaga point of sales
  • SQL Enterprise manager query window to database TicketStorageESProd.
  • The user must have enough right to create tables.

Duration: ca. 5 minutes

  • Be sure that both point of sales at Malaga are signed off before closing the application
  • Close the application and verify that Resolut.exe is not running in the task manager.
  • Be sure the point of sales will not be started during the process and after this process
  • Run the script AenaTablesCreation.sql from the installation folder.
  • Run the script TicketStorage_AenaAccessRights.sql from the installation folder.
  • Run the script AenaConceptCanons_data.sql from the installation folder.

Steps for update Malaga POS

Both Malaga point of sales must be stopped, this should be already done in the Tickets Storage update process.

Requirements:

  • POS.NET 1.14.1 installer
  • AenaUpdate.zip extracted to an installation (temp) folder, for example C:\aenaupdate

The actions below can be started before the tickets storage process is started or completed:

  • Be sure that both point of sales at Malaga are signed off before closing the application

  • Close the application and verify that Resolut.exe is not running in the task manager.

  • De-install POS.NET 1.12 and install 1.14.1

  • Set the screen resolution to 1024x768

  • Install Resolut 4 default installation on both point of sales with the latest Resolut 2.5 to 4 update zip and run the updater tool.
    DO NOT START RESOLUT.EXE !

  • Copy all files from the Installer/pos folder to the c:/pos folder, this is the specific release for Spain
    DO NOT START RESOLUT.EXE !

  • Create the folder /POS/Invoices and copy all files from the Installer/Invoices to this folder

  • Copy the Aena plugin from the Installer/Plugin folder to the c:/pos/plugins folder

  • Copy the file CapiInvoiceLogo.png to the /POS/Media folder

  • Run the MalagaAeanUpdate.sql on the POS database to update the parameters.

  • Run the MalagaConfigurationCorrection.sql on the POS database to correct the configuration and data

    Important: The actions below should only be started when the Ticket Storage process was completed.

  • Run the AeanUpdateUploader.exe from the installer/AenaUpload folder on POS 2 first, this POS has just a few Aena records

  • Follow the instructions in “Aena Uploader tool” paragraph.

  • After the upload is completed, Resolut can be started, and the database will be patched.

  • Verify that there are no errors other than described in the upgrade document.

  • Repeat the same step for POS 1, the upload could take

When both point of sales are update the Installer folder can be removed.

Aena uploader tool

Remark: the Aena upload tool is used once for Malaga.

Start the application and verify the server (1) and database (2) are correct, default is local and Posnet and should be correct for a production point of sale.

Click connect (3) followed by upload (4).
AP5 fig3

The tool shows how many transactions will be uploaded, click ok. During the upload the form may get unresponsive and even show “application not responding”, ignore this message.

The tool will complete with a message “all data uploaded” or with an error message, for example when the connection between POS and database gets disconnected. When the tool is restarted, it will continue from the last transaction.

Press the close button to close the application and the application can be deleted as it is not used anymore for other installations.

New POS installation

Requirements:

  • Default Resolut 4 installer not older than 7970, or installer + 7970 update ZIP
  • AenaUpdate.zip extracted to an installation (temp) folder, for example C:\aenaupdate

Installation:

  • Install the SAVIA export application and create C:\savia\ventas folder. This is documented in an external document.
  • Install Resolut 4 installer and update with ZIP 7970.
  • Copy all files from the Installer/pos folder to the c:/pos folder, this is the specific release for Spain
  • Create the folder /POS/Invoices and copy all files from the Installer/Invoices to this folder
  • Copy the Aena plugin from the Installer/Plugin folder to the c:/pos/plugins folder
  • Copy the file CapiInvoiceLogo.png to the /POS/Media folder
  • Run the script AenaTablesCreation.sql from the installation folder.
  • Run the script TicketStorage_AenaAccessRights.sql from the installation folder.
  • Run the script AenaConceptCanons_data.sql from the installation folder.
  • Run the script Aena Group Mapping.sql from the installation folder.
  • Configure or add a configuration on the POS and ticket storage as described in “Aena configurations”
  • Important: Open and edit the first two statements in the MalagaAeanUpdate.sql on the POS database to update the parameters.
  • Optionally edit the invoice configuration in MalagaAeanUpdate.sql depending on the airport/shop location.
  • Execute MalagaAeanUpdate.sql to update the parameters.
  • Finish the default configuration the POS for the store (shop id, pos id, etc)
  • Start Resolut

New Resolut 4 parameters

AllowMixedSaleRefunds Must be set to 0, but this is also enforced by the POS.
Aena.AutoEndOfDayUserId This is the user id (employee id) in case the software performs an automatic end of day. The user must exist in the employees table.
MaximumItemPrice 99999 (euro), or lower, no decimals
MaxReceiptAmount 9999999 (euro) or lower, no decimals
Aena.AenaConfigurationId 1 (must correspondent with an existing record)
Aena.DiscountsConfig See section Aena.DiscountsConfig parameter
Aena.CloseDayTime 2330 is advised

Ticket storage parameters:

AenaExport.ClientId ID of the client (mandatory)
AenaExport.UnitSalesAmnt Amount fee for each sold piece of item belonging to such category (required only if such items will be sold)
AenaExport.VarSalesPerc Percentual fee for each sold piece of item belonging to such category (required only if such items will be sold)

We do not know the values to be set in those parameters.

Aena Configurations

For each airport/shop a different configuration applies that is configured in the AenaConfigurations table both on the point of sale as in the ticket storage. The data should be provided by Anea of Savia.

The data for each configuration (record) must be identical in all databases.
AP5 fig4

Configure the AenaConfigurationId in the parameter Aena.AenaConfigurationId.

Qty button

The Qty button cannot be used as it could break the discount rules in the export files. Also the parameter EasyQty may not be set.

Invoice printing

It is required to print a receipt to a laser printer, below the setup of parameters which can be found in MalagaAeanUpdate.sql.

When the parameter TopButtons.UseInvoiceCopy is set to 1, a button will appear at the toolbuttons when a sales receipt is printed to print the sale as invoice.
AP5 fig5

The name of the laserprinter can be defined in the configuration screen for a list with configured printers, or when printing an invoice the first time (see image below). The name can be also configured in the parameter LaserprinterName.
AP5 fig6

INSERT PARAMETERS VALUES (0,0,0, ‘Invoice.LogoFilename','CapiInvoiceLogo.png','')
INSERT PARAMETERS VALUES (0,0,0, 'Invoice.CompanyAddress','Malaga Airport\nTIENDA CAPI-LUX AEROPUERTO DE MÁLAGA T3\nZona de embarque puertas C (al lado de la tienda Relay)\nVAT: ESB40594616','')
INSERT PARAMETERS VALUES (0,0,0, 'Invoice.FooterText','All Sales are subject to our General Term and Conditions which can be found at www.capi.com\nCapi-Lux Spain S.L.U ~ Calle Justicia no. 4-8 ~ Valancia 46004 ~ +31 (0) 23 56 99 520 ~ Service@capi.com ~ IBAN NL[insert IBAN number] ~ VAT ESB40594616','')
INSERT PARAMETERS VALUES (0,0,0, 'Invoice.CompanyContact','','')
INSERT PARAMETERS VALUES (0,0,0, 'Invoice.Layout','Capi_Spain_MalageInvoice.repx','')
INSERT PARAMETERS VALUES (0,0,0, 'Invoice.CompanyName','Capi-Lux Spain S.L.U.','')
INSERT PARAMETERS VALUES (0,0,0, 'Invoice.InvoiceText','INVOICE / FACTURA','')
INSERT PARAMETERS VALUES (0,0,0, 'Invoice.DateText','Date / fecha','')

Aena.DiscountsConfig parameter

This JSON must be saved in the parameter table for the parameter Aena.DiscountsConfig.

We do not know if the values are subject to change and how Aena communicates actions with B&S. In AeanFly7 and Aeanyfly8 vouchers there are item number of free gifts specified. For the certification we created product to those promotions, this should be set to the correct values.

It is strongly advised to test Aena discounts on a test environment before changing the settings in production.

{“Discounts”:[{“Type”:1,“Value1”:10.0,“Value2”:0.0,“ItemId1”:0,“ItemId2”:0,“Codes”:[“AENAFLY1”]},{“Type”:2,“Value1”:2.0,“Value2”:0.0,“ItemId1”:0,“ItemId2”:0,“Codes”:[“AENAFLY2”]},{“Type”:3,“Value1”:10.0,“Value2”:15.0,“ItemId1”:0,“ItemId2”:0,“Codes”:[“AENAFLY3”]},{“Type”:4,“Value1”:1.0,“Value2”:0.0,“ItemId1”:0,“ItemId2”:0,“Codes”:[“AENAFLY4”]},{“Type”:5,“Value1”:10.0,“Value2”:2.0,“ItemId1”:0,“ItemId2”:0,“Codes”:[“AENAFLY5”]},{“Type”:6,“Value1”:10.0,“Value2”:0.0,“ItemId1”:0,“ItemId2”:0,“Codes”:[“AENAFLY6”]},{“Type”:7,“Value1”:20.0,“Value2”:0.0,“ItemId1”:2460030,“CompanyId1”:31,“ItemId2”:0,“Codes”:[“AENAFLY7”]},{“Type”:8,“Value1”:20.0,“Value2”:30.0,“ItemId1”:2440082,“CompanyId1”:31,“ItemId2”:2440155,“CompanyId2”:31,“Codes”:[“AENAFLY8”]}]}

Export of XML files

Aena requires to create XML files per month and year with totals per location for all Aena connected point of sales. Those XML files are certified with test values, those values should be configured with correct values.

The installation and configuration of the Export XML application will be added later below.

AENA Ticket Resender

Introduction

At Malaga airport Resolut POS sends all sales and shift information to SAVIA/AENA automatically, but the authorities may request to resend one or more tickets to the server.

The information must be resent from the same point of sale and the information (file) must be identical as the original file sent before which is ensured by the software.

To resend the tickets a separate application ‘Aena Ticket Resender’ was created that can be used on the point of sale only, it is therefore important to know from which point of sale id (on Malaga 3001-1 or 3001-2) a resend is requested.

Instructions

When the application starts it will show the transactions for the actual date. By clicking -1 day or +1 day the date is changed and all transactions for that day are automatically shown.

By clicking TODAY the actual date is shown.

The point of sale may have all transactions for the last years and loads all information from the local database, but in case the transactions are not available anymore in the local database click the Use server connection checkbox . When this option is clicked select the date again to refresh the form.
AP6 fig1

Selecting a date

When the application is started the actual date is shown. By clicking -1 day the previous day is selected and automatically all transactions are shown. By clicking +1 day the next day is selected.

To select a date from the calendar and click the calendar icon shown at 1.
AP6 fig2

When the calendar is shown there are multiple options to step through the dates. The left and right button on top will select the previous or next month.
AP6 fig3

When clicking on the month or year (in this case November 2021) the month can be selected.
AP6 fig4 By clicking the year another year can be easily selected:
AP6 fig5

Selecting a single ticket

Use the top-up-down-bottom buttons to step through the tickets, when a ticket is selected it is shown on the right.
AP6 fig6

Alternatively the line can be clicked (touched) to select that transaction.

The home button selects the first ticket of that day, the bottom button selects the last ticket of that day.

The Aena information is printed on bottom of the receipt and it is important to know that the point of sale ticketsnumbers are not the same as the Aena ticket numbers.
AP6 fig7

Searching for a transaction

With the search button transactions can be searched by Aena ID (which is printed on the bottom of the ticket), the Resolut ticket number, of all tickets that belong to a specific shift number.

Click the option to search for on the left, then enter the number with the keypad and press the search button. When the tickets was found it is shown and can be resent, when the transaction could not be found a message is shown.
AP6 fig8

Sending a single ticket

When clicking the Resend button the application asks for confirmation to resend the ticket again. Click Yes to resend the ticket, if the ticket was successfully created it will show a confirmation ‘The Aena information was created successfully’.
AP6 fig9

Sending a full day

With the Full day button all information for that day is recreated and sent to Aena. The application asks for confirmation, when clicking Yes all information is created and shown and the progress is shown. When using the local database sending a full day takes a few seconds.
AP6 fig10

Using the server connection

Whenever the data is not available in the local database, for example when the point of sale hardware was replaced, the data can be found on the server. When using a server connection the application might respond a bit slower.
AP6 fig11

Public Transport

Subsections of Public Transport

Public Transport Card Reader Configuration

  1. Add the Parameter to the Database

Copy the parameter PublicTransportPlugin.dll to C:\POS\Plugins, and add it to the POS database in the “Plugins” table

Public Transport parameters are loaded from QChessOvcSettings.xml. If needed, they can also be added manually to the POS4 parameters. 

ParameterName Description
PublicTransportWebUrl Example: https://xyz.nl/
PublicTransportRestUrl Example: https://xyz.nl/ovhost/rest
PublicTransportMerchantCode Example: XYZ
PublicTransportCashRegisterId Example: XYZACC01
PublicTransportReaderSerialNumber Example: XYZACC01
PublicTransportAllowPrintCardInfo default false - enable/disable Arriva card check when sending sales to POS from Arriva and printing Arriva card serial number and product info on receipt
PublicTransportAllowQuickPaymentTypes default true - enable/disable Arriva quick payment buttons
  1. Install the card reader (Windows)

Note: you will need to use a real reader, not a simulator

Download, unzip and Install CPR-USB-driver-build20161102.zip and Feig dependent libraries.zip from our Public Transport folder. R39 fig5

Note: Contact our Support Team if you need access to this folder.

Insert the Feig Reader into a USB port. The drivers will be automatically installed.

Install usbreader 1.7.0 from the Public Transport folder:

usbreader_windows_1_7_0.exe

Directory: C:\usbreader

Unzip the Reader configuration file and place the configuration files usbreader.properties and QChessOvcSettings.xml in the folder C:\usbreader.

Double click on c:\usbreader.exe

This will connect the reader to the backend. You should see a green display and the message “Klaar voor gebruik” (Ready to Use).
R39 fig1

You will also see a green dot in the system tray. An orange dot indicates a connectivity error. A blue dot indicates “in progress”.
R39 fig2

The log file is located in C:\usbreader\log\info.

  1. Create buttons in POS4 using the Menu editor

Hold Shift + Right Click on the key button to open the configuration window, and select Menu Editor. Then choose a menu and click Add Button.
4A9 fig1a 4A9 fig2a

Add the buttons:

“AppPublicTransportCardInfo”

“AppPublicTransportCardLogs”

R39 fig3

  1. Test the Card reader

    1. Login to the test company, and start the POS with a card reader
    2. Place a test card on the card reader
    3. Click Card info
    4. The receipt is printed
    5. Click Log
    6. The receipt is printed

R39 fig4

  1. Printing Additonal Information

In order to print additional information for subscription products on the receipt, such as “Centrumzone”, “Star value”, “Valid from”, and “Valid until”, set the parameter PrintItemDescriptionLong to “1”.

R39 fig6

Ximedes

Configure the Ximedes integration.

Set-up

Go to Configuration > Integration and on “Ximedes” click Configure .
J21 fig1

In the “Configuration – Ximedes” window, enter your URL. J21 fig2a

Click Save to keep the configuration.

When you are ready to activate the integration, click Enable.

Subsections of Ticketing

Loyalty Card in Ticketing POS

  1. To use loyalty cards in Ticketing POS, a loyalty card needs to be created in the Resolut office client.
    Go to Loyalty Cards > Details tab and enter in the required information.
    X2 fig1

  2. You can then configure the Loyalty card in the Discount rules tab.
     X2 fig2

  3. In the POS, the Loyalty card is shown in Discounts.
     X2 fig3

  4. To apply the loyalty discount, add the relevant item to the sale and select the loyalty discount. The amount is deducted from the sale.
     X2 fig4

  5. The Loyalty card discount is applied and shown on the printed receipt.
     X2 fig5

Journal app with Ticketing POS

  1. Journal app works with TicketingPOS when they are both installed on the same device.
    X3 fig1

  2. Journal can be opened directly from the Ticketing POS Home screen by tapping Journal.
    X3 fig2

  3. Journal is refreshed immediately and shows actual data up to the set filter date. If needed, tap the refresh button in the top-left corner.
    X3 fig3

  4. Tap a record to show the receipt.
    X3 fig4

  5. The sale can be refunded directly from Journal using the Refund button. This will automatically open Ticketing POS.
    X3 fig5 X3 fig6

  6. Previous sales can be reprinted directly from the journal app by tapping the print icon.
    X3 fig7

  7. Ticketing POS can be opened from Journal by tapping the X icon in the top-left.
    X3 fig8

Change Print Package Price Type

There are three types of Package ticket price info:

  • Discounted
  • Retail
  • None

The price on the receipt is still the same depending on the Ratio configuration in the Package module detail.
X4 fig1

  1. Find the package number in Package groups X4 fig2

  2. Open the item in Packages. The default Ticket price info is set to ”Discounted”.
    The prices on the receipt are split according to the Ratio percentage. Printed prices on the ticket have the same value as on the receipt. The sum of the individual prices is equal to the total package price.
    X4 fig3

X4 fig4

  1. If the Ticket price info is set to ”Retail” then the prices printed on the receipt are the original item prices, as if they were sold separately.
    The sum of individual prices is not equal to the package price.
    X4 fig5

X4 fig6

  1. If the Ticket price info is set to “None” then prices are not printed on the ticket at all. The prices printed on the receipt are according to the Ratio.
    X4 fig7

X4 fig8

Skip printing Group Tickets

Setup

  1. In the Resolut Online Portal, go to Infrastructure > Devices. Select the device you need and under “Applications”, open Resolut Online POS
  2. The parameter “Skip group tickets print count” determines at what quantity of tickets the user will be asked whether or not he wishes to print the tickets. Set this number according to your needs. In the example below, if at least 5 items are sold then the message will be displayed.
    X5 fig1

Usage

The order is placed through the POS, and after finishing payment the message “Do you want to skip ticket printing?” is displayed.
X5 fig2

Subsections of Region

Swedish Fiscalization

Create a functional device with Swedish fiscalization

  1. Create a new device in Resolut Backoffice Client under the administration where the device will be used; Open Devices and click Add.
    The description must be in the format “Name_Number”.
    You must fill in a Device Type and check the Enabled and Sale checkboxes.
    Save and Refresh the Devices Module.
    CF1 fig1 CF1 fig2

  2. Open the Resolut online portal

  3. Find the device you just created in the Resolut Backoffice Client and open device details.

  4. Fill in the fiscalization properties

    NOTE: These screenshots show test environment values! Please contact our Support Team if you need assistance with your environment.

CF1 fig3

  1. Save the device details.
  2. Go back to the Resolut Backoffice client and recreate the activation code for the device.
  3. After successful activation fiscalization data will be shown on the receipt
    CF1 fig4

German Fiscalization

Create a functional device with German fiscalization

  1. Create a new device in Resolut Backoffice Client under the administration where the device will be used; Open Devices and click Add.
    The description must be in the format “Name_Number”.
    You must fill in a Device Type and check the Enabled and Sale checkboxes.
    Save and Refresh the Devices Module.
    CF1 fig1 CF1 fig2

  2. Open the Resolut online portal

  3. Find the device you just created in the Resolut Backoffice Client and open device details.

  4. Fill in the fiscalization properties

    NOTE: These screenshots show test environment values! Please contact our Support Team if you need assistance with your environment.

CF2 fig1

  1. Save the device details.
  2. Go back to the Resolut Backoffice client and recreate the activation code for the device.
  3. After successful activation fiscalization data will be shown on the receipt
    CF2 fig2

Belgium Fiscalization

Setup

Belgium fiscalization setup consists of several components: Fiscal data module, FDM server, FDM client SDK and POS4 Belgium fiscalization plugin.

Fiscal data module is the fiscalization black box. It is possible to use one black box for multiple tills as long as they are connected via network.

FDM server is a service that needs to be installed on the machine where the fiscal data module is connected.

FDM client SDK should be installed on each till where Belgium fiscalization should be used.

Belgium fiscalization plugin is a POS4 plugin that provides the fiscalization functionality in POS4.

Configuration

Fiscalization setup can be configured following the steps below. Documents referred to in this section can be found in sharepoint under:
Data\Customers\Documents\Lagardère Travel Retail BE\Projecten\2023 - BE Black Box\BoxAPos.

Server-side configuration

Here, the server-side represents a machine where the fiscal data module is connected. It can be a standalone server, or it could be a POS machine as well if a standalone one is not available.

  1. Install the fiscal data module following document \User manuals\user manual.pdf.
  2. Install FDM server following document Part 1 - Installation Guide.pdf. The installation file is in \Microsoft Windows\FDM.Server.win.x86.x64_3_5_14[IncludesPatchForRounding].msi.
  3. Configure FDM server following document Part 2 - Configuration Manual.pdf. If fiscal data module will be shared and POS4 applications will run also on different machines than where the FDM server is installed, it will be necessary to configure the Network interface using the IP address of the FDM server machine (chapter 6.6.2 in mentioned document).
  4. Download the key file from FDM server portal manually (chapter 6.7 in the same document). Key file option is accessible from the Configuration option from the Main menu. Keep the chosen passphrase, it will be necessary to configure it on POS.

POS configuration

The following steps should be performed on each POS where transactions should be fiscalized.

  1. Install the FDM client SDK. The installation file is in \Microsoft Windows\FDM.ClientSDK.win.x86.x64_3_3_11.msi
  2. Copy the key file from the portal into C:\POS\Data\fdm.key.
  3. Configure and activate the fiscalization plugin BelgiumFiscalPlugin.dll in the POS database. Plugin dlls (BelgiumFiscalPlugin.dll and FDM.Client.dll) will be downloaded on POS startup.
  4. Configure the following parameters in the POS database.
Parameter name Value Description
Belgium.PosSerialNumber 14-character string Value needs to be in format AXXX (or BXXX) CCCPPPPPPP as described in document \Circulaire ET124747\EN\ CIRCULAR.rtf in chapter 3.2 point 23.
Belgium.TerminalId string Unique ID of the POS
Belgium.TerminalDescription string Description of the POS (optional)
Belgium.Passphrase string Passphrase used to generate the key file in point 4 of the server-side configuration

Other requirements

Every POS user should have their social security number (INSZ or BIS) set in the system. This value can be entered in the Security field in the Resolut online portal.

VAT rates should be configured as in the table below.

VAT description VAT rate
A 21%
B 12%
C 6%
D 0%

The following parameters should be configured on POS to block the prohibited functionality.

Parameter name Parameter value
AllowMixedSaleRefund 0
BlockConfigurationChanges 1
BlockReprintTicket 1
PrintVatNameOnTicket 1

Fiscalizing transactions

The Following POS4 transactions are automatically fiscalized before transaction ticket is stored into database:

  • Sign on
  • Sign off
  • Sale
  • Employee sale
  • Refund
  • Transaction on hold
  • Open drawer (as a standalone action, not as a part of finishing sale)

When fiscalization is successful, fiscalization information is added to the end of the transaction receipt (with exception of open drawer transaction where no extra info is added).
CF3 fig1

If fiscalization is not successful, the cashier is notified and fiscalization must be retried.
CF3 fig2

API

Subsections of API

eCards

Introduction

Bovertis Resolut eCard server provides services for loyalty card, prepaid gift cards and credit gift cards over internet.

A test environment is available and Bovertis can provide barcodes for testing.

Functional description

Giftcard description

The gift card contains a unique barcode and optional a security (or pin) code behind a scratch layer. The security code is used for card non-present environments like web shops.

The barcode is scannable on a point of sale system, below the barcode digits are printed that should be entered when using the gift card in a web shop environment.

The gift card is branded and has a unique identifier equals to credit card brands like AMEX, Eurocard, VISA or DINERS.

Per brand is configured which clients (logins) are allowed to accept the brand.

The brand is returned in the payment response.
API1 fig1

Security

The test and productional environment accept connections from specific IP addresses, so keep in mind a change of IP address would cause malfunction of the service.

Bovertis eCard server monitors activities to detect tamper (brute force attempt to find valid barcodes). In case of tamper the incoming IP address will be blocked. The user of our webservice should prevent automated scripts or other methods that allows unlimited calls to our webservice.

Session token

It is advised to use a session token in the webservice calls when card is used in non-present environments, this will help the eCard server to detect tampers on user/session level.

Good session tokens are shopping card transaction ID, IP address or username of the visitor, or other session token that belongs to the session of the visitor.

Do not use session tokens that are unique on every call like GUIDs, date/time stamps and do not use session tokens that are shared between visitors.

If no session token is used all attempts are counted towards the IP address, this would quicker block an IP address if some tamper is detected.

Configuration

It is recommended that the login token and URL of the webservice are configurable in your application i.e. in the App.config or other external repository.

Technical description

All our web services are using HTTPS protocol.

Service result codes

Result codes
0 Successful – successful operation result
1 Failed - general operation failure
2 UnknownToken - invalid gift card barcode
3 InvalidToken - invalid gift card
4 OutOfBalance – card is out of balance

Result message

The web service expects a correct request parameters and replies with a result message of type CardResult or TransactionResult.

CardResult

The response message is returned for GetCard web service method. CardResult contains gift card details information. Response message has the following fields.

Result message
Result enum See service result codes in 4.1
CardName string Card`s brand name
Balance decimal Current card balance
AccountId int Card is assigned to some account. This is ID of the account.
AccountName string Name of the account which card is assigned to
DepartmentId string Department ID or 0 if department is not assigned
DepartmentName string Department name or empty string
ErrorMessage string Error message details in case of failure
ErrorException string Additional exception details for logging purposes

TransactionResult

The response message is returned for other web service methods. Response message has the following fields.

Result message
Result enum See service result codes in 4.1
TransactionId int ID of the transaction
Balance decimal Current card balance
Amount decimal Transaction amount
AccountId int Card is assigned to some account. This is ID of the account.
AccountName string Name of the account which card is assigned to
CardName string Card`s brand name
DepartmentId string Department ID or 0 if department is not assigned
DepartmentName string Department name or empty string
ErrorMessage string Error message details in case of failure
ErrorException string Additional exception details for logging purposes

Webservice methods

Fields that must be filled are marked as mandatory others are optional depending on web service method.

Legend
X Mandatory
O Optional

GetCard

This method is used to get the card balance information and it returns also other card details if specified.

GetCard method request parameters
LoginToken string X Login token (API key)
Barcode string X Gift card barcode
GetCard method response message
Result X See service result codes in 4.1
CardName O Only set if the result is successful
Balance O Only set if the result is successful
AccountId O Only set if the result is successful
AccountName O Only set if the result is successful
DepartmentId O Only set if the result is successful
DepartmentName O Only set if the result is successful
ErrorMessage O Optional but only set in case of failure
ErrorException O Optional but only set in case of failure

ActivateCard

This method is used for activation of the specified gift card. Amount to which it should be activated can be set in method parameter. If it is not set card will be activated to amount which was set during gift card creation.

ActivateCard method request parameters
LoginToken string X Login token (API key)
Barcode string X Gift card barcode
Amount decimal O If set card will be activated to this amount. If set to null Otherwise
ShopId int O Optional Shop ID from where the gift card was activated
PosId int O Optional POS ID on which gift card was activated
EmployeeId long O Optional Employee ID who activated gift card
ActivateCard method response message
Result X See service result codes in 4.1
TransactionId O Only set if the result is successful
Balance O Only set if the result is successful
Amount O Only set if the result is successful
AccountId O Only set if the result is successful
AccountName O Only set if the result is successful
CardName O Only set if the result is successful
DepartmentId O Only set if the result is successful
DepartmentName O Only set if the result is successful
ErrorMessage O Optional but only set in case of failure
ErrorException O Optional but only set in case of failure

Purchase

The purchase method is used for purchasing with the gift card and it will withdraw the specified amount directly from the gift card balance if it is not out of balance.

Purchase method request parameters
LoginToken string X Login token (API key)
Barcode string X Gift card barcode
Amount decimal X Amount to be withdrawn from the gift card balance
ShopId int O Optional shop ID from where the purchase was executed
PosId int O Optional POS ID on which purchase was executed
EmployeeId long O Optional employee ID who executed the purchase
ReceiptId string O Optional POS receipt ID
Purchase method response message
Result X See service result codes in 4.1
TransactionId O Only set if the result is successful
Balance O Only set if the result is successful
Amount O Only set if the result is successful
AccountId O Only set if the result is successful
AccountName O Only set if the result is successful
CardName O Only set if the result is successful
DepartmentId O Only set if the result is successful
DepartmentName O Only set if the result is successful
ErrorMessage O Optional but only set in case of failure
ErrorException O Optional but only set in case of failure

CancelTransaction

This method cancels the last transaction specified by transaction ID. A purchase can be cancelled only once.

CancelTransaction method request parameters
LoginToken string X Login token (API key)
TransactionId int X ID of the transaction to be cancelled
ShopId int O Optional shop ID from where the transaction was cancelled
PosId int O Optional POS ID on which transaction was cancelled
EmployeeId long O Optional employee ID who cancelled the transaction
CancelTransaction method response message
Result X See service result codes in 4.1
TransactionId O Only set if the result is successful
Balance O Only set if the result is successful
Amount O Only set if the result is successful
AccountId O Only set if the result is successful
AccountName O Only set if the result is successful
CardName O Only set if the result is successful
DepartmentId O Only set if the result is successful
DepartmentName O Only set if the result is successful
ErrorMessage O Optional but only set in case of failure
ErrorException O Optional but only set in case of failure

GetBarcode

This method is used by POS to get a newly generated barcode which can be used as a discount code in the next sale. POS must provide a card scheme ID as the input parameter based on which barcode with configured discount is generated.
API1 fig2

Schiphol Shop & Collect

The S&C interface manages the Shop & Collect purchases at Schiphol Airport. It offers the following functionality:

  • Sending confirmation SMS to shopper
  • Sending reminder SMS to shopper (to not forget to collect the purchase)
  • Announcing the bag to Logibag lockers
  • Sending order for valuable packets to deliver

The interface supports 3 methods for the POS:

  • Register order

This will create an order and return the order id. This method must be followed by a confirmation or cancellation. If a mobile number was specified it will send an SMS directly to confirm that the purchase was registered.

  • Confirm order

This method must be called to confirm that the shopper has paid.

  • Cancel order

    This method is used to cancel an unconfirmed order, or in case the purchase was void or refunded.

Getting started

The WSDL and URL’s for test and production are available on request.

Deliveries:

  • Security token
  • Shop & collect bitmap for the receipt

Webservice methods

Register order

Registers the order and claims the order id. When mobileNumber is provided and sendNotificationSms is set to “true” a confirmation SMS is sent to mobileNumber containing the order id and return date of the customer. The shopper then also receives a reminder SMS the day before returning. If valuable is set to “true”, the package is marked as valuable and the warehouse will be notified by email or SMS in the morning of the pickup date.

/// <param name="securityToken">Client token used for authorization</param>

/// <param name="companyId">The company id.</param>

/// <param name="shopId">The shop id.</param>

/// <param name="posId">The pos id.</param>

/// <param name="mobileNumber">The customer's mobile number. If set, after the order is created, customer receives an register order information sms</param>

/// <param name="customerPickupDate">The date when customer picks upa the package</param>

/// <param name="sendNotificationSms">If set to true, customer receives a notification sms one day before pick up at 12:00</param>

/// <param name="valuable">if set to true, package is marked as valuable and notification email or sms is sent to warehouse on the pickup day approx at 7:00 in the morning</param>

/// <param name="reference">Barcode of the package/order (can be set later in confirm method)</param>

/// <param name="barcode1">Barcode of the package/order (can be set later in confirm method)</param>

/// <param name="barcode2">Customer barcode (can be set later in confirm method)</param>

/// <returns></returns>

ClaimOrderServiceResult RegisterOrderId(string securityToken, int companyId, int shopId, int posId, string mobileNumber, DateTime customerPickupDate, bool sendNotificationSms, bool valuable, string reference, string barcode1, string barcode2);

Confirm order

Confirms the registered order, the moment the sale is paid.

///<param name="securityToken">Client token used for authorization</param>

/// <param name="orderId">The order id</param>

/// <param name="ticketTransactionId">Ticket transacation id (unique id)</param>

/// <param name="ticketDate">Transaction datetime</param>

/// <param name="ticketNumber">Ticket number</param>

/// <param name="ticketData">The ticket data (serialized ticket data or receipt text converted to byte array).</param>

/// <param name="valuable">if set to true, package is marked as valuable and notification email or sms is sent to warehouse on the pickup day approx at 7:00 in the morning</param>

/// <param name="reference">Barcode of the package/order</param>

/// <param name="barcode1">Barcode of the package/order</param>

/// <param name="barcode2">Customer barcode</param>

/// <returns></returns>

ServiceResult ConfirmOrder(string securityToken, int orderId, int ticketTransactionId, DateTime ticketDate, int ticketNumber, byte[] ticketData, bool valuable, string reference, string barcode1, string barcode2);

Cancel order

The cancel order method is used to either cancel a registration, or cancel a booked order. If a mobile number was specified the shopper will receive a message that the order was cancelled.

///<param name="securityToken">Client token used for authorization</param>

/// <param name="orderId">The order id.</param>

/// <returns></returns>

ServiceResult CancelOrder(string securityToken, int orderId);

Contract objects returned by the webservice

ClaimOrderServiceResult

Returned by register order method

Field name Type Description
Success Boolean Indicates if operation was successful
ErrorCode Integer Error code number (see error codes table)
ErrorMessage String Error message in english
ClaimedOrderId Integer Id of the order created in the system, later used in confirm or cancel methods
SmsSent Boolean Indicates if shopper sms was sent

ServiceResult

Field name Type Description
Success Boolean Indicates if operation was successful
ErrorCode Integer Error code number (see error codes table)
ErrorMessage String Error message in english

Error codes

0 No error
1 Error, more details in the ErrorMessage
91 Not all messages could be delivered
92 Password does not match
93 Given date is incorrect
94 Message is larger than 160 characters
95 Senderid is incorrect
96 There are empty parameters or fields
97 Onvoldoende sms-tegoed
98 Domain from which the message is sent does not match with ‘beveiliging domein’
99 Text message could not be delivered
100 Order is received correctly and will be processed
101 Order is not accepted